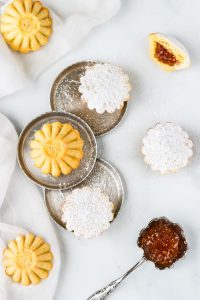
These Italian Bocconotti Cookies are seductive little morsels with their scalloped buttery shells and a lovely fig jam cocooned within. All that's needed is a light dusting of powdered sugar before …
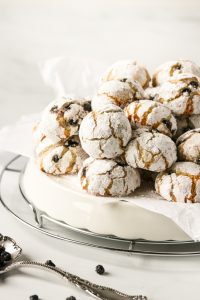
Soft Blueberry Amaretti Cookies
Soft Blueberry Amaretti Cookies made with blanched almond flour and scented with sweet amaretto liqueur. These cookies are studded with reconstituted dried blueberries and coated in icing …

Amaretto Biscotti
Delightfully tender and crumbly, these Amaretto Biscotti are chock full of roasted almonds, chocolate coated almonds and drizzled with more chocolate. This Amaretto Biscotti post was originally …
Triple Chocolate Cookies
When it comes to decadent cookies these Triple Chocolate Cookies certainly fit the bill. This post was originally published on February 4, 2015 and republished Jan 31, 2019 with updated photos and …
Amarena Wild Cherry Biscotti
Wonderfully delicious, lemon scented Amarena Wild Cherry Biscotti. A twice baked biscotti with a scattering of roasted salted pistachios are complimented with slivers of wild cherries bottled in …
Chocolate Raspberry Cream Cheese Cookies
Chocolate Raspberry Cream Cheese Cookies...these delicious morsels are a chocolate lover's dream! Are you ready to be engulfed with the lovely aromas of holiday baking? I love, love this time of …
Continue Reading about Chocolate Raspberry Cream Cheese Cookies →