
Soft and cake-like Lemon Ricotta Cookies made with a quick lemon infused sugar. These fragrantly bright Italian cookies are dipped in a lemon glaze for a delightful all around citrus scent. They're …
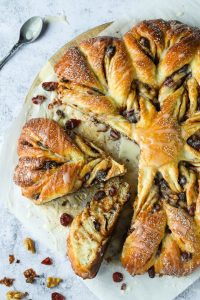
Chocolate Cranberry Twist Star Bread
Learn how to make a spectacular Chocolate Cranberry Twist Star Bread that is sure to impress family and friends. This homemade sweet bread is loaded with walnuts, dried cranberries and dark chocolate …
Continue Reading about Chocolate Cranberry Twist Star Bread →

Homemade Vanilla Sugar
Learn how to make your own homemade vanilla sugar to use in your favourite cookie recipes or other baked goods. All you need is some granulated sugar, a fresh vanilla bean and a few minutes of your …
Chocolate Raspberry Cream Cheese Cookies
Chocolate Raspberry Cream Cheese Cookies...these delicious morsels are a chocolate lover's dream! Are you ready to be engulfed with the lovely aromas of holiday baking? I love, love this time of …
Continue Reading about Chocolate Raspberry Cream Cheese Cookies →
Easy Roasted Turkey Roulade
Easy Roasted Turkey Roulade with butternut squash, kale and spicy Italian sausage makes a crowd-pleasing elegant meal for Thanksgiving or any special occasion. I have a confession to make! I've …
Sandwich Cookie Pops
This past week turned out to be pretty challenging for me. It has been quite hectic in my kitchen trying to finish dozens of chocolate cake pops and these yummy sandwich cookie pops...all …