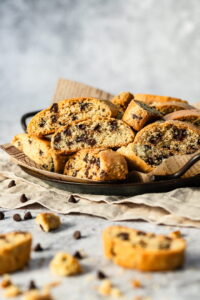
• Skip to primary navigation
  • Skip to content
  • Skip to primary sidebar

Marisa's Italian Kitchen

The Secret Ingredient Is Always Love

  • Home
  • About
  • Recipes
  • Contact
  • Privacy Policy

chocolate

Chocolate Orange Ricotta Tart

March 25, 2019 by Marisa 30 Comments

Chocolate Orange Ricotta Tart

A simple yet elegant Chocolate Orange Ricotta Tart. This Italian treat is made with a crumbly pastry crust, a silky smooth filling of ricotta and mascarpone cheeses. The zest of mandarines with its juices adds a lovely citrusy scent. And of course some grated semi-sweet chocolate simply because chocolate does indeed make everything better.

Chocolate Orange Ricotta Tart

This post was originally published April 14, 2017 and updated with new content and photos March 25, 2019.

Italian Easter Tart

Growing up Italian in a predominately french city, there never was any lack of desserts after a fine celebratory meal.

Easter Sunday was no exception especially after a mandatory and traditional simple roast of agnello or rather lamb.

Desserts as well never wavered far from the customary sweets from way back home in Italy.

One in particular which graced our table each and every Easter was la casata. A typical tart from my home town made with ricotta, sheep’s milk cheese and chocolate which utilizes many eggs. It always had mamma and her sisters vying for the coveted spot of who used the most eggs.

It’s not unusual to use anywhere from 20 to 30 eggs when making la casata from my Paese in the Lazio region of Italy.

Although not my mamma’s casata this chocolate orange ricotta tart still pulls at my heartstrings. It’s somewhat similar in taste to the one I grew up on but way much lighter and not as dense.

Pre-baked chocolate orange tart

Making Short Crust Pastry

We begin with a a crumbly short crust pastry that is really quite easy to make. It’s then rolled out and used to line the tart tin.

You’ll find it to be quite forgiving if any breakage occurs and can be remedied by working it back together with either your fingers or the back of a spoon.

You’ll want to pierce it with a fork before filling it with the ricotta mixture so that no humps occur while baking.

Baked ricotta crostata

I used a 10 inch tart tin with a removable base but you can also use a 9 inch tart tin.

You will however want to divide the pastry dough in half while using one half and freezing the other to use at a later time. Or you can make some pretty cut out cookies with the remaining dough and use to decorate the tart.

You’ll also have to compensate for the slightly smaller tart tin by reducing the amount of time baked.

Baked Chocolate Orange Crostata

Orange and chocolate are one of my absolute favourite pairings.

Since I had so many sweet mandarins lying around I decided to use both the zest and the juices from this sweet fruit.

You can however substitute the mandarins with the zest of an orange.

Baked chocolate orange tart

All that’s needed is a light or generous dusting of icing sugar just before serving.

Sliced Ricotta Tart

This creamy and dreamy tart is especially delightful with your favourite cup of coffee or tea!

Enjoy while still warm or cold.

If you make this recipe remember to tag @marisasitaliankitchen on Instagram so I can see your creation!

Italian Chocolate Orange Ricotta Tart


Chocolate Orange Ricotta Tart
Print Recipe

Chocolate Orange Ricotta Tart

Chocolate Orange Ricotta Tart is a light Italian torta made with a pastry crust, ricotta and mascarpone cheeses, grated chocolate and scented with orange zest.
Course: Dessert
Cuisine: Italian
Keyword: Ricotta, Tart, Crostata, Italian dessert, Easter
Servings: 12
Author: Marisa

Ingredients

  • FOR THE PASTRY CRUST
  • 12 tablespoons unsalted butter softened
  • 1/4 cup granulated sugar
  • 1 egg yolk from a large egg
  • 2 cups all-purpose flour
  • RICOTTA FILLING
  • 2 cups ricotta cheese
  • 1 cup mascarpone cheese
  • 1 cup granulated sugar
  • 3 large eggs beaten
  • grated zest from 3 small tangerines or 1 large orange
  • 2 tablespoons tangerine juice or orange juice
  • 2 ounces grated semi-sweet chocolate
  • icing sugar for dusting

Instructions

  • MAKING THE PASTRY
  • In a large mixing bowl beat the butter and the sugar until smooth.
  • Add in the egg yolk and beat until thoroughly combined.
  • Stir the flour into the mixture.
  • Transfer the mixture to a work surface and work the dough with your hands until you get a smooth pastry dough.
  • Roll out the pastry dough on a lightly floured work surface and carefully transfer the dough to a 10 inch round tart tin with a removable bottom.
  • Place in the fridge to chill for 30 minutes.
  • Preheat the oven to 350 degrees F and start making the filling.
  • Place the ricotta and the mascarpone cheese in a large bowl and beat until smooth.
  • Add the sugar, eggs, orange juice, zest and beat until thoroughly combined.
  • Fold in the grated chocolate then pour the mixture over the prepared pastry dough.
  • Bake for 50 to 60 minutes until the filling is set.
  • Remove the tart from the oven and let cool in the tin.
  • Once cooled dust with icing sugar and serve.

Notes

Recipe is adapted from Cafe Italia cookbook by Liz Franklin with a few switch ups. I substituted the lemon juice and zest with mandarin juice and zest and added 2 ounces of grated semi-sweet chocolate.The original recipe called for using half the pastry dough, baking it in a 9 inch tart tin for 45 minutes.I used a 10 inch tart tin, used the whole amount of pastry dough and therefore increased the baking time by almost 15 minutes to compensate for a bigger tart.


Filed Under: Dessert Tagged With: Baking, cheesecake, chocolate, crostata, Easter, Italian dessert, mascarpone, orange, ricotta, sweets, tart, Torta

Amaretto Biscotti

March 1, 2019 by Marisa 9 Comments

Tender and crumbly Amaretto Biscotti chock full of roasted almonds, chocolate covered almonds and drizzled with more chocolate.

Delightfully tender and crumbly, these Amaretto Biscotti are chock full of roasted almonds, chocolate coated almonds and drizzled with more chocolate.

Tender and crumbly Amaretto Biscotti chock full of roasted almonds, chocolate covered almonds and drizzled with more chocolate.

This Amaretto Biscotti post was originally published January 12, 2015 and republished March 1, 2019 with updated photos and content.

I have a love affair with biscotti! My guilty pleasure! Well…one of them, I may have a few more.

This Italian, twice baked cookie is very popular in coffee shops.

Why buy them though, when you can just as easily make your own! They’ll be far more superior to the store bought ones.

I always feature at least one flavour on my sweet table or cookie platter during the holidays. But then again, I really don’t need much of an excuse to bake them any time of the year.

Nowadays I much prefer one flavour of biscotti or another rather then a chocolate chip cookie.

They’re really not complicated to make at all and perfect for beginners.

Tender and crumbly Amaretto Biscotti chock full of roasted almonds, chocolate covered almonds and drizzled with more chocolate.

You can slice and bake them into long and elegant shapes or shape, slice and bake them into mini morsels as I have done with this recipe.

Unlike some rock hard biscotti which require dunking in milk, coffee or even wine, these are made with butter and have a more tender bite but still remain crunchy.

Tender and crumbly Amaretto Biscotti chock full of roasted almonds, chocolate covered almonds and drizzled with more chocolate.

They’re simply wonderful all on their own.

However, a light drizzle of both the dark and white chocolate adds an extravagant touch of elegance.

Brew a fresh cup of coffee and enjoy one of life’s simple pleasures.

Tender and crumbly Amaretto Biscotti chock full of roasted almonds, chocolate covered almonds and drizzled with more chocolate.

TIPS FOR PERFECT AMARETTO BISCOTTI

First off, I prefer to roughly chop the both the almonds and the chocolate covered almonds. This allows far easier slicing with cleaner cuts.

After the initial first bake do allow the biscotti logs to cool for about 10 minutes for easy slicing. This makes the biscotti more pliable to a sharp knife.

Make sure you’re on a steady cutting board. With the tip of the knife pointed downwards, slice at a diagonal in one fluid motion.

I prefer to stand the biscotti slices upright for the second bake. This allows them to crisp on both sides without having to turn them over and risking breakage.

Allow the biscotti to cool completely before drizzling them with the melted chocolate. This helps the chocolate set much quicker. However, you can just as easily place the chocolate drizzled biscotti tray in the fridge if pressed for time.

They’re at their best stored in an air tight container for about one week and freeze well.

Tender and crumbly Amaretto Biscotti chock full of roasted almonds, chocolate covered almonds and drizzled with more chocolate.

Tender and crumbly Amaretto Biscotti chock full of roasted almonds, chocolate covered almonds and drizzled with more chocolate.


If you make this recipe remember to tag @marisasitaliankitchen on Instagram so I can see your creation!

Tender and crumbly Amaretto Biscotti chock full of roasted almonds, chocolate covered almonds and drizzled with more chocolate.
Print Recipe

Amaretto Biscotti

Delightfully tender and crumbly, these Amaretto Biscotti are chock full of roasted almonds, chocolate coated almonds and drizzled with more chocolate.
Course: Dessert
Cuisine: Italian
Keyword: Amaretto Biscotti
Servings: 48 mini biscotti

Ingredients

  • 2 1/4 cup all purpose flour
  • 2 teaspoon baking powder
  • 1/2 teaspoon ground cinnamon
  • 1/2 teaspoon salt
  • 1/3 cup unsalted butter
  • 1 cup sugar
  • 2 large eggs
  • 2 tablespoons Amaretto liqueur
  • 1 teaspoon almond extract
  • 1 teaspoon vanilla extract
  • 1 cup roasted almonds roughly chopped
  • 1 cup chocolate covered almonds roughly chopped
  • 1/4 cup white chocolate chopped
  • 1/4 cup semi-sweet chocolate chopped

Instructions

  • Preheat oven to 350 degrees F.
  • Lina a baking sheet with parchment paper and set aside.
  • In a medium sized bowl, stir together the flour, baking powder, cinnamon and salt.
  • In a large bowl, beat together the butter and sugar on medium high speed with an electric mixer until fluffy and light in colour.  For about 2 minutes or so.
  • Beat in the eggs, amaretto liqueur, almond and vanilla extracts until combined.
  • With the mixer on low speed, add in the flour mixture and mix just until incorporated.
  • Stir in both the roasted almonds and the chocolate covered almonds.
  • On a lightly floured surface divide the biscotti dough in four equal portions.
  • With lightly dusted hands, roll each portion into a 12 inch log and transfer to the prepared baking sheet.
  • Bake for 20 minutes. The logs will be a light golden colour with firm tops.
  • Allow to cool for 10 minutes.
  • Meanwhile, reduce oven temperature to 250 degrees.
  • Once cooled, slice each log crosswise into 3/4 inch pieces.
  • Place upright on the baking sheet and return to the oven for the second bake.
  • Bake for 15 minutes.
  • Allow the cookies to cool before drizzling with the melted chocolate.
  • Place both chocolates into 2  small separate bowls and melt in the microwave at 20 second intervals.
  • If your chocolate is too thick for drizzling, simply stir in a little vegetable oil to thin it out to a drizzling consistency.
  • Using a small spoon drizzle first the dark chocolate over the sliced biscotti and then the white chocolate.
  • Let the chocolate set before serving.
  • I leave the biscotti on the cookie sheet at room temperature to set.
  • However if your pressed for time you can place the cookie sheet with the biscotti in the fridge to set much quicker.

Notes

Adapted from The food Network Magazine.


Filed Under: Biscotti, Dessert Tagged With: biscotti, chocolate, cookies, crunchy, liquor, sweet

Italian Rainbow Cookies

December 14, 2018 by Marisa 29 Comments

Sliced Italian Rainbow Cookies

Italian Rainbow Cookies are dense almond scented cake layers with raspberry and apricot jams nestled between the sheets of sponge cakes.

This three layer cake is then topped with melted chocolate and a generous sprinkle of festive nonpareils for a truly eye catching and special holiday treat. They’re almost too pretty to eat and totally irresistible!

Italian Rainbow Cookies

This post was originally published in December of 2015 and republished December 14, 2018 with updated photos and content.

When planning my Christmas baking, these pretty Italian rainbow cookies are one of my very first to make.

You can bake them up to two weeks before Christmas as this allows the flavours to mellow. Also, both the raspberry and apricot jams layered between the sponge cakes keeps these rainbow cookies moist and packed full of yummy flavours.

I love them not only for their almond scent but also for their visual appeal. They’re bright and cheerful adorned with festive sprinkles and instantly put me in my happy place! They’re little morsels of deliciousness on a platter!

These Italian Rainbow Cookies have graced my Christmas cookie tray for many years and have always been one of the first to disappear.

Rainbow cookies topped with sprinkles

Italian Rainbow Cookies with Homemade Almond Paste

I had always made these cookies with store bought almond paste before but where I live a good almond paste is always hard to find. Nowadays I much prefer making my very own.

You’re going to find it so so easy to make! And, I’ve simplified it from the original recipe I posted a few years back from Kristina Castella’s cookbook titled Crazy About Cookies.

I’ve omitted the simple syrup as this made the paste a little too loose which had some readers skeptical. Although it had worked wonderfully, it yielded more than you would need to make these rainbow cookies. My revised version makes just enough to use in this recipe.

Ingredients for Homemade Almond Paste

All you need are a few simple ingredients.

  • blanched almonds (see note below for blanching your own)
  • powdered sugar
  • almond extract
  • water

How to Blanch Almonds 

Place the almonds in a pot of boiling water and allow to simmer for about 60 to 70 seconds. The almonds will start to rise and bob on the surface. The skin will have a shrivelled up appearance.

Drain the almonds and run under cold water then pat dry with a clean dish towel.

One at a time, gently press on the almond between your thumb and index finger to release the nut from its skin.

Allow the blanched almonds to dry at room temperature, on a clean dish towel, before proceeding with the recipe. This can also be done overnight.

If you’re pressed for time you can dry the almonds in a low heated oven for 5 minutes or so.

Once the almonds are dry simply pulse them in a food processor with powdered sugar, almond extract, some water and your good to go!

However if making your own seems somewhat daunting, by all means go for the store bought almond paste…whatever works for you is fine.

Rainbow cookies with raspberry and apricot jam

Red white and green cookies

They’re absolutely wonderful any time of the year but are extra special for Christmas and will impress your guests!

Simply plate, serve and enjoy with your favourite cup of coffee or tea!

Red, white and green cookies topped with sprinkles

If you make this recipe remember to tag @marisasitaliankitchen on Instagram so I can see your creation!

 
Rainbow cookies with raspberry and apricot jam
Print Recipe

Italian Rainbow Cookies

A tri-coloured sponge cookie with homemade almond paste, layered with both raspberry and apricot jams and spread with melted chocolate.
Course: Cookie
Cuisine: Italian
Keyword: Italian Rainbow cookies
Servings: 5 dozen
Author: Marisa

Ingredients

ALMOND PASTE

  • 1 1/4 cup blanched almonds To blanch your own see note below
  • 1 1/4 cup icing sugar
  • 1 1/2 teaspoons almond extract
  • 3 tablespoons water

CAKE LAYERS

  • 1 1/4 cups almond paste
  • 1 cup butter softened
  • 1 cup sugar
  • 4 large eggs separated
  • 2 cups all-purpose flour
  • 10-12 drops red food colouring
  • 10-12 drops green food colouring
  • 1/2 cup seedless raspberry jam
  • 1/2 cup apricot jam
  • 1 1/2 cups semisweet chocolate chips
  • chocolate sprinkles of your choice

Instructions

ALMOND PASTE

  • Place the almonds and 1/4 cup of the icing sugar in a food processor and pulse until the mixture has the appearance of coarse sand.
  • Add in the remaining sugar and pulse until the mixture is very fine.
  • Add the almond extract and water then pulse again until thoroughly combined. Set aside. 

CAKE LAYERS

  • Butter three, 13 inch by 9 inch baking pans. Line the pans with parchment paper and grease the paper.
  • Preheat oven to 350*F
  • In a large bowl, cream together the almond paste, butter, sugar and egg yolks until fluffy and smooth. 
  • Stir in the flour.
  • In a small mixing bowl, beat the egg whites (with clean beaters) until soft peaks form. 
  • Fold the beaten egg whites into the cake batter until it is thoroughly blended.
  • Divide the cake batter equally among three small bowls. 
  • Colour one portion with the red food colouring and one with the green and leave the third portion uncoloured. 
  • Spread each portion of cake batter into the prepared pans, smoothing the top with an offset spatula.
  • Bake in preheated oven for about 10-12 minutes, until the edges are a light golden brown.
  • Transfer the pans on a cooling rack.
  • Once cooled, invert the green layer onto a cookie sheet and peel off the parchment paper. Spread the raspberry jam evenly all over.  
  • Top with the uncoloured layer and spread evenly with the apricot jam. 
  • Top with the pink layer and cover with saran wrap or cling wrap.
  • Set a cookie sheet on top to compress the layers together. Refrigerate overnight.
  • The next day, melt the chocolate in the microwave, in 15 second intervals until melted. Spread the melted chocolate over the pink layer and top with sprinkles of your choice.
  • Set aside and allow the chocolate to harden.
  • Once the chocolate is set, trim off the edges with a sharp knife.
  • When ready to serve, cut 1/2 inch strips across the width and then each strip into 4 pieces. Store in airtight container and keep refrigerated.

Notes

How to make homemade blanched almonds:
Place the almonds in a pot of boiling water and allow to simmer for about 60 to 70 seconds. The almonds will start to rise and bob on the surface. The skin will have a shrivelled up appearance.
Drain the almonds and run under cold water then pat dry with a clean dish towel.
One at a time, gently press on the almond between your thumb and index finger to release the nut from its skin.
Allow the blanched almonds to dry at room temperature, on a clean dish towel, before proceeding with the recipe. This can also be done overnight.
If you're pressed for time you can dry the almonds in a low heated oven for 5 minutes or so.


Filed Under: Dessert Tagged With: almonds, apricot jam, Baking, chocolate, dessert, holiday cookies, Italian cookies, raspberry jam

Chocolate and Pear Crostata

August 29, 2018 by Marisa 61 Comments

Chocolate tart with ripe pears

An elegant and impressive Chocolate and Pear Crostata with a silky smooth filling of finely ground walnuts and dark chocolate. As a bonus it’s remarkably easy to put together.

Chocolate and Pear Crostata

This recipe was originally published October 1, 2015 and republished August 29, 2018 with updated content and photos.

Although it has been a couple of years since my dad passed away, his pear tree continues to flourish. A constant and wonderful reminder of how he passionately tended and nurtured his garden.

It lays mostly dormant right now except for this one majestic pear tree. This lone pear tree bears more fruit than we can possibly consume. Although, I must say the squirrels are certainly giving us a run for our money!

Its branches are now weighed down heavily and bursting with delectable fruits while some are strewn all over the ground, blanketed in green and gold.

These ripened sweet fruits are just about ready to be plucked off and sink ones teeth into. But since I have so many…well why not bake with them! Right?

Short crust dough

What is a Crostata?

A crostata is essentially a rustic baked tart with a short crust pastry base. Its basically free-form and in my opinion far easier to make then a 2 crust pie.

This crostata is so outrageously good, it will take a lot of restraint not to devour the whole tart. It is made with a pastry crust much like shortbread and with a silky rich chocolate filling.

Part of the appeal of this crostata are the juicy pear halves which are sliced and nestled over the chocolate filling. They provide such an elegant appearance and are sure to garner many compliments.

But really, feel free here to add your own artistic flare and fan out the slices which ever way you wish!

Tart dough with chocolate walnut filling

Chocolate tart with ripe pears

Although you may use a mixer to make the pastry dough, I much prefer using my food processor. The dough comes together with such ease rendering it soft and pliable and making it very easy to pat down both over and around the tart tin.

Freshly baked chocolate pear crostata

I tried this crostata once using almonds and another time using walnuts. I must say, my husband and I both prefer the walnuts, but they are easily interchangeable. Whichever nuts you choose, this recipe is a real keeper!

Chocolate tart topped with sliced pears

As with all fabulous desserts, do savour every single bite accompanied by a very good espresso of course!

Chocolate tart with ripe pears
Print Recipe

Chocolate and Pear Crostata

Chocolate and Pear Crostata with a silky smooth filling of finely ground walnuts and dark chocolate makes a rustic, elegant dessert.
Course: Dessert
Cuisine: Italian
Keyword: Chocolate Pear Crostata Recipe
Servings: 8
Author: Marisa

Ingredients

For the Pastry

  • 3/4 cup or 12 tablespoons butter cubed
  • 1/4 cup granulated sugar
  • 1 large egg yolk
  • 2 cups all purpose flour

For the Chocolate Filling

  • 14 tablespoons butter cubed
  • 1 cup granulated sugar
  • 3 large eggs beaten
  • 1 1/3 cups walnuts, lightly toasted finely ground
  • 2 tablespoons all purpose flour
  • 3 1/2 ounces dark chocolate or semi-sweet chocolate, melted I used 70% dark chocolate
  • 4 ripe firm pears
  • powdered sugar for dusting
  • 9 inch round tart tin with removable base

Instructions

Making the Pastry

  • Place the butter and sugar together in a food processor and blend until smooth.
  • Add in the egg yolk and blend again until it is thoroughly mixed.
  • Next, add in the flour and pulse intermittently until the dough is smooth and not sticky.
  • Divide the dough in half and freeze one half for later use. A half portion of this dough is enough to line a 9 inch baking tin. 
  • Line the greased tart tin with the dough by patting it down in the tart tin while spreading it out with your fingers.
  • Chill for at least 30 minutes.

For the Filling

  • Beat together the butter with the sugar until light and fluffy.
  • Add in the eggs, ground walnuts, flour and beat until smooth.
  • Stir in the melted chocolate.
  • Spoon the mixture over the pastry and smooth it gently with a pastry knife.
  • Peel the pears and cut them in half length-wise.
  • Remove the cores and slice each half length-wise into thin slices.
  • While keeping each of the sliced halves together, place them over the chocolate filling. (As seen in the photo)
    Tart dough with chocolate walnut filling
  • Bake in a preheated oven at 350 degrees F, for about 45 minutes or until the walnut mixture is firm and the pastry is golden brown.
  • Transfer to a wire rack to cool then dust with powdered sugar just before serving.

Notes

You will only need half of the pastry dough to make a 9 inch crostata. The remaining half can be frozen for later use. However, if your tart tin is 10 inches round do use the whole amount of pastry dough. I've done so successfully without changing the amount of filling.
Recipe is adapted from a favourite cookbook, Cafe Italia Cookbook and only switching almonds for the walnuts as a personal preference. 


Filed Under: Dessert Tagged With: chocolate, crostata, Italian dessert, pastry, pear, sweets, walnuts

Triple Chocolate Brookie Tart

February 1, 2018 by Marisa 28 Comments

Triple Chocolate Brookie Tart

When brownie meets cookie a delectable Triple Chocolate Brookie Tart is born. Made with dark cocoa powder, raspberry chocolate and mini semi-sweet chocolate chips then topped with a luscious raspberry buttercream. This treat makes a delightful chocolaty and fudgy dessert for those special days when CHOCOLATE is absolutely the answer!

Triple Chocolate Brookie Tart

There are days when we ladies are faced with some really tough choices….right?

Sometimes its as simple as choosing the right colored lipstick or nail polish depending on our present mood. Should we make a bold statement and select a fiery cherry red or maybe we are feeling somewhat romantic and flirtatious and we decide to settle on a dusty shade of pink!

Other times, if your a foodie and a chocoholic like I am then our moods and thoughts consistently juggle on whether to have brownies or cookies to mark special occasions.

My friends, this crossover Triple Chocolate Brookie Tart will surely win you and your family over!

Triple Chocolate Brookie Tart

At first glance it may seem like a simple tart but one bite will transport you from simple to sublime with its dense, fudgy texture and a blissful chocolate raspberry taste!

Triple Chocolate Brookie Tart

Since no tart is complete without a little embellishment, I decided to top it with a yummy raspberry buttercream to compliment the chocolate raspberry and I pipped on some pretty swirls with the 1M tip! However, you can use any decorative piping tip and technique that you prefer.

Triple Chocolate Brookie Tart

You’ll need a 10 inch tart pan with a removable bottom to make this dessert but if all you have is an 8 inch tart pan then use that. Simply spread out the dough while filling the tart pan 3/4 way up and scoop up the remaining dough and bake a half dozen or so cookies on a separate baking sheet. Keep in mind to adjust the baking time accordingly!

Triple Chocolate Brookie Tart

Enjoy with your favorite hot cup of coffee, tea or simply with a cold glass of milk!

This recipe is a spine off from my Chocolate Raspberry Cream Cheese Cookies and the raspberry buttercream is the same used for in my Lemon Raspberry Spritz Cookies.

If you make this recipe remember to tag @marisasitaliankitchen on Instagram so I can see your creation!

Triple Chocolate Brookie Tart
Print Recipe

Triple Chocolate Brookie Tart

When brownie meets cookie a delectable Triple Chocolate Brookie Tart is born. Made with dark cocoa powder, raspberry chocolate and mini semi-sweet chocolate chips then topped with a luscious raspberry buttercream. Makes a delightful chocolaty and fudgy dessert.
Course: Dessert
Servings: 8 -10 slices
Author: Marisa

Ingredients

  • FOR THE TART
  • 1 1/2 cups packed light brown sugar
  • ½ cup 125 grams cream cheese, softened (in brick form)
  • ½ cup butter softened
  • 1 large egg plus 1 egg yolk
  • 1 teaspoon vanilla extract
  • 150 grams chopped raspberry chocolate pieces melted
  • 2 cups all purpose flour
  • 1/4 cup baking cocoa powder
  • 1 teaspoon baking soda
  • ⅛ teaspoon salt
  • 2/3 cup mini semi-sweet chocolate chips
  • Icing sugar or powdered sugar for dusting
  • FOR THE RASPBERRY BUTTERCREAM
  • 1/4 cup unsalted butter
  • 1/2 cup icing sugar plus additional 3/4 cup
  • 1 tablespoon seedless raspberry jam
  • 1 1/2 teaspoon whole milk I used almond milk

Instructions

  • Instructions
  • Preheat oven to 350 degrees F.
  • You'll need a 10 inch tart pan with a removable bottom.
  • Grease and set aside.
  • In a large bowl or stand mixer, beat together the brown sugar, cream cheese and butter until light and creamy.
  • Mix in the egg, egg yolk and vanilla until thoroughly combined.
  • Stir the melted chocolate raspberry into the batter mixture.
  • In a separate bowl combine together the flour, cocoa powder, baking soda and salt.
  • On low speed mix the flour mixture into the batter mixture until combined.
  • Stir in the mini chocolate chips.
  • Scoop the batter into the prepared tart tin and smooth it out with an offset spatula until its evenly distributed.
  • Bake in the preheated oven for about 20 to 22 minutes or until a toothpick inserted in the middle comes out clean. Take care to not over bake as the tart can dry out.
  • In my oven, 20 minutes was sufficient and it had a soft yield to the touch. The tart will be puffed up slightly when ready and as its cooling it will deflate a little in the center.
  • Transfer the tart pan to a wire rack and allow to cool completely before piping on the buttercream.
  • RASPBERRY BUTTERCREAM
  • In a small bowl beat ¼ cup of softened butter for 30 seconds on medium speed.
  • Add ½ cup of icing sugar, 1 tablespoon of seedless raspberry jam and 1½ teaspoon of milk and beat until combined.
  • Gradually beat in an additional ¾ cup of icing sugar.
  • Transfer the buttercream to a piping bag with the 1M tip attached and pipe the buttercream around the edges of the tart.
  • Dust with icing sugar then slice, serve and enjoy!


Filed Under: Dessert, Tart Tagged With: brookie, buttercream, chocolate, dessert, raspberry, tart

Next Page »

Primary Sidebar

A Little About Me

Hi I'm Marisa! Welcome to my little corner of the web where you'll find delicious foods inspired by my Italian heritage and Canadian upbringing. So kick off your shoes, have a seat and stay awhile... Read More…

Search In My Kitchen

Copyright © 2019 · Foodie Pro & The Genesis Framework