• Skip to primary navigation
  • Skip to content
  • Skip to primary sidebar

Marisa's Italian Kitchen

The Secret Ingredient Is Always Love

  • Home
  • About
  • Recipes
  • Contact
  • Privacy Policy

anise seeds

Ciambelline al Vino Italian Wine Cookies

October 19, 2018 by Marisa 20 Comments

Ciambelline al Vino Italian Wine Cookies

Ciambelline al Vino Italian Wine Cookies are traditional ring shaped tiny cookies. They’re somewhat rustic in appearance and studded with wine-soaked anise seeds. A subtle lemon scent permeates throughout this easy to make cookie.

Ciambelline al Vino Italian Wine Cookies

If your new to this type of Italian cookie you’ll be glad to know that its really quite simple to make. Also, with just a few simple ingredients which you mostly likely already have on hand.

Its also a dairy free cookie which makes a wonderful option for those following a special diet.

These Italian wine cookies are customarily served as an after dinner treat alongside a glass of wine for dipping the cookies into. But they’re also quite wonderful served with any type of liquor that compliments the scent of the anise seeds. Such as Sambuca or even Ouzo if your so inclined. Hubby loves to dip his in grappa.

Ciambelline al Vino Italian Wine Cookies

How to Shape 
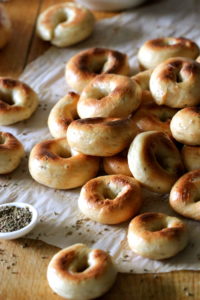
Ciambelline al Vino, Italian Wine Cookies

This my friends is where the fun begins. You’ll so love the aroma while shaping these morsels.

Start off by cutting pieces of dough approximately the size of a walnut in its shell.

You won’t need extra flour for rolling. It actually impedes the process.

Roll out to an 8 inch long rope and pencil thin. At this point you can cut the 8 inch rope in half and simply shape into a ring. Much like these Ciambelle Cookies.

However, if you’re feeling adventurous you’ll want to follow the steps below after rolling it into an 8 inch long rope.

Bend the rope so that it rests parallel and start twisting the 2 strands while interloping them together.

Join the 2 ends together and pinch to secure the round cookies.

You’ll want to repeat this step with the remaining dough before dipping in the sugar.

Ciambelline al Vino Italian Wine Cookies

You’re now ready to dip these pretty shaped cookies into the sugar. Turn them all over to coat while gently pressing them into the sugar.

Ciambelline al Vino Italian Wine Cookies

They don’t take long to bake. In fact 15 minutes is all it took in my conventional mode oven. You’ll know they’re ready when they turn a soft golden hue. And. Oh my goodness. Those wonderful aromas!

Ciambelline al Vino Italian Wine Cookies

They’re tender and crumbly, not overly sweet and extremely addictive! I dare you to eat just one!

Happy baking dear friends!

Ciambelline al Vino Italian Wine Cookies

Italian wine cookies with anise seeds.


If you make this recipe remember to tag @marisasitaliankitchen on Instagram so I can see your creation!

Ciambelline al Vino Italian Wine Cookies
Print Recipe

Ciambelline al Vino Italian Wine Cookies

Ciambelline al Vino Italian Wine Cookies are ring shaped cookies. These rustic cookies studded with wine-soaked anise seeds make wonderfully delicious dunkers.
Prep Time45 mins
Cook Time15 mins
Resting time30 mins
Total Time1 hr 30 mins
Course: Dessert
Cuisine: Italian
Keyword: Ciambelline al Vino Italian Wine Cookies

Ingredients

  • 1 tablespoon anise seeds
  • 3 fluid ounces white wine I used hubby's homemade wine
  • 3 fluid ounces extra virgin olive oil
  • 2 1/4 cup all purpose flour
  • 1/2 cup granulated sugar plus extra for dipping the cookies into
  • 1 teaspoon baking powder
  • 1/8 teaspoon fine sea salt
  • grated lemon zest from 1 lemon

Instructions

  • Place the anise seeds and the white wine in a small bowl and allow to soak for one hour.
  • Strain the anise seeds and reserve the white wine in the small bowl.
  • Add in the extra virgin olive oil to the reserved white wine and whisk the 2 liquids well then set aside.
  • In a medium sized bowl, whisk together the flour, sugar, baking powder, salt, lemon zest and the strained anise seeds until well combined.
  • Make a well in the center of the flour mixture and pour in the oil and wine mixture.
  • Use a wooden spoon to work in as much of the flour as you can with the liquids until you get a soft dough.
  • Transfer the dough with any bits of flour remaining in the bowl to a work surface and knead the dough until it all comes together in a ball, for about 2 or 3 minutes.
  • Cover the dough with cling wrap and allow to rest for 30 minutes.
  • When ready to shape the the cookies, preheat the oven to 350 degrees F.
  • Line 2 cookie trays with parchment paper and set aside.
  • To shape the cookies cut, off a piece of dough approximately the size of a walnut in its shell and roll it out to about 8 inches long and a 1/4 in diameter.
  • Bend in half while keeping it parallel and twist in a rope by overlapping the cookie dough strands. (as seen in photo)
    Ciambelline al Vino Italian Wine Cookies
  • Once roped together shape in a circle by bringing the ends together and pinch to secure and place on the cookie sheet. Repeat with the remaining dough.
  • Place about 2/3 cup of granulated sugar in a shallow bowl. 
  • Dip the cookies one at a time in the sugar, turning to coat all over and return them to the prepared cookie sheet, spacing them about 2 inches apart.
  • Bake in preheated oven for about 15 to 18 minutes.
  • When ready they'll be pale golden in colour and firm to touch.
  • Cool completely.
  • Serve as an after dinner treat for dipping in wine or your favourite hot beverage.

Filed Under: Dessert, Italian Cookies Tagged With: anise seeds, ciambelline, cookies, dessert, Italian cookies, Lemon, wine

Soft Italian Anise Taralli

May 11, 2018 by Marisa 22 Comments

Soft Italian Anise Taralli have a wonderful aromatic scent from the speckled anise seeds. With crispy outer layers and soft spongy middles, these taralli make a perfect snack for just about anytime of the day.

Soft Italian Anise Taralli have a wonderful aromatic scent from the speckled anise seeds. With crispy outer layers and soft spongy middles, these taralli make a perfect snack for just about anytime of the day.

Soft Italian Anise Taralli

Taralli are the quintessential snack of Italy and extremely popular throughout the country.

Every region in Italy has their own variation of the tarallo (singular). From sweet to savory, there’s bound to be one kind or another for every palate out there!

Some are the crisp and dry variety while others are the soft and chewier kind. There are also some recipes that call for yeast while others use baking powder as a leavening agent. Some are eggless and feature wine or even Grappa, not to mention the variety of spices that may be used. The more popular being fennel or even anise seeds.

One thing Italians will agree on is that they are excellent served alongside an antipasto platter with olives and cheeses or simply dunked in wine as an after dinner treat!

Soft Italian Anise Taralli

My friend and colleague Maria, has graciously shared her taralli recipe with me. She and her mom have been making them for years!

Don’t be alarmed by the large amount of flour because this is a large batch recipe. That is if you make tiny taralli as I did! I believe I counted 90+ and that was after I ate half a dozen or so while counting the batch! No judgments here because I know you would do the same after one taste!

Maria makes very large taralli and therefore the recipe yields approximately 3 dozen for her. Whereas I prefer the smaller sized ones. They make cute little morsels that resemble mini bagel bites!

Soft Italian Anise Taralli

However, there are no set rules here. You can make them any size your prefer.

A wonderful alternative would be to make both larger and smaller sizes, this way you get to please everyone!

Soft Italian Anise Taralli

I happen to love the wonderfully sweet aromatic scent of anise seeds with its liquorice flavor!

If your not a fan of anise seeds you can definitely substitute fennel seeds or add some spicy heat with coarsely cracked black pepper.

Soft Italian Anise Taralli

As with any freshly baked bread these Soft Italian Anise Taralli are at their best the day they’re baked. Mostly because when they’re fresh out of the oven, they have this yummy crunchy and crispy outer layer with such soft bagel-like centers, making them simply addictive!

However, you can replicate the same taste and texture by popping them in the oven the next day for about 5 to 10 minutes. If you have any left that is!

Soft Italian Anise Taralli

They also freeze wonderfully well, which is convenient when your’re craving some at a moments notice.

From freezer to oven they go for some fresh tasting taralli that are ready in mere minutes!

Soft Italian Anise Taralli

Roll them as thick or thin as you like…!

Soft Italian Anise Taralli

Shape them big or small…and watch them disappear in no time at all!

Soft Italian Anise Taralli

Many thanks to my friend Maria for sharing her Soft Italian Anise Taralli recipe with us!

If you make this recipe remember to tag @marisasitaliankitchen on Instagram so I can see your creation!

Soft Italian Anise Taralli have a wonderful aromatic scent from the speckled anise seeds. With crispy outer layers and soft spongy middles, these taralli make a perfect snack for just about anytime of the day.
Print Recipe

Soft Italian Anise Taralli

A big batch of Soft Italian Anise Taralli with a crunchy outer layer and a soft bagel like interior that are totally addictable.
Course: Snack
Cuisine: Italian
Author: Marisa

Ingredients

  • 13 cups all purpose flour
  • 3/4 cup granulated sugar
  • 2 tablespoons anise seeds
  • 1 tablespoon active dry yeast
  • 2 large eggs
  • 1/4 cup oil I used canola oil
  • 4 cups water

Instructions

  • In a bowl of a stand mixer, fitted with the hook attachment, add in the flour, sugar, anise seeds yeast and eggs.
  • Heat the oil and water together just until warm. (I used the microwave for 2 minutes however take care that it's not too hot).
  • With the motor running on low speed, add in the liquids then gradually increase the speed to medium.
  • Knead until 3/4 of the flour has been incorporated then transfer the dough to a work surface and continue kneading by hand until you've worked in the remaining flour.
  • This should take about 5 to 10 minutes of kneading time by hand until you've achieved a nice malleable dough with the remaining flour.
  • Place the dough in a well greased large bowl and then cover with plastic wrap.
  • Let the dough rest for 1 1/2 hours. It will increase in size and look light and puffy.
  • When your ready to roll the taralli, divide the dough in half and and return one half to your greased bowl and keep covered so it does not dry out.
  • You'll also want to keep the dough your working with covered for the same reason.
  • There is really no set rule on how long or how thick to role the taralli, its a matter of preference.
  • For small taralli roll out a golf ball sized piece of dough to an 18 inch rope and cut into 3 pieces
  • Shape each piece into a ring and press the ends together to seal.
  • For evenly round taralli, once you press the ends together insert your index and middle finger into the loop where the 2 ends meet and make a back and forth rolling motion for a well rounded shape.
  • For big taralli cut a piece of dough the size of a golf ball and roll out to a half inch wide in diameter and about 12 to 14 inches long.
  • Press the ends together in a loop while sealing the ends as you would the smaller taralli.
  • Transfer the taralli on baking trays lined with a clean kitchen dish towel.
  • When you've finished working with one half of the dough, bring a large pot of water to boil while you preheat the oven to 350 degrees F.
  • Have 2 baking trays ready by your stove top and line one of them with a clean kitchen towel.
  • Drop a few taralli into the boiling water and as soon as they resurface (this should take a few seconds) transfer them first to the unlined tray then to the tray lined with the clean kitchen towel to absorb any residual water.
  • Transfer the boiled taralli onto a cookie sheet lined with parchment paper, spacing them about an inch apart.
  • Bake in a preheated oven for about 24 minutes, turning to flip them over half way through the baking time. I baked them 12 minutes on each side)
  • When ready the taralli will puff up somewhat and have a lovely golden brown appearance with crusty darker brown tops and bottoms.
  • Repeat the whole process with the remaining dough.
  • Small sized taralli yields approximately 8 dozen while bigger shaped taralli will yield about 3 dozen.
  • Of course this will depend on the size you wish to make and again there are no set rules here.
  • Simply have fun and enjoy!


Filed Under: Bread Focaccia Pizza, Dessert, Snack Tagged With: anise seeds, bread, snack, taralli

Chocolate Anise Biscotti

June 3, 2016 by Marisa 44 Comments

chocolate-anise-biscotti


chocolate-anise-biscotti

As promised from my last post, affectionately dubbed by friends overkill Affogato, these are my mini chocolate anise biscotti. Studded with dark chocolate chips, with the lovely scent from orange zest and the sweet flavors of both anise extract and ground anise. And, well just because I sometimes do not do things in small measures, I decided to coat them in dark melted chocolate. Get ready to be transported to biscotti heaven my lovelies!

The dark chocolate, orange zest and ground anise are a trifecta of aromatic flavors that work so well together. I just adore this combination in desserts and find they are simply perfect in this biscotti recipe.

Another thing I am really loving lately is testing out different flours in some of my favorite recipes. One in particular is almond flour, which is high in fiber and a great way to reduce carbohydrates in our diet. It’s nutty flavor and light texture makes it a perfect addition to these chocolate anise biscotti. I have also found that the addition of the almond flour rendered the biscotti much more tender. These are not the rock hard biscotti that will test the strength of one’s new dental work…!

chocolate anise biscotti

I started off by substituting 1/4, 1/3 and finally 1/2 of all purpose flour with the almond flour and found that the 1/3 cup of almond flour worked best in this recipe. Everything I love about these little morsels are combined in these chocolate anise biscotti. Light and airy with a tender bite, also much lower in calories than most cookies.

chocolate anise biscotti

Ground anise seeds have a licorice like sweet flavor very similar to star anise and interchangeable in recipes however do purchase them in small quantities as they tend to lose flavor after grinding.

chocolate anise biscotti

They are really delicious on their own…and dunking them in a frothy cappuccino… will surely take you very quickly, up the stairway, to biscotti heaven!

chocolate anise biscotti

I often bring a pretty jar of biscotti in to work and not only do they disappear very quickly there is always someone requesting the jar itself! Which reminds me, I should go now to purchase more biscotti jars!

chocolate-anise-biscotti
Print Recipe

Chocolate Anise Biscotti

Mini tender chocolate chip biscotti bites. With the sweet scent of anise and grated orange zest and dipped in decadent dark chocolate.
Course: Dessert
Cuisine: Italian
Servings: 4 dozen
Author: Marisa

Ingredients

  • 1 3/4 cup all purpose flour
  • 1/3 cup almond flour
  • 2 teaspoon baking powder
  • 2 teaspoon ground anise seeds
  • 3/4 cup dark chocolate chips
  • 2 large eggs
  • 3/4 cup granulated sugar
  • 1/3 cup butter melted
  • 2 teaspoon pure vanilla extract
  • 1 teaspoon pure anise extract
  • 1 tablespoon grated orange zest from 1 very large orange
  • 1 egg white lightly beaten for brushing the logs
  • 1 cup dark chocolate chips melted (for dipping)

Instructions

  • Preheat oven to 350 degrees F.
  • Line a cookie sheet with parchment paper, set aside.
  • In a large bowl combine the all purpose flour, almond flour, baking powder, ground anise seeds and chocolate chips. Stir and set aside.
  • In a separate smaller bowl, whisk together the eggs, granulated sugar, melted butter, vanilla extract, anise extract and the orange zest.
  • Add the wet ingredients to the flour mixture and stir with a wooden spoon until combined and a soft cookie dough has formed.
  • With a rubber spatula, scrape the cookie dough onto a lightly floured work surface.
  • Divide the dough into 4 equal portions
  • Roll 1 portion at a time into a 10 inch log.
  • Transfer logs to prepared cookie sheet.
  • Brush each log with the beaten egg whites. ( A pastry brush is really handy for this)
  • Bake in preheated oven for 20 minutes.
  • Remove the cookie sheet from the oven, place the cookie sheet on a cooling rack and let it cool for 10 minutes.
  • Once slightly cooled, transfer the logs one at a time to a cutting board and slice diagonally about 3/4 inch pieces.
  • Return cookies to the cookie sheet, standing them upright for even baking, and return to the oven and bake for an additional 15 minutes.
  • Let cookies cool on wire rack.
  • Once cooled, dip the bottom flat end of biscotti into the melted chocolate.
  • Scrape excess chocolate with an offset spatula.
  • Place dipped biscotti upright on a cookie sheet lined with parchment paper.
  • Let stand till chocolate is set.

Notes

Melt chocolate in microwave, on high setting, in 30 second intervals.
For easier dipping, thin chocolate with a little vegetable oil and stir well.
Biscotti keep very well in an airtight container for up to 2 weeks. However in my family they only last a few days.


Filed Under: Biscotti, Cookies Tagged With: anise seeds, biscotti, chocolate chips, cookies, dark chocolate, dessert, Italian cookies, orange, sweet

Classic Pizzelle

August 19, 2015 by Marisa 28 Comments

Classic Pizzelle are wafer thin Italian cookies made in a waffle like iron press machine and one of Italy’s oldest cookies.

classic pizzelle

I was inspired to make these pizzelle after a visit to my dad’s one afternoon. One cannot visit dad without a tour of his lush garden. It is just streaming with fruits and vegetables as well as a selection of  wonderful aromatic herbs. He has a hybrid pear tree that grows 3 different varieties. I don’t know how he does it.!  His pride and joy are his four fig trees which will be producing over 100 figs come September. Nestled between his grape vines were these clusters of wild anise plants.

anise seeds

The anise plant has sweet licorice flavored kernels which can be added to a variety of baked goods and savory dishes. It is the source of flavor in the Italian liquor Anisette. It’s tear drop shaped fruits are called anise seeds. They are ready to harvest when ripened to a grey-brown color. Simply clip the entire head and leave it out to dry, on a clean dish towel, for 24 hours. Once dried, shake the plant in a brown paper bag to collect its seeds. The kernels will easily fall off and they are then ready to store in a tightly sealed jar.

You will need a pizzelle press machine to make these thin, light and crispy waffle-like Italian cookies. They are extremely popular during Christmas and Easter and for special family gatherings.They are wonderful on their own but can also be transformed into various shapes. Pizzelle, while still warm, can be rolled into cannoli shells and filled with sweetened ricotta. They can also be sandwiched together with ice-cream or turned into waffle cones and also into edible bowls with your favorite filling.

There are many different flavor combinations to choose from. They can be scented with vanilla, almond, anise extracts as well as lemon, and they can also be chocolate flavored. I have tried many different ones and I must say my absolute favorite is the anise pizzelle studded with the little anise seeds.

Let’s Get Started with the Classic Pizzelle

Ingredients:

  • 1- 3/4 cups all purpose flour
  • 2 teaspoon baking powder
  • 1 tablespoon anise seeds
  • 3 large eggs
  • 3/4 cup granulated sugar
  • 1/2 cup unsalted butter, melted
  • 1 tablespoon anise extract

Preheat the Pizzelle Press while preparing the batter.

In a medium bowl, whisk together the flour, baking powder, anise seeds and set aside.

In a separate bowl, beat together the eggs and sugar on medium speed for about one minute, just until thickened. Reduce the speed to low and add in the melted butter, anise extract and mix just until all ingredients are combined, for about 15 seconds. Next, add in the flour mixture and also mix just until combined for another 15 seconds. Don’t over mix the batter.

Use a heat proof brush to grease the top and bottom grids of the pizzelle press with a flavorless vegetable oil or melted vegetable shortening. Do not use butter because it will burn. I used a cake release product from Wilton, it works wonders, and I only needed to grease the grids once.

Scoop out about 1- 1/2 to 2 teaspoons of pizzelle batter onto each cookie grid, centering the batter just a little behind the center of the patterned grid because when closing the lid, the batter gets pushed forward to the center yielding a more evenly rounded looking pizzelle. I used a 1 1/4 inch round cookie scoop. I found that dipping the scoop in a glass of water made it easier to release the dough onto the grid.

Close the lid and lock. My pizzelle press is a Cuisinart. I set it at number 4 and the pizzelle were ready in 60 seconds. If you have a different pizzelle press, follow the manufacturers instructions. If you prefer a lighter color, reduce the baking time and for a darker color add several more seconds.

pizzelle

When ready, use a heat proof spatula to remove the pizzelle and place on a cookie rack to cool. Don’t worry too much if it spreads out from the outer circle, you can simply round it off with a scissor.

pizzelle bowl

Here I used a liquor glass to form an edible ice-cream bowl. Simply invert the pizzelle while still warm and pliable onto the glass and let cool. Tip: Lighter pizzelle are easier to mold or roll than a darker one.

pizzelle cone

Here the Classic Pizzelle are deliciously served with black cherry ice-cream to beat the summer heat!

Variation: For the Double Chocolate Pizzelle, as shown above, reduce the four to 1 -1/2 cups, add 1/4 cup unsweetened cocoa powder. Add 2 ounces of melted semi-sweet chocolate to the sugar, butter mixture. Omit the anise extract and anise seeds and add 1 tablespoon of pure vanilla extract.

Adapted from the Cuisinart

Filed Under: Dessert, Italian Cookies Tagged With: anise seeds, Classic Pizzelle, dessert, Italian cookies, wafer cookies

Primary Sidebar

A Little About Me

Hi I'm Marisa! Welcome to my little corner of the web where you'll find delicious foods inspired by my Italian heritage and Canadian upbringing. So kick off your shoes, have a seat and stay awhile... Read More…

Search In My Kitchen

Copyright © 2019 · Foodie Pro & The Genesis Framework