
This Easy Berry Muffin Recipe is an uncomplicated, no-fuss bake. The muffins are soft and fluffy morsels bursting with juicy raspberries and blackberries, and your whole family will love …
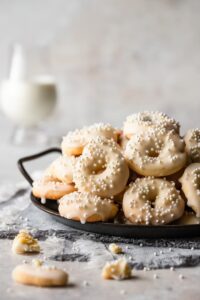
Ciambelle Italian Lemon Cookies
We call these Italian lemon cookies, Ciambelle or Ciambellini cookies, referencing their tiny size. They're tender, crumbly cookies dipped in a tangy lemon glaze and topped with sprinkles! They …

Classic Pumpkin Roll Cake
Impress your family and friends with a simple-to-make yet show-stopping Pumpkin Roll Cake! It has all the wonderful aromas of Fall with aromatic pumpkin pie spices such as ginger, nutmeg and cinnamon. …
Sweet Crispy Pasta Nests
Are you wondering what is a good dessert with pasta? Well how about taking fresh egg pasta and turning it into irresistible Sweet Crispy Pasta Nests! This sweet pasta dessert is deep fried till …
Homemade Vanilla Sugar
Learn how to make your own homemade vanilla sugar to use in your favourite cookie recipes or other baked goods. All you need is some granulated sugar, a fresh vanilla bean and a few minutes of your …
Tarallucci al Limone: Italian Lemon Knot Cookies
Tarallucci al limone are traditional Italian lemon knot cookies from southern Italy. They were very popular at weddings as they symbolize two people "tying the knot" in holy matrimony. Today …
Continue Reading about Tarallucci al Limone: Italian Lemon Knot Cookies →