• Skip to primary navigation
  • Skip to main content
  • Skip to primary sidebar

Marisa's Italian Kitchen

The Secret Ingredient Is Always Love

  • Home
  • About
  • Recipes
  • Contact
  • Privacy Policy

moist

Carrot Cake With Cream Cheese Frosting

May 4, 2019 by Marisa 22 Comments

A 2 layered Carrot cake on a white cake stand.

The absolute best Carrot Cake with Cream Cheese Frosting…ever! Two carrot cakes are baked and assembled together with the most luscious cream cheese frosting to form a two layered cake.

Carrot Cake with Cream Cheese Frosting

I forgot how much I loved carrot cake until I revisited this recipe. It’s like seeing a long lost best friend and not being able to get enough.

Memories came flooding back on all the times I’ve baked this cake for Sunday family gatherings at mamma’s house.

It’s been a family favourite for a long while and just recently my sister requested the recipe. She raves about it all the time, claiming it’s “the best she’s ever tasted” !

I’m so glad to have found this recipe, type written…yikes, who even owns a typewriter anymore. It’s dog eared and slightly spattered with cake batter.

It truly attests to the shear amount of times I’ve baked this deliciously moist cake.

Much of its moistness comes from sweet bits of crushed pineapple which makes a lovely contrast to the finely ground walnuts and carrots speckled throughout the cake.

Baby carrots in a brown wooden box.

What Pans Can I Use to Bake Carrot Cake?

You can most certainly serve it in a more traditional way by baking it in a 9 x 13 inch pan, as I’ve always done.

However, do keep in mind you’ll need to bake it for 50 to 60 minutes. Or simply until a toothpick inserted in the middles comes out clean.

One batch of the cream cheese frosting will be enough for a 9 x 13 inch cake.

Two layers of carrot cake on a black cooling rack.

This time around, I decided to elevate it into a much more elegant 2 layered cake. Inspired by what is now being referred to as “naked cake” and I used 2, 9 inch round cake pans.

It’s a lovely way of making a cake with open layers.

This has the icing peeking through the outer edges, giving it a more exposed look. I find it gives the cake a pretty and enchanting appeal!

How to Decorate a Two Layered Carrot Cake

To achieve the frilly icing border, you’ll want to start piping at the inner edge of your cake, working your self inward.

Use an off set spatula to smooth the inside frosting while leaving the edges untouched.

Bottom layer of carrot cake topped with cream cheese

I repeated the same with the top layer and piped a rosette in the middle of the cake.

I wanted to achieve the look of a naked cake but with a frilly border!

Two layered carrot cake with frosting on a cake stand.

How to Make Cream Cheese Frosting

You can either use an electric mixer when beating your cream cheese frosting or a food processor with a 4 cup capacity.

Both methods work quite well but I do prefer my food processor as this gives me a wonderful smooth consistency in mere minutes.

I doubled the frosting amount for this 2 layered cake and used a 1M piping tip from Wilton to decorate the carrot cake.

You’ll have a little more than enough for the double layers so be as generous as you like!

A 2 layered Carrot cake on a white cake stand.

This recipe was given to me by Raoul whom I’ve never met.

He was gracious enough to pass on this recipe through a mutual friend.

Raoul worked in our hospital cafeteria and had my colleagues and I running down every second Wednesday to get our carrot cake fix!

It’s that wonderful and you’ll want to make it over and over again!

blank

And if your as much of a carrot cake lover as I am you’ll want to check out these Gluten Free Mini Carrot Loaves! It’s a slight variation on this 2 layered carrot cake. But minus the cream cheese.

Happy baking dear friends!

This recipe was originally published May 25, 2015 and republished May 4, 2019 with updated content and photos.

Carrot Cake with Cream Cheese Frosting
Print Recipe
5 from 3 votes

Carrot Cake with Cream Cheese Frosting

A delicious 2 layered Carrot Cake with a luscious Cream Cheese Frosting that is simply perfect for birthdays, holidays or any other special occasion.
Prep Time30 mins
Cook Time40 mins
Total Time1 hr 10 mins
Course: Dessert
Cuisine: American
Keyword: Carrot Cake, Cream cheese frosting
Servings: 10
Calories: 587kcal
Author: Marisa

Ingredients

  • 1 1/2 cups sunflower oil or canola oil
  • 2 cups granulated sugar
  • 4 large eggs
  • 2 cups all purpose flour
  • 2 teaspoons baking powder
  • 1 teaspoon baking soda
  • 1/2 teaspoon salt
  • 1 cup walnuts finely chopped
  • 14 ounce canned crushed pineapple well drained
  • 2 cups grated carrots about 3 medium sized

CREAM CHEESE FROSTING (double this amount for a 2 layer cake)

  • 3 ounces cream cheese
  • 2 teaspoon pure vanilla extract
  • 1/4 pound butter
  • 1/2 pound powdered sugar (icing sugar)

Instructions

  • Grease and flour 2, 9 inch round cake pans.
  • Preheat oven to 325 degrees F.
  • In a large bowl whisk the oil, sugar and eggs together until combined and set aside.
  • In a separate bowl, whisk the flour, baking powder, baking soda and salt.
  • Add the dry ingredients to the wet ingredients and stir until combined. 
  • Fold in the crushed pineapple, chopped walnuts and the grated carrots.. Do not over mix.
  • Divide evenly into the prepared pans.
  • Bake in the preheated oven for about 40 minutes or until a wooden skewer inserted in the centre comes out clean.
  • Transfer the pans on a wire rack and let cool completely in the pans.
  • Carefully release the cakes from the pans when cooled and ready to frost.

CREAM CHEESE FROSTING (double the amount for a 2 layer cake)

  • In a large bowl combine the frosting ingredients together. 
  • Starting on low speed and working your way to high, mix until the cream cheese frosting is smooth and creamy.

ASSEMBLING LAYERED CARROT CAKE

  • Carefully place one cake on a large serving platter.
  • To make the frilly icing border, use a piping bag inserted with a 1M piping tip.
  • Fill the piping bag with the frosting and start piping at the inner edge of your cake, working yourself inward.
  • With an off set spatula or the back of a large spoon, smooth the inside frosting and leave the edges untouched.
  • Top with the second layer of cake and repeat with more frosting.
  • Pipe a rosette on the top middle of cake and garnish with mint leaves.
  • Slice and enjoy with your favourite cup of coffee or tea.

Nutrition

Calories: 587kcal | Carbohydrates: 93g | Protein: 8g | Fat: 22g | Saturated Fat: 9g | Cholesterol: 108mg | Sodium: 383mg | Potassium: 330mg | Fiber: 3g | Sugar: 70g | Vitamin A: 4802IU | Vitamin C: 5mg | Calcium: 87mg | Iron: 2mg


Filed Under: Cakes, Dessert Tagged With: Carrot Cake, creamcheese, delicious, dessert, moist, walnuts

Triple Chocolate Cookies

January 31, 2019 by Marisa 15 Comments

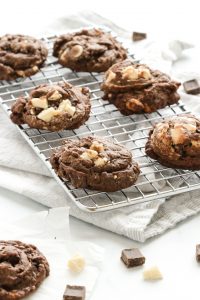
Decadent triple chocolate cookies. These cookies are soft and chewy with loads of gooey chocolate.

When it comes to decadent cookies these Triple Chocolate Cookies certainly fit the bill.

Decadent triple chocolate cookies. These cookies are soft and chewy with loads of gooey chocolate.

This post was originally published on February 4, 2015 and republished Jan 31, 2019 with updated photos and content.

They’re a trifecta of pure cocoa and chock full of both semisweet and white chocolate chunks as well as white chocolate chips.

The addition of instant coffee granules elevates these heavenly cookies with amazing mocha flavour!

You’ll find them soft and chewy with loads of gooey melted chocolate when bitten into…just the way I like my cookies.


Decadent triple chocolate cookies. These cookies are soft and chewy with loads of gooey chocolate.

These triple chocolate cookies are just about ready to hit the oven right after mixing the dough together. However, if you love and want more of that concentrated chocolate flavour, then do chill the dough overnight.

This cookie dough is a rather stiff dough to start off with. So, if you do chill the dough overnight then simply remember to allow the dough to sit at room temperature for about an hour or two. This will make it easier to scoop out and bake.

A good old tablespoon is enough to scoop up chunks of cookie dough for baking. However, if you have a small ice-cream scoop of about 1 and a half inch to 2 inches, this would work even better. It allows you to swoop in and scoop and releases the cookie dough without much effort.

Decadent triple chocolate cookies. These cookies are soft and chewy with loads of gooey chocolate.

You’ll probably get a good 3 dozen medium size cookies…give or take a few!

However you can make them larger if you wish.

Simply remember to adjust the baking time accordingly for bigger cookies.

Decadent triple chocolate cookies. These cookies are soft and chewy with loads of gooey chocolate.

Tips for making soft triple chocolate cookies

A useful tip to chewy gooey cookies, is not to over bake them.

For cookies with soft and chewy centres, bake them for about 8 minutes. They’ll be very fragile when removed from the oven so allow them to cool in the baking pan placed over a cooling rack.

If you like them crispier around the edges then simply bake them for 10 to 12 minutes.

Decadent triple chocolate cookies. These cookies are soft and chewy with loads of gooey chocolate.

If you make this recipe remember to tag @marisasitaliankitchen on Instagram so I can see your creation!

Decadent triple chocolate cookies. These cookies are soft and chewy with loads of gooey chocolate.
Print Recipe
No ratings yet

Triple Chocolate Cookies

Triple chocolate cookies, chock full of both semi-sweet and white chocolate chunks and semi-sweet chocolate chips. A heavenly decadent cookie.
Course: Dessert
Cuisine: American
Keyword: Chocolate, Cookie, Triple chocolate, Soft and chewy
Servings: 36
Author: Marisa

Ingredients

  • 2 1/2 cups all purpose flour
  • 3 tbls unsweetened cocoa powder
  • 1 tsp baking soda
  • 1/2 tsp instant coffee granules
  • 3/8 tsp salt
  • 1 cup unsalted butter softened
  • 1/2 cup firmly packed light brown sugar
  • 1/2 cup granulated sugar
  • 2 large eggs
  • 2 tsp pure vanilla extract
  • 1 cup semi-sweet chocolate chips
  • 1 cup chopped semi-sweet chocolate
  • 1 cup chopped white chocolate

Instructions

  • Preheat oven to 375*
  • Line 2 cookie sheets with parchment paper.
  • In a medium size bowl combine the flour, unsweetened cocoa powder, baking soda, coffee, salt and set aside.
  • In a large bowl using an electric mixer, cream the butter and both the sugars together. Add the eggs and vanilla and mix till blended. Mix in the flour mixture. Stir in the chocolate chips, chopped semi-sweet chocolate and chopped white chocolate.
  • Using a cookie scoop or spoon, form balls into large walnut size chunks of dough. Bake 10 to 12 minutes, they should look just barely set with a shiny sheen. Remove from oven and let cool 15 mins.

Notes

This recipe was adapted from The Best of Better Baking by Marcy Goldman. One of my favourite cookbooks, with lots of insightful information to turn anyone into a better baker.


Filed Under: Cookies, Dessert Tagged With: chewy, cookies, dark chocolate, moist, semi-sweet chocolate, white chocolate

Blueberry Bundt Cake

June 25, 2015 by Marisa 17 Comments

blank

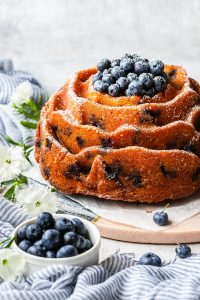
Blueberry Bundt Cake a, wonderfully dense and moist cake baked in a rose shaped Bundt pan for a lovely sculpted look and scented with the sweet aroma of orange zest.

Bluberry Bundt Cakes1

This Blueberry Bundt Cake is perfect for a Sunday brunch, potlucks and elegant enough for special occasions.

A huge advantage when baking with a bundt pan is the beautiful decorative shape, allowing nothing more than a light simple syrup and a dusting of icing sugar to enhance the look of your cake.

To ensure easy unmolding of your cake with all the fancy designs intact, use a good cake release product. Here I used one from Wilton which allowed me to release the cake effortlessly. Another good alternative is to brush the inside of your pan with vegetable shortening and then dust with flour.

What I was not successful with was using a cooking spray. I am not sure why I decided too but my first time using it was a disaster. Half the cake was stuck in the bottom of the pan and would not unmold, hence the delay in this post! Mind you, it was perfectly edible and my husband had no problem polishing it off…lol ! So I went searching the following day for a good cake release product and a few other ingredients to bake my cake all over again. ๐Ÿ™‚

Ingredients:

  • 1 cup butter, softened
  • 1 1/2 cups granulated sugar
  • 4  large eggs
  • 2 tbsp coarsely grated orange rind
  • 3 cups all purpose flour
  • 1 tbsp baking powder
  • 1/2 tsp salt
  • 1 cup orange juice
  • 4 cups fresh blueberries

Glaze:

  • 1/2 cup granulated sugar
  • 1/2 cup orange juice

Grease a 10 inch (3 liter) Bundt cake pan or an angel food cake pan and set aside.

In a large bowl beat the softened butter with 1 cup of sugar just until fluffy. Next beat in the egg yolks one at a time and then the grated orange rind.

In a smaller bowl, use clean beaters to beat the egg whites until soft peaks form and set aside.

In yet another bowl, whisk together the flour, baking powder and the salt. Using a wooden spoon, stir the flour mixture into the butter mixture alternately with the orange juice. You will make 3 additions of flour and 2 of juice. The batter will be slightly stiff.

Next, stir 1/3 of the beaten egg whites into the batter mixture and fold in the remaining egg whites with a rubber spatula. Fold in 2 cups of the blueberries and scrape the cake batter into your prepared pan. Smooth out the top and give the pan a light tap on your counter to release any air pockets.

If you are using a regular Bundt pan or angel food pan, bake at 350F (180C) for 45 to 55 minutes or until a wooden skewer inserted in the middle comes out clean.  Remove from the oven and place the cake on a cooling rack. Let cool for 20 minutes.  If using a cast aluminum Bundt pan as I did, preheat the oven at 325F (160*C) and bake for about 55 to 65 minutes.

Glaze: Combine 1/2 cup of sugar and 1/2 cup of orange juice in a small sauce pan. Bring to a boil and boil 1 minute while stirring. As another alternative, you can just as easily use your microwave on high for 2 to 3 minutes. Keep an eye on it so that it does not boil over. Let it cool a little.

Loosen the cake from the pan and invert onto a serving platter. Brush the cake with the orange glaze and let it cool.

blueberry bundt cake

Once cooled, fill the center of the cake with the remaining blueberries and dust with icing sugar ๐Ÿ™‚

Yields 12 servings.

Blueberry Bundt CakeAdapted from Canadian living Magazine.

Filed Under: Cakes, Dessert Tagged With: blueberries, Bundt cake, dessert, moist

Red Velvet Cupcakes

March 1, 2015 by Marisa 9 Comments

blank

IMG_1460

A colleague of mine started a new tradition at work. Rather than collecting money for a birthday cake on someone’s special day, the “birthday person” gets to bring a cake or treat. Since baking is right up my alley, it works just fine for me. The difficult part was in deciding what to bake! I have no qualms in baking my own cake, I have even ordered my own birthday cake on one occasion…but that’s another story!

I love Red Velvet Cake!!! Rather than baking a whole cake I decided on mini red velvet cupcakes topped with my favorite buttercream icing. It is my birthday after all! But enough about me. Let me say, these cupcakes were a hit! With a deep rich red color and tender texture…simply irresistible!!!

The addition of vinegar to the batter boosts the red coloring. I promise you won’t even know its’ there.

The recipe calls for 1 cup of buttermilk, but if your like me and almost never have it in the fridge, here is a simple substitution. Pour 1 tablespoon of white vinegar into a measuring cup and pour in enough milk to make 1 cup. Stir and let stand for about 10 minutes and use as buttermilk.

Cupcakes

  • 1 cup  buttermilk
  • 1 tsp   pure vanilla extract
  • 1/2 cup unsalted butter at room temperature
  • 1 1/2 cups granulated sugar
  • 1 tsp coarse salt
  • 2 large eggs, room temperature
  • 1/4 cup red food coloring
  • 2 tbls dutch processed unsweetened cocoa powder
  • 2 1/4 cups  cake flour, sifted
  • 1 tsp baking soda
  • 1 tbl  white wine vinegar

Preheat the oven to 350*F.

Place 26 small parchment baking cups, divided on 2 baking sheets. You can also use standard muffin pans, in this case you will need a 12 cup pan and a 6 cup pan sprayed with nonstick cooking spray or lined with cupcake liners.

For the cupcakes: In a small bowl combine the buttermilk, vanilla and set it aside.

In a large bowl mix the butter, sugar and the salt on medium-high speed just until it is light in color and looks creamy, about 2 to 3 minutes. If you are using a stand mixer you will need to scrape down the bowl about half way through. Beat in the eggs one at a time.

In another small bowl, combine the food coloring and the cocoa together, stir to form a paste. Beat the paste into the butter-sugar mix until combined.

Next, start adding the flour and the buttermilk mixture in tree batches by starting with the flour and ending with the flour. Let the batter stand for 15 minutes.

Stir together the baking soda and the vinegar in a small bowl. Let it stand until it starts to foam then fold into the batter. Divide the batter among the baking cups.

For best results, bake one pan at a time for about 18 to 23 minutes. Because I used smaller baking cups, I found 18 minutes was sufficient. If you are using standard baking cups you may need to bake them a little bit longer. Use the 18 to 23 minutes as a guide line. When the cupcakes spring back when gently touched, you’ll know they are ready. You can also insert a toothpick in the middle of the cupcake, if it comes out clean then it is ready. Cool completely before frosting.

IMG_1370

IMG_1394

Vanilla Buttercream Frosting:

4 cups    icing sugar, sifted (also known as confectioner’s sugar)

2/3 cup   unsalted butter at room temperature

1/4 cup   whole milk

1/4 tsp    pure vanilla extract

Beat the icing sugar and butter together on medium-low speed until well mixed.

In a small bowl, combine the milk and vanilla extract. Add it to the butter-sugar mixture a bit at a time, beating on low speed until incorporated. Then turn the mixer to high speed and continue beating until the frosting is light and fluffy for at least 5 minutes. The longer you beat the frosting, the lighter and fluffier it becomes.

Frost the cupcakes with the Vanilla buttercream using any technique you prefer. I used a pastry bag fitted with a large pastry tip, the 1M from Wilton to form the rosette on top.

Yields 18 standard cupcakes or 26 mini cupcakes.

IMG_1426

IMG_1409

The Cupcake recipe was adapted from The Sono Baking Company Cookbook.

Filed Under: Cakes, cupcakes, Dessert Tagged With: buttercream, cupcakes, moist, red velvet, vanilla

Primary Sidebar

A Little About Me

blankHi I'm Marisa! Welcome to my little corner of the web where you'll find delicious foods inspired by my Italian heritage and Canadian upbringing. So kick off your shoes, have a seat and stay awhile... Read Moreโ€ฆ

Let's Be Social

  • Facebook
  • Twitter
  • Pinterest
  • Instagram

Search In My Kitchen

Copyright © 2021 · Foodie Pro & The Genesis Framework