• Skip to primary navigation
  • Skip to main content
  • Skip to primary sidebar

Marisa's Italian Kitchen

The Secret Ingredient Is Always Love

  • Home
  • About
  • Recipes
  • Contact
  • Privacy Policy

brunch

Chocolate Cranberry Twist Star Bread

December 15, 2020 by Marisa 33 Comments

Star bread with chocolate and cranberries with two slices cut off.

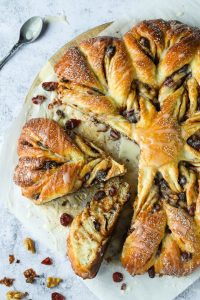
Learn how to make a spectacular Chocolate Cranberry Twist Star Bread that is sure to impress family and friends. This homemade sweet bread is loaded with walnuts, dried cranberries and dark chocolate pieces with some aromatic cinnamon flavour in every bite.

Chocolate Cranberry Twist Star Bread.

There is something so magical by taking a few simple ingredients, which you probably already have on hand and transforming them into an incredibly delicious sweet bread.

In texture this yeast based dough recipe is much like an Italian Panettone but not as dry on the inside. It’s fluffier and more brioche-like!

The filling is a chocolate, cranberry and walnut mixture that once rolled into the dough creates a pretty swirl into each slice.

Alternately you can also spread it with your favourite jam. I’m thinking raspberry jam and then sprinkled with some mini dark chocolate chips would work really well here.

Another wonderful option is Nutella, everyone’s favourite Italian chocolate hazelnut spread!

The Inspiration for this Holiday Star Bread

The inspiration for this gorgeous and delicious holiday bread comes from an old Canadian Living Magazine recipe that I’ve been making for well over 20 years.

I would usually make this sweet bread by slicing and braiding the filled dough into a wreath shape. It was then baked in a springform pan and would greatly resemble a fancy Panettone.

This year I decided to switch it up by tweaking the ingredients and shaping the dough to resemble a star bread. I have to say it did not disappoint at all!

It not only makes a beautiful presentation but…è semplicemente delizioso…it’s simply delicious!

Drizzled with icing or a simple dusting of powdered sugar, this sweet bread makes a spectacular centrepiece for the holidays!

Or just enjoy it on a crispy-cold day, curled up in front of the fireplace with a steaming cup of coffee or tea.

How to make a Chocolate Cranberry Twist Star Bread

A large glass bowl filled with a fully risen sweet bread dough.
Four round shaped sweet bread dough on a brown wooden board.

  • Punch the dough down and turn it out onto a slightly floured work surface. 
  • Divide the dough into four equal portions.
  • Work with one piece at a time while keeping the remaining pieces covered with cling wrap so it doesn’t dry out.
A ten inch round rolled out sweet bread dough on parchment paper.
Rolled out sweet dough topped with a chocolate cranberry mixture and sprinkled with cinnamon.

  • Roll out a piece of dough to an 8 to 10 inch circle. ( This will depend on the size of your largest baking sheet as you’ll need some growing space of 2 inches more)
  • Transfer the rolled out dough to a parchment lined baking sheet.
  • Spread a third of the filling over the dough, pressing it slightly into the surface of the dough.
  • Sprinkle with 1 teaspoon of cinnamon over the filling.
  • Repeat this with the second and third piece of dough.
  • Then roll out the fourth piece of dough and place it over the 3rd stack of dough. (this one will have NO filling on top)
Three layers of rolled out sweet dough filled with a chocolate cranberry mixture.
Ten inch round sweet dough sliced in four wedges.

  • Once your dough is all rolled out, filled and stacked you are ready to slice into wedges.
  • First, place a round cookie cutter or glass of about 2 and a quarter inch wide over the centre of the stacked dough.
  • With a sharp knife, cut the dough all the way through into four equal edges while leaving the cookie cutter or glass in place.
Star bread dough sliced into eight wedges, placed on a parchment lined wooden board.
Star bread dough sliced into 16 wedges on a parchment lined wooden board.

  • Cut each of the 4 wedges in half making sure to slice all the way through. You now have 8 wedges.
  • Then cut each of the 8 wedges in half all the way through. You now have 16 wedges all connected to the middle circle.
  • You’re now ready to twist the wedges.

How to Twist the Chocolate Cranberry Star Bread

Twisting two wedges of sliced star bread while placed on a parchment lined wooden board.
Shaped star bread filled with a cranberry chocolate mixture.

  • This part is a lot easier than it may look.
  • Grab hold of two pieces of dough that are side by side.
  • Lift and twist the wedges away from each other, making two whole twists and pinch the edges to seal.
  • Repeat with the remaining wedges to form the star bread.
  • Cover with cling wrap and allow to rise for 30 minutes.

Chocolate cranberry bread shaped into a star on a parchment lined cookie baking tray.

  • After the star bread dough has risen for 30 minutes, remove the cling wrap and gently brush the top and sides with a beaten egg.
  • Bake in the centre of a preheated oven (350*F), for 20 minutes.
  • When ready the star bread will have a deep golden brown colour.

Freshly baked star bread with a cranberry and chocolate filling on a gold serving tray.

This star bread with its filling of chocolate, cranberries and walnuts is a thing of beauty all on its own.

I love it as is with a light dusting of powdered sugar and usually serve it while still warm with the filling all ooey and gooey.

But if you prefer a little extra sweetness you can also serve it with a drizzle of icing.

Cranberry and chocolate bread dusted with powdered sugar on a parchment lined gold serving tray.

Two Ingredient quick and easy Icing

For the icing, mix together 1/3 cup of sifted icing sugar with 2 teaspoons of milk.

Drizzle the icing over the top of the star bread.

Star bread with chocolate and cranberries with two slices cut off.

The bread is at it’s best served the same day while it’s still warm, but can also be wrapped and stored for one day.

Any leftovers the next day, can be portioned out wrapped in paper towels and warmed in the microwave for about 10 to 15 seconds. It will come out tasting like it had just been freshly baked!

Happy Baking!

This recipe was originally posted November 7, 2015 and republished with updated photos and content December 15, 2020.

Cranberry and chocolate bread dusted with powdered sugar on a parchment lined gold serving tray.
Print Recipe
0 from 0 votes

Chocolate Cranberry Twist Star Bread

This Chocolate Cranberry Star Bread recipe makes a show stopping centrepiece for the holidays. It's studded with walnuts, cranberries and dark chocolate pieces. All it needs before serving is a light dusting of powdered sugar.
Prep Time45 mins
Cook Time20 mins
Course: Dessert
Cuisine: American
Keyword: Chocolate Cranberry Twist Star Bread
Servings: 16
Calories: 377kcal

Ingredients

For The Star Bread Dough

  • 1/4 cup granulated sugar
  • 1/2 cup warm water
  • 1 8g envelope of active dry yeast
  • 1/2 cup milk
  • 1/4 cup unsalted butter
  • 1 teaspoon fine sea salt
  • 2 large eggs
  • 3 ¾ cups all purpose flour plus 1/4 cup more while kneading

For The Filling

  • 1/3 cup packed brown sugar
  • 1/2 cup corn syrup
  • 1 cup dried cranberries
  • 1 cup dark chocolate pieces
  • 3/4 cup chopped walnuts
  • 3 teaspoons cinnamon

For Brushing Over The Star Bread

  • 1 beaten egg

For Dusting Over The Star Bread

  • 1/3 cup powdered sugar

Instructions

Making The Star Bread Dough

  • In a large bowl, dissolve 1 teaspoon of the sugar in warm water.
  • Sprinkle in the yeast and let it stand for 10 minutes or until it turns frothy.
  • In the meantime, place the milk, remaining sugar, butter and salt in a small pot over a stove top.
  • Heat the mixture over medium heat and stir till the butter melts.
  • Set aside and let cool to lukewarm temperature.
  • Whisk the eggs into the yeast mixture.
  • Add in the milk mixture and whisk again.
  • With a wooden spoon, stir in the 3 ¾ cups of flour. (the dough will be slightly sticky)
  • Transfer the dough to a work surface lightly dusted with flour.
  • Knead the dough for approximately 10 minutes, while adding in enough of the 1/4 cup of flour as needed to achieve a smooth and elastic dough.
  • Transfer the dough to a large greased bowl and turn the dough to grease all over.
  • Cover the bowl with cling wrap and let the dough rise in a draft free area for about 1 hour or until the dough has doubled in size.

Chocolate, Cranberry and Walnut Filling

  • Prepare the filling just before you're ready to roll out the dough.
  • In a small bowl, stir together the brown sugar, corn syrup, cranberries, chocolate pieces and walnuts.
  • Keep in mind that this mixture will be used to spread over 3 of the rolled out doughs. The top 4th dough will not have any filling.
  • Set aside while you quarter and roll out the dough.

Rolling And Shaping The Star Bread

  • First off, punch down the dough and divide the dough into 4 equal pieces.
  • Work with 1 piece at a time while keeping the remaining pieces covered with cling wrap.
  • On a lightly floured work surface and dusted rolling pin, roll out one piece of dough to an 8 to 10 inch circle. (This will depend on the size of your largest baking sheet as you'll need some growing space of about 2 inches more)
  • Transfer the rolled out dough to a parchment lined cookie sheet. (use a very large baking sheet)
  • Spread a third of the filling over the dough while pressing down lightly into the dough. (It gets messy and sticky but works out well. Simply wash your hands in between rolling the next round of dough.)
  • Sprinkle one teaspoon of cinnamon over the filling.
  • Roll out the second piece of dough and place directly over the first.
  • Top with some of the filling and sprinkle with another teaspoon of cinnamon.
  • Repeat with the third piece of dough. Roll out and place directly over the second round of dough,
  • Spread with the remaining filling and cinnamon.
  • Roll out the fourth piece of dough and place it over the third while pressing down gently. (this one will not have any filling over it)
  • Now we are ready to slice.
  • First, place a round cookie cutter or glass of about 2 ¼ inch wide over the centre of the stacked star bread.
  • With a sharp knife, cut the dough all the way through into four equal wedges while leaving the cookie cutter or glass in place.
  • Cute each wedge into 2 equal pieces while cutting all the way through. So now you have 8 pieces.
  • Cut each of the 8 pieces in half. And now you end up with 16 wedges all connected to the middle circle.
  • We are now ready to twist the wedges.
  • Grab hold of two wedges of dough that are side-by-side.
  • Twist the wedges away from each other making two whole twists and pinch the edges to seal.
  • Repeat with the remaining wedges to form the star bread.
  • Cover the star bread loosely with cling wrap and set aside in a draft free area for 30 minutes to rise slightly.
  • Preheat the oven to 350 degrees F.
  • Brush the star bread with the beaten egg.
  • Bake in the preheated oven for approximately 20 minutes.
  • When ready, the star bread will have a deep golden brown colour.
  • Let rest for about 30 minutes on a cooling rack.
  • Then serve while still warm from the oven topped with a dusting of powdered sugar.

Nutrition

Calories: 377kcal | Carbohydrates: 56g | Protein: 7g | Fat: 15g | Saturated Fat: 6g | Cholesterol: 42mg | Sodium: 183mg | Potassium: 183mg | Fiber: 3g | Sugar: 28g | Vitamin A: 150IU | Vitamin C: 1mg | Calcium: 74mg | Iron: 2mg

Filed Under: Dessert, Sweet Loaf Tagged With: brunch, chocolate, cranberry, dessert, holiday, pecan, sweet loaf

Crespella with Nutella and Berries

July 3, 2020 by Marisa 18 Comments

Creseplla with Nutella

This Crespella with Nutella recipe is an Italian oven baked pancake filled with fresh strawberries, raspberries and blackberries. It makes a perfect weekend indulgent breakfast or even brunch!

Oven baked crespella with Nutella topped with fresh berries.

When we lived in the country, up in the Laurentians, we had these patches of wild strawberry bushes growing roadside which stretched for miles and miles.

The fruits looked like miniature versions of the store bought strawberries. They were also way smaller and sweeter than the more cultivated strawberries sold at markets today.

Whenever my nieces would come up and stay for the weekend we would happily trek down the hill to gather bowls full of these sweet little berries to serve alongside our crespella. All the more delicious enjoyed with their company!

What is a Crespella

A crespella is simply the Italian version of a french crêpe.

They can be rolled up, folded or even stacked together with either a savoury or sweet filling.

You don’t need a special crêpe pan to make this crespella. In fact any 12 inch oven proof pan will do.

Chopped strawberries on a white plate.

This Italian crêpe recipe is my favourite way to use up Quebec strawberries which are exquisitely sweet and full of flavour.

In a pinch you can use any other favourite fruit of yours.

How to make an Italian Crespella with Nutella

For all the Nutella lovers who are looking for yet another way to enjoy their favourite chocolate hazelnut spread, you’re going to love this recipe. 

You can turn just a few simple ingredients into something so delicious and spectacular looking that will surely please every member of your family.

And with this oven baked crespella, with its tender middle and crispy edges, no flipping is required!

So first, let’s start by preheating the oven to 450 degrees F.

If the handles of your frying pan are not oven proof, no worries! You can simply wrap the handles with aluminum paper to protect them.

A glass bowl filled with pancake batter ingredients.
Italian pancake batter in a glass bowl.

While the oven preheats, mix all your ingredients together in a medium sized bowl.

Add the butter to the pan and allow to melt in the preheated oven.

Once the butter has melted, carefully pour the batter into the pan and bake for 20 to 22 minutes.

Oven baked Italian crespella in a skillet.

The crêpe will puff up prettily as it bakes and very impressively I might add. Much like a dutch baby pancake.

But once it’s removed from the oven it quickly deflates, creating a crevice to hold all the fresh juicy berries.

I find it has such a rustic appeal all on its own. However, once dusted with powdered sugar…then filled with berries…and topped with a drizzle of warm Nutella…it’s elegant enough for special company!

Creseplla with Nutella

Nutella Drizzle for Crêpes

Warm the Nutella by heating it up in the microwave in 15 second intervals, until you achieve a drizzling consistency.

Alternately you can also thin it out by stirring some milk into it. Try it with a teaspoon at a time until you get a drizzling consistency.

I would not use almond milk as it has a high water content and might seize the chocolate.

A white plate with a slice of Italian crespella pancake.

You can serve this Italian crespella for breakfast, brunch or for just about anytime you need a quick and fuss free dessert!

Happy Baking!

More berry goodness recipes:

  • Strawberry Rhubarb Jam
  • Mini Strawberry Grapefruit Cheesecakes

This recipe was originally published July 15, 2015 and republished June 3, 2020 with updated content and photos.

Oven baked crespella with Nutella topped with fresh berries.
Print Recipe
0 from 0 votes

Crespella with Nutella and Berries

Crespella with Nutella, a thin Italian pancake similar to french crêpes and topped with fresh strawberries, raspberries and blackberries.
Prep Time15 mins
Cook Time22 mins
Course: Breakfast
Cuisine: Italian
Keyword: crêpes, Crespella with Nutella, dutch baby pancake, Italian crespella recipe, Italian pancake
Servings: 4
Calories: 428kcal
Author: Marisa

Equipment

  • 12 inch oven proof skillet

Ingredients

  • 3/4 all purpose flour
  • 2 large eggs
  • 3 tablespoons granulated sugar
  • 1 ounce Grand Marnier liquor or brandy
  • 1/2 tsp salt
  • 1 1/4 cups milk
  • 2 tablespoons unsalted butter
  • 2 cups of fresh berries strawberries, raspberries and blackberries
  • powdered sugar for dusting
  • 1/2 cup nutella heated for drizzling (see notes below)

Instructions

  • Place a 12 inch ovenproof pan in the middle of the oven and preheat oven to 450*F.
  • In a medium sized bowl, combine the flour, eggs, sugar, vanilla extract, salt, milk and whisk all ingredients together.
  • When the oven reaches 450*F add the butter to your pan and heat in the oven till the butter turns golden, for about 1 minute.
  • Pour the batter into the pan and bake for about 20 to 25 minutes. The crespella will puff up and look golden brown when ready.
  • When ready place the pan on a rack and let the crespella cool for about 5 minutes. It will quickly start to sink (and that is ok).
  • Dust with powdered sugar, place the mixed berries over the crespella and drizzle with the warm Nutella.

Notes

Warm the Nutella by heating it up in the microwave in 15 second intervals, until you achieve a drizzling consistency.
If you wish you can also thin it out by stirring some milk or cream into it. Try it with a teaspoon at a time until you get a drizzling consistency.
I would not use almond milk as it has a high water content and might seize the chocolate.

Nutrition

Calories: 428kcal | Carbohydrates: 48g | Protein: 8g | Fat: 22g | Saturated Fat: 16g | Cholesterol: 105mg | Sodium: 372mg | Potassium: 325mg | Fiber: 4g | Sugar: 42g | Vitamin A: 453IU | Vitamin C: 2mg | Calcium: 145mg | Iron: 2mg

Filed Under: Breakfast, Dessert Tagged With: breakfast, brunch, crespelle, dessert, nutella, pancakes, Quebec strawberries

Parmesan Crusted Potatoes with Asparagus

April 18, 2020 by Marisa 38 Comments

Parmesan Crusted Potatoes with Asparagus

Parmesan crusted potatoes with asparagus is a simple and delicious one pan side dish. It features just a few ingredients and can be prepared on any busy weeknight. 

Parmesan Crusted Potatoes with Asparagus

My family is a huge potato lover!

Growing up, my mom was never able to prepare enough potatoes to satisfy everyone at family gatherings!

We would often find ourselves wrestling each other at the diner table for her oven roasted potatoes. 

So naturally I began to prepare oven roasted potatoes by making sheet pans loaded with our favourite buds. And I usually combine them with some other yummy veggie such as my Oven Roasted Potatoes and Fennel recipe.

I used a delicious combination of red and yellow little creamer potatoes, this time around. They’re thin skinned, buttery and nutritious and also pair so well with the fresh asparagus.

Although I can make an entire meal out of crispy potatoes, I find that roasted alongside some vibrant green asparagus makes for one remarkable side dish!

You can serve them alongside steak, chicken or even fish.

Or, go vegetarian by topping the roasted vegetables with a fried egg. Yummy!

Bright green asparagus stalks on a cloth kitchen napkin.

How To Trim Asparagus

There is no rocket science behind trimming asparagus stalks. And, you probably know this already if you’re a seasoned cook.

However if you’re new to this, it’s really a simple process. All you do is bend the woodsy end of the asparagus spear and it naturally snaps off at its driest point.

You’re left with perfectly tender and juicy asparagus spears ready to be used in your favourite recipe.

Red and golden baby creamer potatoes in a basket.

Creamer Potatoes

Creamer potatoes are small thin skinned, bite-size baby potatoes anywhere from 1 to 2 inches in size.

They’re buttery in taste with a creamy-like texture making them a cinch to prepare.

I used the red and yellow coloured creamer potatoes for this recipe. However, you can also add the blue coloured ones, should you come across any!

Sliced red and golden potatoes on a baking sheet.

How to Roast Asparagus and Potatoes in the Oven

Start by lining a baking sheet with parchment paper.

This ensures that the potatoes don’t stick to the pan and it’s easy clean up!

Toss the potatoes with olive oil, salt and pepper.

Spread them out in a single layer, giving them room to brown and bake for about 20 minutes.

Chopped baby potatoes with asparagus topped with parmesan cheese.

After the initial first 20 minutes, remove the pan from the oven and flip the potatoes over.

Toss the asparagus with olive oil, salt and pepper and nestle them between the potatoes in a single layer.

You’ll then return the sheet pan to the oven and bake an additional 15 minutes more.

Roasted baby potatoes and asparagus on a baking sheet.

When the asparagus are almost tender, sprinkle the veggies with the grated Parmesan cheese and bake an additional 5 minutes.

The cheese will melt and develop a wonderful golden brown crust over the vegetables which will impart another layer of goodness to the veggies. It’ll render them so irresistible!

It’s that simple! And that delicious!

Oven roasted baby potatoes with asparagus

If you make this recipe remember to tag @marisasitaliankitchen on Instagram so I can see your creation!

Freshly roasted asparagus and potatoes on a cutting board.

This recipe for Parmesan Crusted Potatoes with Asparagus was originally published on April 22, 2016, and updated with new content and photos on April 18, 2020.

Parmesan Crusted Potatoes with Asparagus
Print Recipe
0 from 0 votes

Parmesan Crusted Potatoes with Asparagus

These Parmesan crusted potatoes are a healthy and delicious combination of red, yellow and blue Grelot potatoes. The vegetables are oven roasted to a golden brown perfection.
Course: Vegetable
Cuisine: Vegetarian
Keyword: Parmesan Crusted Potatoes with Asparagus
Servings: 4
Author: Marisa

Ingredients

  • 1 1/2 pounds small baby potatoes sliced in half
  • 1/2 pound asparagus tips trimmed
  • 2 tablespoons plus 1 tablespoon of olive oil
  • salt to taste
  • pepper to taste
  • 1/4 cup grated Parmesan cheese

Instructions

  • Preheat oven to 400 degrees F.
  • Line a baking sheet with parchment paper.
  • In a medium sized bowl, toss the potatoes with 2 tablespoons of olive oil, salt and pepper.
  • Spread on the prepared baking sheet, in a single layer.
  • Bake in preheated oven for 20 minutes.
  • Using the same bowl, toss the asparagus with 1 tablespoon of olive oil, salt and pepper.
  • Remove the pan with potatoes from the oven and flip the potatoes over.
  • Add the asparagus to the pan and bake along side the potatoes for 15 minutes.
  • Sprinkle with the grated cheese and bake for an additional 5 minutes or until the cheese is golden in spots.


Filed Under: Salads & Side Dishes, Vegetable, Vegetarian Tagged With: asparagus, brunch, lunch, olive oil, parmesan cheese, potato, roasting, supper, vegetable, vegetarian

Roasted Tomato Focaccia with Ricotta

August 24, 2018 by Marisa 17 Comments

Roasted tomato focaccia with ricotta

This Herbed Ricotta and Roasted Tomato Focaccia makes a truly satisfying lunch with a side salad. It can also be enjoyed as a delicious appetizer before your main meal.

Four balls of focaccia dough on a pizza plate


I’ve been loving lately these wonderfully sweet cherry tomatoes made even more so by oven roasting them till they’re slightly charred and pop open. The roasted tomatoes ooze out the most sweetest concentrated juices with their wonderful aromas permeating the air.

There are so many ways to use these roasted jewels as some of my Instagram friends can attest! You can snack on them as they are with some crusty Italian bread or tossed with your favourite pasta.

Some suggested slow roasting the tomatoes, storing them in jars filled with oil and kept in the refrigerator up to a month.

Usually, I simply top the roasted cheery tomatoes over ciabatta bread which makes a crowd pleasing appetizer. As seen with this Roasted Cherry Tomato Ricotta Bruschetta.

Oven roasted cherry tomatoes


I’ve decided to switch it up today by baking some fresh focaccia bread which is essentially a flatbread and not difficult to put together.

The flatbread with its soft, airy textures and crusty outer layers is then slathered with a a creamy herbed ricotta mixture. I must say its truly mouthwatering on its own but we’re going for the “swoon factor” here!

What better way to do so then topping the flatbread with some juicy oven roasted cherry tomatoes! Oozing out all their caramelized goodness and ready to be sopped up…yummy!

Oven baked focaccia topped with herbs


You can enjoy the flatbreads with a side salad and call it a meal. We especially love them sliced into wedges and served as appetizers.

Focaccia topped with ricotta and roasted cherry tomatoes


You can also make and bake the flatbreads ahead and freeze them till ready to use. This way you’ll have a yummy flatbread to enjoy at a moments notice!

Roasted tomato focaccia with ricotta


Buon Appetito!

Roasted tomato focaccia with ricotta
Print Recipe
0 from 0 votes

Herbed Ricotta and Roasted Tomato Focaccia

Soft and airy focaccia bread with crusty outer layers, slathered with a a creamy herbed ricotta mixture and topped with oven roasted cherry tomatoes.
Course: Appetizer, Main Course, Snack
Cuisine: Italian
Keyword: focaccia with oven roasted tomatoes and ricotta
Servings: 6

Ingredients

Focaccia Dough

  • 2 cups water
  • 4 + 4 tablespoons extra virgin olive oil
  • 4 to 5 cups all purpose flour
  • 8 grams quick rise instant yeast
  • 1 teaspoon fine sea salt
  • 2 tablespoons granulated sugar
  • 4 garlic cloves minced
  • 2 tablespoons fresh oregano

Oven Roasted Tomatoes

  • 800 grams cherry tomatoes
  • 6 cloves garlic smashed
  • 4 springs oregano fresh
  • sprinkle salt and ground black pepper to your taste
  • olive oil for drizzling

Herbed Ricotta

  • 600 grams ricotta
  • 2 tablespoons oregano fresh
  • 2 tablespoons thyme fresh
  • sprinkle of salt and pepper to your taste

Instructions

Focaccia Dough

  • Heat 2 cups of water with 4 tablespoons of olive oil in the microwave until lukewarm.
  • In a large bowl combine 3 cups of flour, yeast, salt, sugar and stir well.
  • Stir the warm liquids into the flour mixture with a wooden spoon, mixing well.
  • Stir in another cup of flour until combined.
  • Transfer the dough to a well floured work surface and knead for a few minutes while working in the remaining cup of flour a bit at a time, just until the dough is soft and smooth.
  • Grease a large bowl with oil and place your pizza dough in the greased bowl while turning the dough over to grease all over.
  • Cover the bowl with a dish towel and set aside to rise for 60 minutes or until doubled in size.
  • Line 2 baking sheets with parchment paper and brush lightly with olive oil
  • Once the dough has doubled in size, transfer to a floured work surface and divide into 4 equal portions.
  • Transfer the portions to the prepared baking sheets, placing 2 on each sheet allowing enough space between the 2 portions.
  • Using your hands, push the dough towards the edges of the baking sheet while shaping it roughly to a 6x8 rectangle.
  • Cover with a clean dishcloth and allow to rest for 30 minutes.
  • Preheat oven to 400 degrees F.
  • Uncover the focaccia dough and using your fingers press down to form indentations.
  • Stir together 4 tablespoons of olive oil with the minced garlic, oregano and brush over the surface of the focaccia.
  • Bake for 20 to 25 minutes or until golden brown.

Oven Roasted Tomatoes

  • Place the cherry tomatoes on a parchment lined baking sheet.
  • Scatter with the smashed garlic, tuck in the sprigs of oregano, a sprinkle of salt and pepper and drizzle with some olive oil.
  • Roast in preheated oven at 400 degrees F for about 30 minutes to 35 minutes.

Herbed Ricotta

  • Combine the ricotta, oregano, thyme wth salt and pepper in a bowl and stir well.

Assembling The Herbed Ricotta and Roasted Tomato Focaccia

  • Slather the herbed ricotta mixture over the baked focaccia with equal portions.
  • Equally top with the oven roasted tomatoes.
  • Garnish with extra oregano, a drizzle of extra virgin olive oil.
  • Slice, serve and enjoy!

Filed Under: Appetizers, Bread Focaccia Pizza, Focaccia, Snack Tagged With: appetizer, brunch, flatbread, Focaccia, lunch, ricotta, roasted tomato, supper

Banana Oatmeal Chocolate Chip Muffins

July 9, 2016 by Marisa 41 Comments

banana-oatmeal-chocolate-chip-muffins

banana-oatmeal-chocolate-chip-muffins

No matter what season we are in or what day of the week it is, these banana oatmeal chocolate chip muffins are always a welcome treat. I know, a mouthful right! I did not want to leave any of these yummy key ingredients out. In my opinion they all shine in this recipe, like a well played orchestra! Pairing them all together truly has them singing in harmony.

There is no baking challenge required here and you will find them quite easy to make. With just a few simple steps and with ingredients we usually have on hand, you’ll be well on your way to making these deliciously moist and cake-like muffins for your family.

chocolate oatmeal banana muffins

Consequently, my family simply adores bananas! We literally go through about 2 dozen bananas a week. I kid you not!

Overly ripe bananas, with brown speckled skin, are simply the best for baking so be sure to use really ripe ones as they yield a more intense banana flavor. Whenever I have to many over ripe bananas, I like to freeze them, skin intact, in a resealable freezer bag ready for whenever the baking bug hits. Which is quite often in my case!

banana-oatmeal-chocolate-chip-muffins

I used my mini processor to grind my rolled oats till fine. You can however use them whole for a chewier texture.

banana-oatmeal-chocolate-chip-muffins

Initially, I wanted to use chocolate chunks, however after testing the recipe a few times I settled on mini chocolate chips for an even distribution of chocolate. The heavier chocolate chunks tended to settle mostly at the bottom of the muffin. I did however top the muffins with the bigger chocolate chunks, just before baking to give them a little extra love!

banana-oatmeal-chocolate-chip-muffins

It bears mentioning that sour cream really does lend some extra moistness to these muffins, however, it is interchangeable with plain yogurt and also buttermilk for some extra tang!

chocolate oatmeal banana muffins

Also noteworthy is this really wonderful streusal topping which I slightly tweaked from an older post of Raspberry Crumb Muffins. I added rolled oats for an extra crumbly texture and substituted golden brown sugar for the granulated sugar. It worked out beautifully. And, as an added bonus, this streusal topping can be made in advance and chilled till ready to use. Any leftover topping can be refrigerated for a couple of weeks.

banana-oatmeal-chocolate-chip-muffin

Enjoy these banana oatmeal chocolate chip muffins for breakfast, brunch, potlucks or for just about anytime of the week! I am sure they will soon become a family favorite!

banana-oatmeal-chocolate-chip-muffins
Print Recipe
5 from 1 vote

Banana Oatmeal Chocolate Chip Muffins

Deliciously moist banana oatmeal chocolate chip muffin with a crumbly streusel topping.
Prep Time30 mins
Cook Time25 mins
Course: Muffin
Cuisine: American
Keyword: Banana Muffins, Chocolate Chip muffins, Oatmeal muffins
Servings: 12
Calories: 357kcal
Author: Marisa

Ingredients

  • CRUMB TOPPING MIX
  • 1/3 cup flaked rolled oats
  • 1/2 cup all-purpose flour
  • 1/2 cup golden brown sugar
  • 4 tablespoons unsalted butter
  • MUFFINS
  • 4 tablespoons unsalted butter softened
  • 1/2 cup sugar
  • 1 teaspoon vanilla extract
  • 1 cup all-purpose flour
  • 3/4 cup ground oat flakes
  • 1 teaspoon baking powder
  • 1/2 teaspoon baking soda
  • 1 large egg
  • 1/2 cup sour cream
  • 3/4 cup semi-sweet mini chocolate chips
  • 3 ripe bananas peeled and mashed

Instructions

  • Streusel Crumb Topping
  • Place all ingredients for the streusel topping in a small bowl. Use your hands to work the dry ingredients with the butter till they resemble crumb like morsels.
  • Chill till ready to use.
  • Muffins
  • Preheat the oven to 350 degrees F.
  • In a medium size bowl, whisk together the all purpose flour, ground oats, baking powder and the baking soda and set aside.
  • Grease a 12 cup muffin pan or line with paper muffin cups.
  • In a large bowl, cream together the butter, sugar and the vanilla.
  • Mix in the egg until combined.
  • Mix in 1/4 cup of sour cream and half the flour mixture.
  • Repeat with the remaining sour cream and then the remaining flour.
  • Fold in the mini chocolate chips and the mashed bananas.
  • Divide the batter equally among the 12 muffin cups. ( I used an ice cream scoop)
  • Top each muffin with a heaping tablespoon of the prepared crumb mixture.
  • Bake for 25 minutes to 30 minutes, or just until a toothpick inserted in the middle comes out clean.
  • If you are not using the paper liners be sure to let the muffins cool for about10 minutes before releasing them from the pan.

Nutrition

Calories: 357kcal | Carbohydrates: 50g | Protein: 5g | Fat: 16g | Saturated Fat: 9g | Cholesterol: 40mg | Sodium: 65mg | Potassium: 294mg | Fiber: 3g | Sugar: 27g | Vitamin A: 339IU | Vitamin C: 3mg | Calcium: 53mg | Iron: 2mg


Filed Under: Dessert, Muffins Tagged With: banana, breakfast, brunch, chocolate chip, muffins, oat, snack

Next Page »

Primary Sidebar

A Little About Me

blankHi I'm Marisa! Welcome to my little corner of the web where you'll find delicious foods inspired by my Italian heritage and Canadian upbringing. So kick off your shoes, have a seat and stay awhile... Read More…

Search In My Kitchen

Copyright © 2021 · Foodie Pro & The Genesis Framework