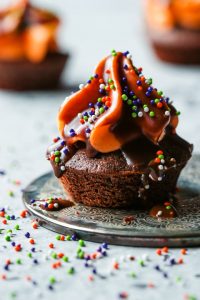
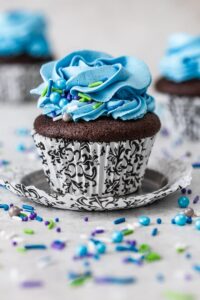
• Skip to primary navigation
  • Skip to main content
  • Skip to primary sidebar

Marisa's Italian Kitchen

The Secret Ingredient Is Always Love

  • Home
  • About
  • Recipes
  • Contact
  • Privacy Policy

cupcakes

Mini Brownie Bites with Cream Cheese Frosting

October 29, 2020 by Marisa 46 Comments

Mini Brownie Bites with Cream Cheese Frosting

These Mini Brownie Bites with Cream Cheese Frosting are a two bite marvel and an absolute delicious treat for Halloween. The swirl of orange tinted cream cheese frosting is dipped in a chocolate glaze and topped with sprinkles.

Mini Brownie Bites with Cream Cheese Frosting

When it comes to Halloween baking, I’m not really much into the creepy, spooky or ghoulish treats. I’m more into something that has the cutesy factor.

These adorable mini brownie bites sure do and some! They’re rich, chocolaty and dense in texture without being overly sweet.

If you are fairly new to baking, you will find them delightfully easy to make. And if piping the frosting seems somewhat intimidating to you, simply give it a try by practicing first.

Set a cookie sheet lined with parchment paper on a counter. Fit any piping tip of your choice into a pastry bag and fill the bag with frosting.

Start piping directly onto your parchment lined cookie sheet. Then simply scrape off the frosting back into the pastry bag and you’re good to go. Easy right!

The brownie recipe comes from one of my favourite magazines, Better Homes and Garden.

I tweaked it somewhat, simply for personal taste, by using a luscious cream cheese frosting.

Then, I tinted the frosting with orange icing colour and switched it up to give it a Halloween flare. I just adore the chocolate and cream cheese combination!

You’ll need 3, 12 hole mini muffin pans to make this recipe. It’s a worthy investment as this recipe is one you’ll be making over and over again.

It’s super easy to make and totally fun! You can also adapt this recipe to suit any occasion of your choice!

How to make mini brownie bites 

Silver mixing bowl filled with flour and cocoa powder on a black tray.

  • Place the flour and cocoa powder in a small mixing bowl.
  • Stir together and set aside while you beat the sugar with the eggs.

A glass mixing bowl filled with beaten eggs and sugar on a black tray.

  • In a separate medium sized mixing bowl, add in the sugar and eggs.
  • Beat with an electric mixer on medium speed until thick and pale yellow in colour, about 2 minutes.

A glass bowl filled with brownie batter on a black tray.

  • Mix in the flour and cocoa mixture, just until smooth.
  • Add in 1/2 cup of melted butter and stir with a wooden spoon until thoroughly combined.

Mini baking tins filled with brownie batter.

  • Divide the batter evenly among the prepared mini muffin tins. I used a 1 and a half inch cookie scoop but you can just as easily use teaspoons to measure out the batter.
  • Bake in a preheated oven at 350 degrees F, for about 10 to 12 minutes.
  • Test for doneness by inserting a wooden skewer in the middle. If it comes out clean, then the brownies are ready.

Freshly baked mini brownies in grey baking tins.

  • Place the brownies on a cooling rack.
  • Allow the brownies to cool in the tins for about 5 minutes before gently releasing them.
  • Once removed from the baking tins, transfer them back to the rack to cool completely before frosting.

Oven baked chocolate mini brownies cooling on a baking rack.

How to make coloured cream cheese frosting

To make the frosting you’ll need:

  • cream cheese
  • butter
  • powdered sugar
  • vanilla extract
  • Orange icing colour

Combine the cream cheese, butter, icing sugar and vanilla in a medium bowl and beat until combined.

Alternately, you can also use a food processor to mix the frosting ingredients together.

Tint the icing with orange icing colour. Colouring for frostings are sold in a gel form. Don’t use the liquid colourings as those are for cake batters.

A little goes a long way so start with a little bit at a time or, until you get the desired colour. I used approximately 1/8 of a teaspoon.

Use a large pastry bag fitted with a star tip to pipe the frosting onto each brownie. (I used the 1M tip from Wilton, not sponsored).

You’ll need to refrigerate the frosted brownies for 30 minutes. This will set the frosting and makes it easier to dip into the chocolate glaze which also helps set the glaze.

Chocolate mini brownie bites topped with cream cheese frosting.

How to make chocolate dipping glaze

For the chocolate glaze, place 1/4 cup of cubed butter, 2 ounces of semi-sweet chocolate in a small sauce pot over low heat and stir until melted and smooth.

Then simply remove it from the heat and stir in the corn syrup.

Set it aside and let it cool for about 10 minutes.

Once cooled dip the top of each brownie, about 3 quarters in, into the chocolate glaze.

Sprinkle the mini brownies with nonpareils and refrigerate till the chocolate is set, for about 15 minutes.

Mini brownie bites topped with cream cheese and multi coloured sprinkles.

These mini brownie bites with cream cheese frosting store very well in an airtight container, refrigerated for up to 5 days.

They’re adorable, fun and oh so yummy!

Happy Baking!

Other Halloween treats you’ll love:

Ossi Di Morto Bones of the Dead

Chocolate Popcorn Halloween Cupcakes

This post was originally published Oct 29 2015 and republished Oct 29, 2020 with updated photos and content.

Mini Brownie Bites with Cream Cheese Frosting
Print Recipe
5 from 1 vote

Mini Brownie Bites with Cream Cheese Frosting

These mini chocolate brownies topped with orange tinted cream cheese and dipped in melted chocolate are a delicious two bite marvel. They make a perfect Halloween treat topped with festive sprinkles.
Prep Time30 mins
Cook Time12 mins
Course: Dessert
Cuisine: American
Keyword: Mini Brownie Bites with Cream Cheese Frosting
Servings: 36 Mini Brownies
Calories: 150kcal

Equipment

  • Mini muffin tins

Ingredients

CHOCOLATE BROWNIES

  • 2/3 cup all purpose flour
  • 1/2 cup unsweetened dutch processed cocoa powder
  • 2 large eggs
  • 1 cup granulated sugar
  • 1/2 cup butter melted

CREAM CHEESE FROSTING

  • 125 grams cream cheese
  • 1/2 cup cold butter
  • 2½ cups powdered sugar
  • 2 teaspoons pure vanilla extract
  • ⅛ teaspoon orange icing colour (optional) I used Wilton's gel colour

CHOCOLATE GLAZE

  • 1/4 cup butter cubbed
  • 2 ounces semi-sweet chocolate
  • 4 teaspoons corn syrup light coloured
  • Halloween sprinkles optional

Instructions

MINI BROWNIES

  • Preheat ove to 350 degrees F.
  • Grease mini muffin pans or line with mini paper cups.
  • Place the flour and cocoa powder in a small bowl, stir and set aside.
  • Beat the sugar and eggs together in a large mixing bowl with an electric mixer on medium speed for 2 minutes or until thick and pale yellow in colour.
  • Beat in the flour mixture just until smooth.
  • Add in 1/2 cup of melted butter and stir until combined.
  • Divide the batter evenly among the prepared muffin tins.
  • Bake for about 10 to 12 minutes or when a toothpick inserted in the middle comes out clean.
  • Let the brownies cool in the pan for about 5 minutes then carefully remove the brownies from the baking pan and transfer on a wire rack to cool completely.

CREAM CHEESE FROSTING

  • Combine all the frosting ingredients in a medium bowl and beat until well combined.
  • Tint the frosting with the orange icing colour. A little goes a long way so start with a little bit at a time and stir till you get the desired shade of orange. I barley used 1/8 of a teaspoon.
  • Use a large pastry bag fitted with a star tip to pipe the frosting onto each brownie. I use the 1M tip from Wilton.
  • Refrigerate the frosted brownies for 30 minutes. This will set the frosting making it much easier to dip in the chocolate.

ChOCOLATE GLAZE

  • Place 1/4 cup of cubed butter and 2 ounces of semi-sweet chocolate in a small sauce pot.
  • On low heat, stir until the butter is melted and the chocolate mixture is smooth.
  • Remove the mixture from the heat and stir in the corn syrup.
  • Ste the glaze aside to cool for about 10 minutes.
  • Once cooled, dip the top of each brownie into the chocolate glaze.
  • Top with the Halloween sprinkles and refrigerate until the chocolate sets. For about 15 minutes before serving.

Notes

These mini brownie bites with cream cheese frosting store very well in an airtight container, refrigerated for up to 5 days.

Nutrition

Calories: 150kcal | Carbohydrates: 18g | Protein: 1g | Fat: 9g | Saturated Fat: 4g | Cholesterol: 24mg | Sodium: 80mg | Potassium: 40mg | Fiber: 1g | Sugar: 15g | Vitamin A: 293IU | Calcium: 10mg | Iron: 1mg


Filed Under: Brownies, Dessert, Halloween Tagged With: Baking, brownies, chocolate, cream cheese, cupcakes, dessert, halloween, sprinkles

Vegan Chocolate Cupcakes

February 16, 2017 by Marisa 25 Comments

Vegan Chocolate Cupcakes

These Vegan Chocolate Cupcakes are amazingly moist, fluffy and ever so light in taste! And, simply because one can never have too much chocolate I’ve topped them with a dollop of dark chocolate glaze.

blank

Every once in awhile my daughter brainstorms and decides to go on a 30 day vegan challenge which this year happened to coincide with her birthday. Don’t get me wrong, personally I have nothing against veganism! Its simply that this fairly last minute announcement had me dashing all over town one Sunday afternoon trying to find a vegan cake and to no avail!

Most bakeries I had visited offered gluten free alternatives but alas no vegan cake or cupcakes!

Thankfully my resolve had not ended there and once at home I turned to the almighty Google in search of a not to complicated vegan chocolate cake.

blank

When I came across these Fail Proof Vegan Chocolate Cupcakes by Angela at Oh She Glows, I knew I had stumbled across the perfect birthday treat.

I made a few switch ups simply to compensate for ingredients that I didn’t have on hand. I decided to keep my almond milk for my morning cup of coffee and substituted it with canned coconut milk instead. Also I replaced the grapeseed oil with canola oil.

Angela from “Oh She Glows” topped her vegan cupcakes with a salted buttercream made with vegan butter, which sounds absolutely delicious and I’ll definitely be looking into vegan butter soon! In the meantime, this simple chocolate glaze poured over the vegan chocolate cupcakes is too irresistible to pass up!

Vegan Chocolate Cupcakes

In fact they are so irresistible that I simply had to make them again for Valentine’s Day and topped them with sprinkle hearts to mark the occasion!

Vegan Chocolate Cupcakes

Weather you’re vegan or not you”ll find these cupcakes so easy to put together, incredibly delicious and will disappear so quickly.

No one will ever guess they’re vegan ๐Ÿ™‚

Vegan Chocolate Cupcakes

Unless you tell them of course ๐Ÿ™‚

Vegan Chocolate Cupcakes
Print Recipe
0 from 0 votes

Vegan Chocolate Cupcakes

These Vegan Chocolate Cupcakes are amazingly moist, light and topped with a delicious drizzle of silky chocolaty glaze.
Course: Vegan
Servings: 12 cupcakes
Author: Marisa

Ingredients

  • FOR THE CUPCAKES
  • 1 cup canned coconut milk well stirred then measured out
  • 1 cup pure cane sugar I used Redpath sugar
  • 1/3 cup canola oil
  • 3 teaspoons apple cider vinegar
  • 1 tablespoon pure vanilla extract
  • 1 1/2 cups all purpose flour
  • 1/3 cup unsweetened baking cocoa powder
  • 1 teaspoon baking soda
  • 3/4 teaspoon fine sea salt
  • FOR THE CHOCOLATE GLAZE
  • 1 cup of icing sugar
  • 2 tablespoons unsweetened cocoa powder
  • 1 1/2 teaspoons of light corn syrup
  • 2 to 3 tablespoons of almond milk depending on how thin you want the glaze
  • sprinkles optional

Instructions

  • Preheat the oven to 350 degrees F.
  • Line a 12 cup, cupcake pan with cupcake liners.
  • In a large mixing bowl, beat together the coconut milk, sugar, oil, vinegar and vanilla until combined.
  • In another bowl, whisk together the the flour, cocoa powder, baking soda, and the salt just until there are no more clumps.
  • Slowly beat in the flour mixture in with the wet ingredients just until smooth and you no longer see any bits of flour.
  • Spoon the batter evenly into the 12 cupcake liners, filling just about two-thirds full.
  • Bake in the preheated oven for about 20 to 24 minutes. (Mine were ready in 22 mins.)
  • When ready the cupcakes should spring back easily when gently pressed down or when a toothpick inserted in the middle comes out clean.
  • Let the cupcakes cool completely before glazing.
  • FOR THE CHOCOLATE GLAZE
  • In a medium sized bowl, whisk together the icing sugar, cocoa powder, corn syrup and almond milk until smooth. (You can add extra almond milk depending on how thin you prefer the glaze).
  • Spoon a heaping teaspoon of chocolate glaze onto each cupcake.
  • Top with sprinkles of your choice.

Notes

Partially adapted from "Oh She Glows" website on her fail proof Vegan Chocolate Cupcakes with Salted Buttercream. (With a few switch-ups)


Filed Under: Cupcake, Dessert, Vegan Tagged With: chocolate, cupcakes, dessert, Vegan

Red Velvet Cupcakes

March 1, 2015 by Marisa 9 Comments

blank

IMG_1460

A colleague of mine started a new tradition at work. Rather than collecting money for a birthday cake on someone’s special day, the “birthday person” gets to bring a cake or treat. Since baking is right up my alley, it works just fine for me. The difficult part was in deciding what to bake! I have no qualms in baking my own cake, I have even ordered my own birthday cake on one occasion…but that’s another story!

I love Red Velvet Cake!!! Rather than baking a whole cake I decided on mini red velvet cupcakes topped with my favorite buttercream icing. It is my birthday after all! But enough about me. Let me say, these cupcakes were a hit! With a deep rich red color and tender texture…simply irresistible!!!

The addition of vinegar to the batter boosts the red coloring. I promise you won’t even know its’ there.

The recipe calls for 1 cup of buttermilk, but if your like me and almost never have it in the fridge, here is a simple substitution. Pour 1 tablespoon of white vinegar into a measuring cup and pour in enough milk to make 1 cup. Stir and let stand for about 10 minutes and use as buttermilk.

Cupcakes

  • 1 cup  buttermilk
  • 1 tsp   pure vanilla extract
  • 1/2 cup unsalted butter at room temperature
  • 1 1/2 cups granulated sugar
  • 1 tsp coarse salt
  • 2 large eggs, room temperature
  • 1/4 cup red food coloring
  • 2 tbls dutch processed unsweetened cocoa powder
  • 2 1/4 cups  cake flour, sifted
  • 1 tsp baking soda
  • 1 tbl  white wine vinegar

Preheat the oven to 350*F.

Place 26 small parchment baking cups, divided on 2 baking sheets. You can also use standard muffin pans, in this case you will need a 12 cup pan and a 6 cup pan sprayed with nonstick cooking spray or lined with cupcake liners.

For the cupcakes: In a small bowl combine the buttermilk, vanilla and set it aside.

In a large bowl mix the butter, sugar and the salt on medium-high speed just until it is light in color and looks creamy, about 2 to 3 minutes. If you are using a stand mixer you will need to scrape down the bowl about half way through. Beat in the eggs one at a time.

In another small bowl, combine the food coloring and the cocoa together, stir to form a paste. Beat the paste into the butter-sugar mix until combined.

Next, start adding the flour and the buttermilk mixture in tree batches by starting with the flour and ending with the flour. Let the batter stand for 15 minutes.

Stir together the baking soda and the vinegar in a small bowl. Let it stand until it starts to foam then fold into the batter. Divide the batter among the baking cups.

For best results, bake one pan at a time for about 18 to 23 minutes. Because I used smaller baking cups, I found 18 minutes was sufficient. If you are using standard baking cups you may need to bake them a little bit longer. Use the 18 to 23 minutes as a guide line. When the cupcakes spring back when gently touched, you’ll know they are ready. You can also insert a toothpick in the middle of the cupcake, if it comes out clean then it is ready. Cool completely before frosting.

IMG_1370

IMG_1394

Vanilla Buttercream Frosting:

4 cups    icing sugar, sifted (also known as confectioner’s sugar)

2/3 cup   unsalted butter at room temperature

1/4 cup   whole milk

1/4 tsp    pure vanilla extract

Beat the icing sugar and butter together on medium-low speed until well mixed.

In a small bowl, combine the milk and vanilla extract. Add it to the butter-sugar mixture a bit at a time, beating on low speed until incorporated. Then turn the mixer to high speed and continue beating until the frosting is light and fluffy for at least 5 minutes. The longer you beat the frosting, the lighter and fluffier it becomes.

Frost the cupcakes with the Vanilla buttercream using any technique you prefer. I used a pastry bag fitted with a large pastry tip, the 1M from Wilton to form the rosette on top.

Yields 18 standard cupcakes or 26 mini cupcakes.

IMG_1426

IMG_1409

The Cupcake recipe was adapted from The Sono Baking Company Cookbook.

Filed Under: Cakes, cupcakes, Dessert Tagged With: buttercream, cupcakes, moist, red velvet, vanilla

Primary Sidebar

A Little About Me

blankHi I'm Marisa! Welcome to my little corner of the web where you'll find delicious foods inspired by my Italian heritage and Canadian upbringing. So kick off your shoes, have a seat and stay awhile... Read Moreโ€ฆ

Search In My Kitchen

Copyright © 2021 · Foodie Pro & The Genesis Framework