• Skip to primary navigation
  • Skip to main content
  • Skip to primary sidebar

Marisa's Italian Kitchen

The Secret Ingredient Is Always Love

  • Home
  • About
  • Recipes
  • Contact
  • Privacy Policy

snack

Pumpkin Apple Streusel Muffins

October 10, 2019 by Marisa 32 Comments

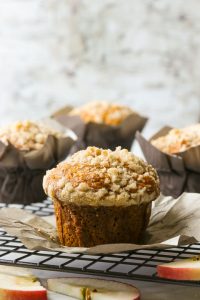
Freshly baked Pumpkin Apple Streusel Muffins

Your mornings have just gotten better with these moist and delectable Pumpkin Apple Streusel muffins. They’re made with coconut oil and partially sweetened with honey and crowned with a lovely cinnamon streusel topping.

Pumpkin Apple Streusel Muffins

This recipe came about after having extra pumpkin purée from a previous baking adventure. Usually I find myself freezing any of the leftover pumpkin purée for a later use.

However, with a fridge drawer bursting at the seams with juicy and crispy Lobo apples, these pumpkin apple streusel muffins were screaming to be baked.

I generally find that tart or tangy apples work best in baking as they balance off the sweetness of baked goods. But feel free to use any baking apple of your choice in this recipe.

Some rather excellent choices to consider are Cortland, Empire, McIntosh, and the Lobo apples just to name a few.

You’ll find these muffins pretty easy to make and a prefect recipe for beginners. Also, no special equipment is required!

All you’ll need are two mixing bowls. One for dry ingredients, the other for the wet ingredients and a light hand when stirring.

Oh! And one other small bowl for the streusel topping!

Streusel topping in a glass bowl.

Diced apples on a cutting board.


Steps for making Pumpkin Apple Muffins with streusel topping

  • Use a pastry blender to combine the streusel ingredients together or simply use your hands and work the ingredients together till they resemble coarse crumbs. Can be made ahead and refrigerated till ready to use.
  • Wash, peel and core the apples then chop into small pieces.
  • In a large bowl, stir together the dry ingredients
  • In a separate bowl, whisk together the wet ingredients with the pumpkin purée
  • Stir the wet ingredients into the flour mixture just until moistened
  • Stir in the diced apples
  • Spoon the muffin batter into the prepared muffin cups, filling up to 3/4 full
  • Sprinkle the streusel topping evenly over each muffin
  • For standard sized muffins bake for 20 to 25 minutes
  • For larger sized muffins, you’ll need an extra few minutes
Muffin batter in baking tins.

Streusel topping sprinkled over muffin batter.

Standard Baking Cups VS Parchment Lotus Cups

You can use your choice of preferred muffin liners.

Do note that if using the standard sized muffin liners then this recipe will yield 18 standard sized muffins.

However if you choose the pretty lotus shaped parchment liners, as seen in the photo above, then this recipe will yield 12 larger sized muffins.

The parchment lotus cups fit a standard cup muffin tin. And because of its deeper cup size you’ll be able to fill the cups a little higher with the pumpkin and apple batter and still have enough room for the streusel topping.

They’ll bake up beautifully just like large bakery style muffins!

Freshly baked Pumpkin Apple Streusel Muffins

Your kitchen will fill with the warm aromas of Fall spices and will have you cozying up next to a warm fireplace with a cup of tea in one hand and a pumpkin apple streusel muffin in the other.

So simple, easy and yet packed full of delicious flavours.

I dare you to eat just one!

A big apple and pumpkin muffin with streusel topping

Other Yummy Muffins You’ll Love:

  • Raspberry Crumb Muffins
  • Banana Oatmeal Chocolate Chip Muffins

Happy Baking!

Pumpkin Apple Streusel Muffins
Print Recipe
0 from 0 votes

Pumpkin Apple Streusel Muffins

These moist and delectable Pumpkin Apple Streusel muffins are made with coconut oil, partially sweetened with honey and topped with a lovely cinnamon streusel.
Course: Dessert
Cuisine: American
Servings: 18
Author: Marisa

Ingredients

  • 2 1/2 cups all purpose flour
  • 1 1/2 cups granulated sugar
  • 1 teaspoon baking powder
  • 1 teaspoon baking soda
  • 1 1/2 teaspoon ground cinnamon
  • 1/2 teaspoon ground nutmeg
  • 1/2 teaspoon ground ginger
  • 1/4 teaspoon ground cloves
  • 1/2 teaspoon salt
  • 2 large eggs
  • 1/2 cup honey
  • 5 tablespoons melted coconut oil (cooled)
  • 1 1/4 cup canned pumpkin purée
  • 2 cups peeled and diced apples about 2 medium apples
  • Streusel Topping
  • 1/4 cup all purpose flour
  • 1/4 cup granulated sugar
  • 1/4 teaspoon ground cinnamon
  • 2 tablespoons cold butter

Instructions

  • Preheat the oven to 350 degrees F.
  • FOR THE STREUSEL TOPPING
  • Combine the flour, sugar, cinnamon and butter together in a small bowl. Using your hands, work the ingredients together till they resemble coarse crumbs. Refrigerate till ready to use.
  • Grease 18 muffin cups or line with paper cups.
  • In a large bowl stir together the flour, sugar, baking powder, baking soda, cinnamon, nutmeg, ginger, cloves and salt.
  • In a separate bowl combine the 2 large eggs, honey, coconut oil, pumpkin purée and whisk well.
  • Stir the wet ingredients into the flour mixture just until all the ingredients are moistened.
  • Stir the apples into the batter mixture.
  • Spoon the muffin batter into the prepared muffin cups, filling up to 3/4 full.
  • Divide the streusal topping evenly over the muffins.
  • Bake on the middle rack of preheated oven for about 20 to 25 minutes or until the muffins are a golden brown and the tops spring back lightly to the touch.
  • You can also insert a wooden skewer in the middle to test if the muffins are done. If the skewer comes out clean then the muffins are ready.

Notes

Note that if using the standard sized muffin liners then this recipe will yield 18 standard sized muffins.
However if you choose the pretty lotus shaped parchment liners, as seen in photo above, then this recipe will yield 12 larger sized muffins.
The parchment lotus cups fit a standard cup muffin tin. And because of its deeper cup size you'll be able to fill the cups a little higher with the pumpkin and apple batter and still have enough room for the streusel topping.
 

This post was originally published Oct 18, 2016 and republished October 10, 2019 with updated content and photos.


Filed Under: Dessert, Muffins Tagged With: apple, breakfast, dessert, muffin, pumpkin, snack

Chickpea Red Onion Focaccia

January 26, 2019 by Marisa 14 Comments

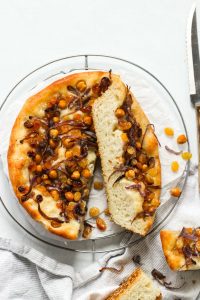
Baked focaccia topped with chickpeas, red onion and raisins.

A wonderfully soft and pillowy, Chickpea and Red Onion Focaccia topped with sweet golden raisins. This focaccia makes a delicious anytime snack or a complimentary side dish to a steaming bowl of soup.

Focaccia dough in a black cast iron skillet.

Straight out of the oven comfort foods such focaccia are always met with much anticipation at my house.

The allure of freshly made bread or rather focaccia, which is essentially a flatbread has a broad appeal to both adults and young ones.

I especially love how and with very few ingredients you truly get so much. All it takes is some flour, yeast and water. A few add ins for flavour such as salt, sugar and olive oil and you have something so easily achieved in your own kitchen.

Freshly baked focaccia bread in a skillet.

One other addition that bears mentioning here is mashed potatoes!

I can’t stress enough how the humble potato takes bread dough to a whole other level!

Surprisingly, it renders the dough so light, airy and fluffy. You immediately feel this as your kneading the dough. It’s like holding a pillowy soft cloud in your hands!

Well almost! And not that I know what a cloud feels like…but you get where I’m going with this!

Red onion and chickpea flatbread.

You can top focaccia with just about anything!

A favourite sweet version of mine is Schiacciata Con L’uva, a sweet tuscan flatbread with grapes. Its a lip smacking delicacy that I simply never get enough of when the best coronation grapes are in season!

However, this time of the year is a perfect time to make do with a few good old pantry ingredients.

Chickpea red onion focaccia

TOPPING FOR CHICKPEA RED ONION FOCACCIA

Adding raisins to savoury dishes was very common while growing up. Sweet plump raisins always made an appearance in calzone with greens such as my Swiss Chard Mozzarella Calzone.

To use raisins in this focaccia recipe, you’ll first want to plump them up by soaking them in hot water for about ten minutes. Then make sure to drain them, pat them dry and scatter over the focaccia before adding other toppings. This will ensure they don’t burn while nestled beneath the other toppings.

I adore caramelized onions and have often used them as a pizza topping. Take care to not cook them overmuch. You simply want them softened and translucent as they will continue to caramelize in the oven.

Sliced focaccia bread in a skillet.

Focaccia dough in a black cast iron skillet.

HOW TO PREP A PAN FOR FOCACCIA

I thought it would be a neat way to try focaccia in my cast iron pans.

I used 3, 8 inch round pans for this recipe but really any size pan will do. If all you have are rectangular rimmed baking sheets, those will work as well.

You can use one as large as 15 x 10, in which case it will yield one rectangular focaccia.

Which ever size you use, do grease your pans with oil and then sprinkle them with coarse cornmeal.

This will ensure crispy bottoms and edges and facilitates easy removal!

Enjoy as an appetizer or serve alongside your favourite salad or hot bowl of soup!

If you make this recipe remember to tag @marisasitaliankitchen on Instagram so I can see your creation!

Chickpea red onion focaccia
Print Recipe
0 from 0 votes

Chickpea Red Onion Focaccia

A wonderfully soft and pillowy, chickpea and red onion focaccia topped with sweet golden raisins. This focaccia makes a delicious anytime snack.
Prep Time40 mins
Cook Time30 mins
Total Time1 hr 10 mins
Course: Bread, Main Meal
Cuisine: Italian
Keyword: Flatbread, Focaccia, Tuscan flatbread
Servings: 6
Calories: 458kcal
Author: Marisa

Ingredients

FOCACCIA DOUGH

  • 2 teaspoons granulated sugar
  • 1 cup warm water
  • 1 8 gram pkg active dry yeast
  • 2 tablespoons extra virgin olive oil
  • 2 cups mashed potatoes cooled
  • 1 teaspoon fine sea salt
  • 3 1/2 cups all purpose flour approximately
  • 2 tablespoons coarse cornmeal

TOPPING

  • 1 medium red onion thinly sliced
  • 3/4 cup canned chickpeas drained, rinsed and patted dry
  • 1/2 cup golden raisins
  • sprinkle of coarse sea salt for topping

Instructions

FOCACCIA DOUGH

  • Place the sugar and warm water together in a large bowl and stir to dissolve. 
  • Sprinkle in the yeast and let this stand until frothy, for about 10 minutes.
  • Once it's frothy, stir in the 2 tablespoons of extra-virgin olive oil.
  • In a small bowl, mix the mashed potatoes with the salt. 
  • Stir the potato mixture into the yeast mixture until very well combined. (a whisk will actually work better here)
  • Gradually stir in the flour, approximately 2 1/2 to 3 cups until the dough pulls away from the sides of the bowl.
  • Transfer the dough to a well floured work surface.
  • With floured hands knead in as much of the remaining flour as needed, until the dough is smooth and has a slightly sticky feel. About 8 minutes.
  • Place the dough in a large greased bowl, turning to grease all over. 
  • Cover your dough with cling wrap and let it rise in a draft free space until it has doubled in size, for about 1 hour.
  • Grease 3, 8 inch cast iron skillets with oil and sprinkle with the coarse cornmeal.
  • Divide the focaccia dough into 3 equal portions and place into the prepared cast iron skillets.
  • Pat down the dough, stretching and pulling with your hands to reach the sides of the skillets
  • Cover the pans with greased cling wrap and and set aside to allow the dough to puff up to the rim of the pans for about 45 minutes to 60 minutes.
  • Meanwhile heat a tablespoon of olive oil in a medium sized frying pan.
  • Add the sliced red onions to the frying pan with a sprinkle of salt and pepper.
  • Cook over low heat while stirring occasionally, until the onions are soft and translucent, for about 5 minutes.
  • Remove from the heat and set aside to cool.
  • Meanwhile, place the raisins in a small bowl and cover with a little bit of hot water.
  • Allow to soak for about 10 minutes until the raisins plum up.
  • Drain the raisins and pat dry. Set aside.
  • Preheat the oven to 375 degrees F.
  • Remove the cling wrap from the risen dough.
  • Scatter first the raisins over the dough then top with the chickpeas, the sautéed onions and using your fingers gently press down into the dough while making indentations.
  • Drizzle the tops with a little olive oil. (about 1 teaspoon over each focaccia)
  • Bake in the preheated oven for about 25 to 30 minutes, until the edges are crusty and the focaccia is golden brown.
  • Sprinkle a pinch or 2 of coarse sea salt over each focaccia while still warm.
  • Allow to cool a little before slicing and serving.

Nutrition

Calories: 458kcal | Carbohydrates: 90g | Protein: 11g | Fat: 6g | Saturated Fat: 1g | Sodium: 471mg | Potassium: 455mg | Fiber: 5g | Sugar: 10g | Vitamin C: 18mg | Calcium: 34mg | Iron: 4mg

Filed Under: Bread Focaccia Pizza, Pizza, Soups Pasta Sauces Tagged With: appetizer, bread, chickpeas, flatbread, Focaccia, onion, raisins, snack, Tuscan flatbread

Schiacciata Con L’uva

September 14, 2018 by Marisa 49 Comments

Schiacciata Con L'uva

Schiacciata con l’uva is a sweet flatbread with grapes. More commonly known as focaccia, this flatbread is a seasonal dish made yearly during the grape harvest in Tuscany.

Schiacciata Con L'uva

This recipe was originally published in October of 2016 and republished September 14, 2018 with updated content and photos.

There is much to embrace with the arrival of Fall. As the days get cooler and the air turns crisp, I get this sudden urge to roll up my sleeves and delve into the magical world of bread making. Or any sort of baking for that matter and wanting only to come up for air well after the Christmas holidays. Is it just me or do any of you feel the same way?

A little about coronation grapes

This time of the year grocery stores and local farmer’s markets are laden with thin skinned, seedless coronation grapes. A rather regal name for these Ontario blue grapes is it not!

They are vibrant blue in colour much like their relative the concord grape and quite interchangeable when making schiacciata con l’uva. Also, they have a deliciously sweet taste that simply bursts in the mouth, making them a perfect choice for baking or even preserving.

The sweetness of the coronation grape pairs beautifully with the savoury rosemary. Once baked you’ll find they mimic the taste of grape jam on toast. Definitely a lip smacking and finger licking delicacy!

Schiacciata Con L'uva

This Tuscan flatbread consists of two layers of dough which are sandwiched together with a filling of seedless blue grapes, a sprinkle of sugar, chopped rosemary and a drizzle of good quality extra virgin olive oil and topped with more of the same filling.

Schiacciata Con L'uva

It’s then baked to a golden brown perfection with yummy crispy edges that we all love.

You can slice and enjoy as is while still warm with the grapes oozing their irresistible sweet juices. Or simply dust the tops with a sprinkle of icing sugar for some extra sweetness.

Schiacciata Con L'uva

Gather friends or family around your kitchen and bake some today! I’m sure it will become a new favourite seasonal recipe!

If you make this recipe remember to tag @marisasitaliankitchen on Instagram so I can see your creation!

Schiacciata Con L'uva
Print Recipe
0 from 0 votes

Schiacciata Con L'uva

Schiacciata con l'uva is a sweet flatbread with grapes, a seasonal dish that is traditionally made during the grape harvest in Tuscany.
Course: Tuscan Flatbread
Cuisine: Italian
Servings: 24 pieces
Author: Marisa

Ingredients

  • Focaccia dough
  • 2 cups water
  • 4 tbs olive oil
  • 4 to 5 cups of all purpose flour
  • 2 tbs sugar
  • 1 tsp kosher salt
  • 1 packet “quick rise” instant yeast Fleischmann’s 8 grams
  • Topping
  • 2 cups grapes picked off the stem
  • 2 teaspoons chopped fresh rosemary
  • 2 tablespoons granulated sugar
  • extra virgin olive oil for drizzling

Instructions

  • Heat 2 cups of water with 4 tablespoons of olive oil in the microwave for 60 to 90 seconds or till lukewarm.
  • Stir the warm liquids in the flour mixture with a wooden spoon, mixing well.
  • Stir in another cup of flour till combined.
  • Invert the dough onto a well floured counter and knead for a few minutes, working in the last cup of flour a bit at a time just until the dough is soft and smooth. (I only used up to 1/2 cup of the remaining flour).
  • Grease a large bowl with some olive oil. Place your pizza dough in the greased bowl turning the dough to grease all over. Cover with saran wrap.
  • Let it rise till it doubles in size for about 1 1/2 to 2 hours, in a draft free place. (on a sunny day I place my bowl in direct sunlight and this helps tremendously with the rising).
  • When your dough has doubled in size, transfer it onto a floured work space.
  • Grease a 17x11 rimmed baking sheet (or any large baking sheet you have) with some olive oil and then lightly sprinkle evenly with cornmeal. This will prevent the dough from sticking to the pan and impart a lovely crunch.
  • Cut the dough in half and working with one piece at a time roll it out to the size of your pan. (its ok if it does not entirely reach the edges).
  • Place the first layer of rolled out dough on your prepared pan.
  • Layer 1 cup of the grapes, evenly spread, onto the dough while pressing them slightly into the dough.
  • Sprinkle 1 tablespoon of sugar and 1 teaspoon of chopped rosemary, evenly onto the first layer of dough. Drizzle with some extra virgin olive oil.
  • Roll out the second piece of dough and layer it onto prepared first layer. Press down slightly and pinch the edges together.
  • Spread the remaining grapes over the top layer of dough, again pressing down into the dough.
  • Sprinkle with an additional 1 tablespoon of sugar and 1 teaspoon of chopped rosemary.
  • Drizzle more extra virgin olive oil evenly over the top layer.
  • Bake the flatbread in a preheated oven, at 350 degrees F, for about 35 to 40 minutes or until the dough is a nice golden brown and the grapes are oozing with delicious goodness.


Filed Under: Bread Focaccia Pizza Tagged With: athentic Italian, flatbread, foccacia, grapes, pizza, rosemary, schiacciata, snack

Soft Italian Anise Taralli

May 11, 2018 by Marisa 30 Comments

Soft Italian Anise TaralliĀ 

Soft Italian Anise Taralli have a wonderful aromatic scent from the speckled anise seeds. With crispy outer layers and soft spongy middles, these taralli make a perfect snack for just about anytime of the day.

Soft Italian Anise Taralli 


Taralli are the quintessential snack of Italy and extremely popular throughout the country.

Every region in Italy has their own variation of the tarallo (singular). From sweet to savory, there’s bound to be one kind or another for every palate out there!

Some are the crisp and dry variety while others are the soft and chewier kind. There are also some recipes that call for yeast while others use baking powder as a leavening agent. Some are eggless and feature wine or even Grappa, not to mention the variety of spices that may be used. The more popular being fennel or even anise seeds.

One thing Italians will agree on is that they are excellent served alongside an antipasto platter with olives and cheeses or simply dunked in wine as an after dinner treat!

Round shaped taralli dough ready for the oven.


My friend and colleague Maria, has graciously shared her taralli recipe with me. She and her mom have been making them for years!

Don’t be alarmed by the large amount of flour because this is a large batch recipe. That is if you make tiny taralli as I did! I believe I counted 90+ and that was after I ate half a dozen or so while counting the batch! No judgments here because I know you would do the same after one taste!

Maria makes very large taralli and therefore the recipe yields approximately 3 dozen for her. Whereas I prefer the smaller sized ones. They make cute little morsels that resemble mini bagel bites!

Big taralli dough cookies on a baking sheet.


However, there are no set rules here. You can make them any size your prefer.

A wonderful alternative would be to make both larger and smaller sizes, this way you get to please everyone!

Freshly baked cookies on a baking tray.

I happen to love the wonderfully sweet aromatic scent of anise seeds with its liquorice flavor!

If your not a fan of anise seeds you can definitely substitute fennel seeds or add some spicy heat with coarsely cracked black pepper.

Small anise flavoured Italian cookies on a tray.


As with any freshly baked bread these Soft Italian Anise Taralli are at their best the day they’re baked. Mostly because when they’re fresh out of the oven, they have this yummy crunchy and crispy outer layer with such soft bagel-like centers, making them simply addictive!

However, you can replicate the same taste and texture by popping them in the oven the next day for about 5 to 10 minutes. If you have any left that is!

Large shaped round taralli cookies.


They also freeze wonderfully well, which is convenient when your’re craving some at a moments notice.

From freezer to oven they go for some fresh tasting taralli that are ready in mere minutes!

Soft bagel-like Italian cookies in a white bowl.


Roll them as thick or thin as you like…!

A white bowl filled with anise taralli.


Shape them big or small…and watch them disappear in no time at all!

Small Italian taralli cookies in a white bowl.


Many thanks to my friend Maria for sharing her Soft Italian Anise Taralli recipe with us!

If you make this recipe remember to tag @marisasitaliankitchen on Instagram so I can see your creation!

Soft Italian Anise Taralli 
Print Recipe
3.25 from 4 votes

Soft Italian Anise Taralli

A big batch of Soft Italian Anise Taralli with a crunchy outer layer and a soft bagel like interior that are totally addictable.
Course: Snack
Cuisine: Italian
Keyword: Anise Taralli, Italian Taralli, Taralli Recipe
Servings: 96 small taralli
Calories: 75kcal
Author: Marisa

Ingredients

  • 13 cups all purpose flour
  • 3/4 cup granulated sugar
  • 2 tablespoons anise seeds
  • 1 tablespoon active dry yeast
  • 2 large eggs
  • 1/4 cup oil I used canola oil
  • 4 cups water

Instructions

  • In a bowl of a stand mixer, fitted with the hook attachment, add in the flour, sugar, anise seeds yeast and eggs.
  • Heat the oil and water together just until warm. (I used the microwave for 2 minutes however take care that it's not too hot).
  • With the motor running on low speed, add in the liquids then gradually increase the speed to medium.
  • Knead until 3/4 of the flour has been incorporated then transfer the dough to a work surface and continue kneading by hand until you've worked in the remaining flour.
  • This should take about 5 to 10 minutes of kneading time by hand until you've achieved a nice malleable dough with the remaining flour.
  • Place the dough in a well greased large bowl and then cover with plastic wrap.
  • Let the dough rest for 1 1/2 hours. It will increase in size and look light and puffy.
  • When your ready to roll the taralli, divide the dough in half and and return one half to your greased bowl and keep covered so it does not dry out.
  • You'll also want to keep the dough your working with covered for the same reason.
  • There is really no set rule on how long or how thick to role the taralli, its a matter of preference.
  • For small taralli roll out a golf ball sized piece of dough to an 18 inch rope and cut into 3 pieces
  • Shape each piece into a ring and press the ends together to seal.
  • For evenly round taralli, once you press the ends together insert your index and middle finger into the loop where the 2 ends meet and make a back and forth rolling motion for a well rounded shape.
  • For big taralli cut a piece of dough the size of a golf ball and roll out to a half inch wide in diameter and about 12 to 14 inches long.
  • Press the ends together in a loop while sealing the ends as you would the smaller taralli.
  • Transfer the taralli on baking trays lined with a clean kitchen dish towel.
  • When you've finished working with one half of the dough, bring a large pot of water to boil while you preheat the oven to 350 degrees F.
  • Have 2 baking trays ready by your stove top and line one of them with a clean kitchen towel.
  • Drop a few taralli into the boiling water and as soon as they resurface (this should take a few seconds) transfer them first to the unlined tray then to the tray lined with the clean kitchen towel to absorb any residual water.
  • Transfer the boiled taralli onto a cookie sheet lined with parchment paper, spacing them about an inch apart.
  • Bake in a preheated oven for about 24 minutes, turning to flip them over half way through the baking time. I baked them 12 minutes on each side)
  • When ready the taralli will puff up somewhat and have a lovely golden brown appearance with crusty darker brown tops and bottoms.
  • Repeat the whole process with the remaining dough.
  • Small sized taralli yields approximately 8 dozen while bigger shaped taralli will yield about 3 dozen.
  • Of course this will depend on the size you wish to make and again there are no set rules here.
  • Simply have fun and enjoy!

Nutrition

Calories: 75kcal | Carbohydrates: 15g | Protein: 2g | Fat: 1g | Saturated Fat: 1g | Cholesterol: 3mg | Sodium: 2mg | Potassium: 22mg | Fiber: 1g | Sugar: 2g | Vitamin A: 5IU | Vitamin C: 1mg | Calcium: 4mg | Iron: 1mg


Filed Under: Bread Focaccia Pizza, Dessert, Snack Tagged With: anise seeds, bread, snack, taralli

Cherry Granola Greek Yogurt Parfait

July 20, 2017 by Marisa 17 Comments

Cherry Granola Greek Yogurt Parfait

Cherry Granola Greek Yogurt Parfait makes a perfect breakfast alternative and is equally delicious as a dessert or simply an anytime snack.

This parfait has a lovely contrast in textures from the smooth velvety soft yogurt which is scented with cardamom and sweetened with honey to the crunchy bites of almond and cherry granola.

Cherry Granola Greek Yogurt Parfait

YOGURT

Greek yogurt has got to be my new favorite type of yogurt, since testing and sampling recipes from the Yogurt Every Day Cookbook. I’ve grown to love its thick creaminess which I find has the same soft and luscious consistency of a Dairy Queen ice-cream.

Before that, the only kind of yogurt one would find in my house was the sweetened fruit filled one. You all the know the one I’m referring to. The kind packed with sweetened fruit at the bottom and topped with plain yogurt which you’d stir together just before devouring it. My absolute favorite was the cherry yogurt!

This Cherry Granola Greek Yogurt Parfait is partially inspired by Hubert Cormier’s Yogurt Every Day Cookbook and my favorite flavored yogurt.


Cherry Granola Greek Yogurt Parfait

GRANOLA

Have you ever made your own granola?

Homemade granola is far healthier then the store bought variety, not only because its sweetened with honey, a natural sweetener but also because you get to control the amount of sweetness used.

Its super easy to make and the best part…you can mix and match the flavors and also add your favorite dried fruits or nuts.

I’ve scented my granola with cardamon to compliment the cardamom in the yogurt mix and added a touch of almond extract with the more usual vanilla extract.

I also went with dried cherries since we’re still in cherry season but only added them in after the baking time because I didn’t want my dried fruit brick hard.

Cherry Granola Greek Yogurt Parfait

It’s important to let them cool completely before breaking them apart and storing so that they retain their crunchiness. However, at my house they really don’t last past the second day.

Cherry Granola Greek Yogurt Parfait

You’ll only need approximately one cup of granola to make this layered yogurt parfait and the rest can be enjoyed as a snack.

Try dividing the remaining granola in small individual ziplock bags for some fun and easy, grab-and-go snacks which kids will love.

Cherry Granola Greek Yogurt Parfait

I’ve topped my granola yogurt parfait with fresh cherries as a pretty visual appeal but that’s really entirely optional!

Cherry Granola Greek Yogurt Parfait

With very little fuss and a whole lot of flavor…there is much to love with this granola!

Cherry Granola Greek Yogurt Parfait

Cherry Granola Greek Yogurt Parfait
Print Recipe
0 from 0 votes

Cherry Granola Greek Yogurt Parfait

Cherry Granola Greek Yogurt Parfait makes a perfect breakfast alternative and is equally delicious as a dessert or simply an anytime snack.
Course: Breakfast, Dessert, Snack
Cuisine: American
Keyword: cherry granola, greek yogurt, parfait
Servings: 4 cups of granola, 2 granola yogurt parfaits
Author: Marisa

Ingredients

  • FOR THE GRANOLA
  • 2 cups rolled oats
  • 3/4 cup almonds coarsely chopped or left whole
  • 1 teaspoon ground cardamom
  • pinch of fine sea salt
  • 3 tablespoons melted coconut oil
  • 3 tablespoons honey
  • 1 teaspoon pure vanilla extract
  • 1/2 teaspoon pure almond extract
  • 1/2 cup dried cherries
  • FOR THE YOGURT
  • 1 1/2 cups Greek Yogurt
  • 1 teaspoon cardamom
  • 3 teaspoons honey

Instructions

  • GRANOLA
  • Preheat oven to 300 degrees F
  • Line a large cookie sheet with parchment paper or silpat mat and set aside. ( I used an 11 x 17 size pan)
  • In a medium sized bowl, stir together the rolled oats, almonds, cardamon and salt.
  • In a separate small bowl place the melted coconut oil, honey, vanilla and almond extracts then stir to combine.
  • Pour the coconut mixture over the rolled oats mixture and stir well until all ingredients are combined.
  • Spread the mixture on the prepared baking sheet in one single layer.
  • Bake for 5 minutes.
  • After the first 5 minutes, give the granola a good stir.
  • Return to the oven and bake an additional 10 to 15 minutes or until golden brown.
  • Remove the granola from the oven.
  • Scatter the dried cherries over the granola and allow to cool completely before breaking into clusters and storing.
  • Reserve approximately 1 cup of granola for the yogurt parfait.
  • Store the remaining granola in an air tight container.
  • YOGURT MIXTURE
  • In a small bowl stir together the yogurt, cardamom and honey.
  • ASSEMBLING THE YOGURT PARFAIT
  • Layer 4 teaspoons of granola in each of 2 decorative glasses.
  • Top with 3 tablespoons of yogurt mixture.
  • Repeat with a second layer of granola and yogurt then sprinkle the tops with more granola.
  • Garnish with fresh cherries if desired.


Filed Under: Breakfast, Dessert Tagged With: breakfast, cherry, dessert, Granola, snack, yogurt

Next Page »

Primary Sidebar

A Little About Me

blankHi I'm Marisa! Welcome to my little corner of the web where you'll find delicious foods inspired by my Italian heritage and Canadian upbringing. So kick off your shoes, have a seat and stay awhile... Read More…

Search In My Kitchen

Copyright © 2021 · Foodie Pro & The Genesis Framework