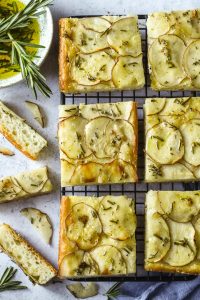
• Skip to primary navigation
  • Skip to main content
  • Skip to primary sidebar

Marisa's Italian Kitchen

The Secret Ingredient Is Always Love

  • Home
  • About
  • Recipes
  • Contact
  • Privacy Policy

bread

Chickpea Red Onion Focaccia

January 26, 2019 by Marisa 14 Comments

Baked focaccia topped with chickpeas, red onion and raisins.

A wonderfully soft and pillowy, Chickpea and Red Onion Focaccia topped with sweet golden raisins. This focaccia makes a delicious anytime snack or a complimentary side dish to a steaming bowl of soup.

Focaccia dough in a black cast iron skillet.

Straight out of the oven comfort foods such focaccia are always met with much anticipation at my house.

The allure of freshly made bread or rather focaccia, which is essentially a flatbread has a broad appeal to both adults and young ones.

I especially love how and with very few ingredients you truly get so much. All it takes is some flour, yeast and water. A few add ins for flavour such as salt, sugar and olive oil and you have something so easily achieved in your own kitchen.

Freshly baked focaccia bread in a skillet.

One other addition that bears mentioning here is mashed potatoes!

I can’t stress enough how the humble potato takes bread dough to a whole other level!

Surprisingly, it renders the dough so light, airy and fluffy. You immediately feel this as your kneading the dough. It’s like holding a pillowy soft cloud in your hands!

Well almost! And not that I know what a cloud feels like…but you get where I’m going with this!

Red onion and chickpea flatbread.

You can top focaccia with just about anything!

A favourite sweet version of mine is Schiacciata Con L’uva, a sweet tuscan flatbread with grapes. Its a lip smacking delicacy that I simply never get enough of when the best coronation grapes are in season!

However, this time of the year is a perfect time to make do with a few good old pantry ingredients.

Chickpea red onion focaccia

TOPPING FOR CHICKPEA RED ONION FOCACCIA

Adding raisins to savoury dishes was very common while growing up. Sweet plump raisins always made an appearance in calzone with greens such as my Swiss Chard Mozzarella Calzone.

To use raisins in this focaccia recipe, you’ll first want to plump them up by soaking them in hot water for about ten minutes. Then make sure to drain them, pat them dry and scatter over the focaccia before adding other toppings. This will ensure they don’t burn while nestled beneath the other toppings.

I adore caramelized onions and have often used them as a pizza topping. Take care to not cook them overmuch. You simply want them softened and translucent as they will continue to caramelize in the oven.

Sliced focaccia bread in a skillet.

Focaccia dough in a black cast iron skillet.

HOW TO PREP A PAN FOR FOCACCIA

I thought it would be a neat way to try focaccia in my cast iron pans.

I used 3, 8 inch round pans for this recipe but really any size pan will do. If all you have are rectangular rimmed baking sheets, those will work as well.

You can use one as large as 15 x 10, in which case it will yield one rectangular focaccia.

Which ever size you use, do grease your pans with oil and then sprinkle them with coarse cornmeal.

This will ensure crispy bottoms and edges and facilitates easy removal!

Enjoy as an appetizer or serve alongside your favourite salad or hot bowl of soup!

If you make this recipe remember to tag @marisasitaliankitchen on Instagram so I can see your creation!

Chickpea red onion focaccia
Print Recipe
No ratings yet

Chickpea Red Onion Focaccia

A wonderfully soft and pillowy, chickpea and red onion focaccia topped with sweet golden raisins. This focaccia makes a delicious anytime snack.
Prep Time40 mins
Cook Time30 mins
Total Time1 hr 10 mins
Course: Bread, Main Meal
Cuisine: Italian
Keyword: Flatbread, Focaccia, Tuscan flatbread
Servings: 6
Calories: 458kcal
Author: Marisa

Ingredients

FOCACCIA DOUGH

  • 2 teaspoons granulated sugar
  • 1 cup warm water
  • 1 8 gram pkg active dry yeast
  • 2 tablespoons extra virgin olive oil
  • 2 cups mashed potatoes cooled
  • 1 teaspoon fine sea salt
  • 3 1/2 cups all purpose flour approximately
  • 2 tablespoons coarse cornmeal

TOPPING

  • 1 medium red onion thinly sliced
  • 3/4 cup canned chickpeas drained, rinsed and patted dry
  • 1/2 cup golden raisins
  • sprinkle of coarse sea salt for topping

Instructions

FOCACCIA DOUGH

  • Place the sugar and warm water together in a large bowl and stir to dissolve. 
  • Sprinkle in the yeast and let this stand until frothy, for about 10 minutes.
  • Once it's frothy, stir in the 2 tablespoons of extra-virgin olive oil.
  • In a small bowl, mix the mashed potatoes with the salt. 
  • Stir the potato mixture into the yeast mixture until very well combined. (a whisk will actually work better here)
  • Gradually stir in the flour, approximately 2 1/2 to 3 cups until the dough pulls away from the sides of the bowl.
  • Transfer the dough to a well floured work surface.
  • With floured hands knead in as much of the remaining flour as needed, until the dough is smooth and has a slightly sticky feel. About 8 minutes.
  • Place the dough in a large greased bowl, turning to grease all over. 
  • Cover your dough with cling wrap and let it rise in a draft free space until it has doubled in size, for about 1 hour.
  • Grease 3, 8 inch cast iron skillets with oil and sprinkle with the coarse cornmeal.
  • Divide the focaccia dough into 3 equal portions and place into the prepared cast iron skillets.
  • Pat down the dough, stretching and pulling with your hands to reach the sides of the skillets
  • Cover the pans with greased cling wrap and and set aside to allow the dough to puff up to the rim of the pans for about 45 minutes to 60 minutes.
  • Meanwhile heat a tablespoon of olive oil in a medium sized frying pan.
  • Add the sliced red onions to the frying pan with a sprinkle of salt and pepper.
  • Cook over low heat while stirring occasionally, until the onions are soft and translucent, for about 5 minutes.
  • Remove from the heat and set aside to cool.
  • Meanwhile, place the raisins in a small bowl and cover with a little bit of hot water.
  • Allow to soak for about 10 minutes until the raisins plum up.
  • Drain the raisins and pat dry. Set aside.
  • Preheat the oven to 375 degrees F.
  • Remove the cling wrap from the risen dough.
  • Scatter first the raisins over the dough then top with the chickpeas, the sautéed onions and using your fingers gently press down into the dough while making indentations.
  • Drizzle the tops with a little olive oil. (about 1 teaspoon over each focaccia)
  • Bake in the preheated oven for about 25 to 30 minutes, until the edges are crusty and the focaccia is golden brown.
  • Sprinkle a pinch or 2 of coarse sea salt over each focaccia while still warm.
  • Allow to cool a little before slicing and serving.

Nutrition

Calories: 458kcal | Carbohydrates: 90g | Protein: 11g | Fat: 6g | Saturated Fat: 1g | Sodium: 471mg | Potassium: 455mg | Fiber: 5g | Sugar: 10g | Vitamin C: 18mg | Calcium: 34mg | Iron: 4mg

Filed Under: Bread Focaccia Pizza, Pizza, Soups Pasta Sauces Tagged With: appetizer, bread, chickpeas, flatbread, Focaccia, onion, raisins, snack, Tuscan flatbread

Soft Italian Anise Taralli

May 11, 2018 by Marisa 30 Comments

Soft Italian Anise TaralliĀ 

Soft Italian Anise Taralli have a wonderful aromatic scent from the speckled anise seeds. With crispy outer layers and soft spongy middles, these taralli make a perfect snack for just about anytime of the day.

Soft Italian Anise Taralli 


Taralli are the quintessential snack of Italy and extremely popular throughout the country.

Every region in Italy has their own variation of the tarallo (singular). From sweet to savory, there’s bound to be one kind or another for every palate out there!

Some are the crisp and dry variety while others are the soft and chewier kind. There are also some recipes that call for yeast while others use baking powder as a leavening agent. Some are eggless and feature wine or even Grappa, not to mention the variety of spices that may be used. The more popular being fennel or even anise seeds.

One thing Italians will agree on is that they are excellent served alongside an antipasto platter with olives and cheeses or simply dunked in wine as an after dinner treat!

Round shaped taralli dough ready for the oven.


My friend and colleague Maria, has graciously shared her taralli recipe with me. She and her mom have been making them for years!

Don’t be alarmed by the large amount of flour because this is a large batch recipe. That is if you make tiny taralli as I did! I believe I counted 90+ and that was after I ate half a dozen or so while counting the batch! No judgments here because I know you would do the same after one taste!

Maria makes very large taralli and therefore the recipe yields approximately 3 dozen for her. Whereas I prefer the smaller sized ones. They make cute little morsels that resemble mini bagel bites!

Big taralli dough cookies on a baking sheet.


However, there are no set rules here. You can make them any size your prefer.

A wonderful alternative would be to make both larger and smaller sizes, this way you get to please everyone!

Freshly baked cookies on a baking tray.

I happen to love the wonderfully sweet aromatic scent of anise seeds with its liquorice flavor!

If your not a fan of anise seeds you can definitely substitute fennel seeds or add some spicy heat with coarsely cracked black pepper.

Small anise flavoured Italian cookies on a tray.


As with any freshly baked bread these Soft Italian Anise Taralli are at their best the day they’re baked. Mostly because when they’re fresh out of the oven, they have this yummy crunchy and crispy outer layer with such soft bagel-like centers, making them simply addictive!

However, you can replicate the same taste and texture by popping them in the oven the next day for about 5 to 10 minutes. If you have any left that is!

Large shaped round taralli cookies.


They also freeze wonderfully well, which is convenient when your’re craving some at a moments notice.

From freezer to oven they go for some fresh tasting taralli that are ready in mere minutes!

Soft bagel-like Italian cookies in a white bowl.


Roll them as thick or thin as you like…!

A white bowl filled with anise taralli.


Shape them big or small…and watch them disappear in no time at all!

Small Italian taralli cookies in a white bowl.


Many thanks to my friend Maria for sharing her Soft Italian Anise Taralli recipe with us!

If you make this recipe remember to tag @marisasitaliankitchen on Instagram so I can see your creation!

Soft Italian Anise Taralli 
Print Recipe
3.25 from 4 votes

Soft Italian Anise Taralli

A big batch of Soft Italian Anise Taralli with a crunchy outer layer and a soft bagel like interior that are totally addictable.
Course: Snack
Cuisine: Italian
Keyword: Anise Taralli, Italian Taralli, Taralli Recipe
Servings: 96 small taralli
Calories: 75kcal
Author: Marisa

Ingredients

  • 13 cups all purpose flour
  • 3/4 cup granulated sugar
  • 2 tablespoons anise seeds
  • 1 tablespoon active dry yeast
  • 2 large eggs
  • 1/4 cup oil I used canola oil
  • 4 cups water

Instructions

  • In a bowl of a stand mixer, fitted with the hook attachment, add in the flour, sugar, anise seeds yeast and eggs.
  • Heat the oil and water together just until warm. (I used the microwave for 2 minutes however take care that it's not too hot).
  • With the motor running on low speed, add in the liquids then gradually increase the speed to medium.
  • Knead until 3/4 of the flour has been incorporated then transfer the dough to a work surface and continue kneading by hand until you've worked in the remaining flour.
  • This should take about 5 to 10 minutes of kneading time by hand until you've achieved a nice malleable dough with the remaining flour.
  • Place the dough in a well greased large bowl and then cover with plastic wrap.
  • Let the dough rest for 1 1/2 hours. It will increase in size and look light and puffy.
  • When your ready to roll the taralli, divide the dough in half and and return one half to your greased bowl and keep covered so it does not dry out.
  • You'll also want to keep the dough your working with covered for the same reason.
  • There is really no set rule on how long or how thick to role the taralli, its a matter of preference.
  • For small taralli roll out a golf ball sized piece of dough to an 18 inch rope and cut into 3 pieces
  • Shape each piece into a ring and press the ends together to seal.
  • For evenly round taralli, once you press the ends together insert your index and middle finger into the loop where the 2 ends meet and make a back and forth rolling motion for a well rounded shape.
  • For big taralli cut a piece of dough the size of a golf ball and roll out to a half inch wide in diameter and about 12 to 14 inches long.
  • Press the ends together in a loop while sealing the ends as you would the smaller taralli.
  • Transfer the taralli on baking trays lined with a clean kitchen dish towel.
  • When you've finished working with one half of the dough, bring a large pot of water to boil while you preheat the oven to 350 degrees F.
  • Have 2 baking trays ready by your stove top and line one of them with a clean kitchen towel.
  • Drop a few taralli into the boiling water and as soon as they resurface (this should take a few seconds) transfer them first to the unlined tray then to the tray lined with the clean kitchen towel to absorb any residual water.
  • Transfer the boiled taralli onto a cookie sheet lined with parchment paper, spacing them about an inch apart.
  • Bake in a preheated oven for about 24 minutes, turning to flip them over half way through the baking time. I baked them 12 minutes on each side)
  • When ready the taralli will puff up somewhat and have a lovely golden brown appearance with crusty darker brown tops and bottoms.
  • Repeat the whole process with the remaining dough.
  • Small sized taralli yields approximately 8 dozen while bigger shaped taralli will yield about 3 dozen.
  • Of course this will depend on the size you wish to make and again there are no set rules here.
  • Simply have fun and enjoy!

Nutrition

Calories: 75kcal | Carbohydrates: 15g | Protein: 2g | Fat: 1g | Saturated Fat: 1g | Cholesterol: 3mg | Sodium: 2mg | Potassium: 22mg | Fiber: 1g | Sugar: 2g | Vitamin A: 5IU | Vitamin C: 1mg | Calcium: 4mg | Iron: 1mg


Filed Under: Bread Focaccia Pizza, Dessert, Snack Tagged With: anise seeds, bread, snack, taralli

Polenta Ricotta Bread

April 12, 2018 by Marisa 10 Comments

Sliced ricotta bread with fig jam.

I would definitely say that this Polenta Ricotta Bread recipe could very well be a beginner’s introduction into the art of bread making.

It’s a simple process of gathering a few staple ingredients and transforming them in a domestic kitchen. And so easily attainable for any home baker.

Polenta Ricotta Bread

Although I religiously make pizza once a week and occasionally focaccia, I’ve never actually delved into the art of bread making.

More notably…artisan bread. I love working with just about any type of dough!

There’s something so comforting in using a few simple ingredients such as flour mixed with liquids that I’m immediately transported into my zen moment.

I turned to my new cookbook, Simply Bread from The Australian Women’s Weekly for inspiration and came across these Polenta Ricotta Loaves.

It sounded like perfect usage for that lonely tub of ricotta sitting in my fridge. A constant reminder that I bought way too much ricotta for my Easter baking marathon!

Not to mention what great mileage my large bag of polenta received from making a few batches of my Lemon Cornmeal S Cookies and now these beautiful loaves of bread.

Fresh polenta ricotta bread dough.

The dough comes together effortlessly using a stand mixer. It requires a gentle kneading before both the first and second rise with very minimal hands on time.

The ricotta adds a certain lightness of flavour to the bread. And the polenta lends a pleasant gritty texture which in turn tinges the dough to a lovely golden hue.

Just before baking, the loaves are brushed with a little bit of water and sprinkled with extra polenta for a crispy outer layer.

Ready to slice ricotta and polenta bread

Toppings For Polenta Ricotta Bread

I love these slices slathered with ricotta and a dollop of fig jam. But just as delicious is a topping of fresh fruit and a drizzle of honey. They’re a perfect compliment to the delicate tasting loaves.

Sliced ricotta bread with fig jam.

Sliced polenta bread topped with ricotta and grapes.

As with most breads these Polenta Ricotta loaves are best enjoyed the same day. They’re so yummy you’ll want to make a double batch of these ricotta loaves as I did.

Try slicing the breads, wrap well and freeze. Then enjoy at a moments notice when a craving hits!

If you make this recipe remember to tag @marisasitaliankitchen on Instagram so I can see your creation!

Polenta Ricotta Bread
Print Recipe
No ratings yet

Polenta Ricotta Bread

Delicious and easy to make Polenta Ricotta Bread. With a lightness of flavour and a pleasant gritty texture from the cornmeal.
Course: Bread
Cuisine: Italian
Servings: 2 loaves
Author: Marisa

Ingredients

  • 3 1/4 cups bread flour
  • 1 cup polenta I used fine cornmeal
  • 2/3 cup ricotta
  • 1 teaspoon fine sea salt
  • 1 tablespoon granulated sugar
  • 8 grams dried yeast I used traditional active dry yeast
  • 1 1/4 cups warm water approximately
  • 2 tablespoons polenta extra for sprinkling on loaves (I used fine cornmeal)

Instructions

  • In the bowl of an electric mixer and fitted with the hook attachment, add in the flour, polenta, ricotta, salt, sugar and yeast.
  • With the mixer running on low speed, gradually add in 1 cup of the warm water and mix just until combined.
  • Add the remaining 1/4 cup of water only if needed to bring the dough together.
  • Transfer the dough to a lightly floured work surface and knead until smooth.
  • Place the dough in a large well greased bowl, turning to grease all over..
  • Cover with plastic wrap and set aside in a warm place for 1 1/2 hours or until the dough has doubled in size.
  • Meanwhile line 2 baking trays with parchment paper, grease lightly and sprinkle with some of the extra cornmeal.
  • Once the dough has doubled in size, transfer the dough onto a lightly floured work surface.
  • Knead the dough until smooth and divide in half.
  • Shape each half into a round loaf and place each on individual prepared baking trays.
  • Cover each loaf with a greased plastic wrap and set aside in a warm place for 1 1/2 hours or until doubled in size.
  • When ready to bake, preheat the oven to 425 degrees F.
  • Remove the plastic wraps and brush the loves with a little bit of water and sprinkle with the extra cornmeal.
  • Bake the loaves for 15 minutes.
  • Reduce the oven temperature to 400 degrees F and bake an additional 20 minutes or until golden brown in color.
  • Transfer the loaves to a wire rack to cool a little and enjoy while still warm.

Notes

Recipe is adapted from The Australian Women's Weekly, Simply Bread cookbook.


Filed Under: Bread Focaccia Pizza Tagged With: bread, polenta, ricotta

Tropical Chocolate Banana Pecan Bread

January 21, 2015 by Marisa Leave a Comment

Tropical Chocolate Banana Pecan Bread

 An easy to bake Tropical Chocolate Banana Pecan Bread and simply heavenly!

The very first time I brought this banana bread in at work, a co-worker took one bite rolled her eyes and uttered  “orgasmic”! It’s most certainly that good.

Tropical Chocolate Banana Pecan Bread

This tropical chocolate banana pecan bread will be a huge hit at your next family gathering or potluck. It has always been my go to banana bread recipe whenever a craving hit and a no fail recipe. Even beginners will appreciate the simplicity of this sweet loaf as its not complicated to put together and yet so amazingly delicious you’ll want to bottle the tropical aromas.

While the mashed bananas render this sweet loaf moist, the pecan and coconut topping adds a lovely crunchy bite in contrast to the loaf itself.

When using bananas for baking, make sure they are ripe with brown freckles but not bruised. If you have an abundance of over ripe bananas you can freeze them, with the peel on, sealed in a ziplock bag. When you’re ready to use them, simply bring them out to thaw. Peel the bananas and add them to your favorite recipe.

Consequently, you will need approximately 3 medium sized ripe bananas to equal one cup of mashed bananas for this recipe. Although a potato masher comes in real handy when mashing the bananas, a fork will do just fine.

Tropical Chocolate Banana Pecan Bread

I omitted the raisins from the original recipe and added the chocolate chips and pecans simply to suit my personal tastes. I’m just not a fan of raisins in my desserts!

Alternately, walnuts can be substituted for the pecans if that is what you have on hand.

Tropical Chocolate Banana Pecan Bread

Bake this Tropical Chocolate Banana Pecan Bread today and enjoy with your favorite cup of tea, coffee or simply a cold glass of milk.

Ingredients:

  • 1/2 cup  butter, softened
  • 1 cup packed brown sugar
  • 3 eggs
  • 1 tsp vanilla
  • 2 cups all-purpose flour
  • 1 tsp baking powder
  • 1 tsp baking soda
  • 1/2 tsp cinnamon
  • 1 cup mashed bananas
  • 1 cup mini semi-sweet chocolate chips
  • 1 cup pecans, chopped

Topping:

  • 1/2 cup shredded coconut
  • 1/4 cup packed brown sugar
  • 1 tbsp butter softened
  • 1 1/2 tsp all-purpose flour
  • 1/4 tsp cinnamon
  • 1/4 cup pecans, chopped


For the topping: Combine all ingredients until nice and crumbly into a small bowl and set aside

Grease a 9 x 5 inch loaf pan and set aside. Preheat oven to 325*F (160*C).

In a large bowl beat together the butter and sugar on medium speed just until light and fluffy.

Next, beat in the eggs one at a time, beating well after each addition. If you are using a stand mixer make sure to scrape down the mixture a couple of times. Stir in the vanilla.

In a medium sized bowl combine the flour, baking powder, baking soda and cinnamon. Stir the flour mixture into the butter mixture alternately with the mashed bananas just until combined. Do not over-mix.

Fold in the chocolate chips and chopped pecans.

Pour the batter in the prepared loaf pan and sprinkle with the coconut topping.

Bake in preheated oven for about one hour. The loaf should be golden brown. I always check to see if it is done by inserting a toothpick in the center. If it comes out clean it is done. If it is wet, bake a little longer.

Tropical Chocolate Banana Pecan Bread

Adapted from Canadian Living Magazine (with a few tweaks)

Filed Under: Dessert, Sweet Loaf Tagged With: banana, bread, cake, chocolate, coconut, pecans, sweet

Primary Sidebar

A Little About Me

blankHi I'm Marisa! Welcome to my little corner of the web where you'll find delicious foods inspired by my Italian heritage and Canadian upbringing. So kick off your shoes, have a seat and stay awhile... Read More…

Let's Be Social

  • Facebook
  • Twitter
  • Pinterest
  • Instagram

Search In My Kitchen

Copyright © 2021 · Foodie Pro & The Genesis Framework