• Skip to primary navigation
  • Skip to main content
  • Skip to primary sidebar

Marisa's Italian Kitchen

The Secret Ingredient Is Always Love

  • Home
  • About
  • Recipes
  • Contact
  • Privacy Policy

cookie

Italian Mostaccioli Cookie Recipe

December 1, 2017 by Marisa 48 Comments

White and dark chocolate cookies on a silver rack

This Italian Mostaccioli Cookie Recipe is sure to bring a nostalgic feel to your family gathering.

Italian Mostaccioli cookies on a silver rack

These soft, two bite cookies are chock-full of finely ground almonds and filled with a lovely aromatic essence from both ground cloves and cinnamon.

A touch of limoncello with orange and lemon zests lends a lovely citrus taste to these soft cake-like cookies.

They’re also flavoured with both cocoa and semi-sweet chocolate which are then enveloped in more chocolate goodness.

About Mostaccioli Cookies

The origin of this cookie is said to date back 300 hundred years before the birth of Christ and rooted deep in Italian history. However not all food historians seem to agree on this. The consensus however, is that the mostaccioli cookies have greatly evolved throughout the years.

In the old country these cookies were made with Wine Must. It was used as a sweetening agent because of its high glucose content. Wine Must is basically pressed grapes containing all components of the fruit. This was a time when sugar or even honey were not readily available. A time when people made do with what they had on hand.

They were also made in different shapes and sizes with intricate patterns depicting historical animals. Or items such as baskets or even the palm. Some were made with jewel like decorations. These were sold at auctions in order to raise money for charities.

It wasn’t until centuries later that this clove and cinnamon scented cookie gained in popularity. Most families nowadays have their own unique way of making them. From sculpted cookies to biscotti like shapes. Or the more popular diamond shaped one that you see here today.

While some contain no leavening agent yielding a harder cookie, these are soft and almost cake-like.

Mostaccioli cookies with honey on a silver cooling rack

Italian Mostaccioli Cookie Recipe

You’ll be working with a very soft dough and will need to flour your work surface, rolling pin and hands when shaping and cutting the cookies.

I used a 2 inch diamond shaped cookie cutter to form the diamond shaped cookies. You can also use a knife to cut them into diamond shapes.

I chose to dip half the batch of cookies in semi-sweet chocolate and the other half in white chocolate. I find this makes a lovely presentation when platted together on a large platter.

Keep in mind to allow sufficient time for the chocolate to set before platting…trust me on this!

Then simply enjoy with your favourite beverage!

Happy baking dear friends!

Italian cookies dipped in white chocolate on a rack

Italian Mostaccioli Cookies dipped in dark and white chocolate


If you make this recipe remember to tag @marisasitaliankitchen on Instagram so I can see your creation!

White and dark chocolate cookies on a silver rack
Print Recipe
3.63 from 8 votes

Italian Mostaccioli Cookie Recipe

A traditional Italian cookie with ground almonds, sweetened with honey, scented with both orange and lemon zest, cloves, cinnamon and dipped in chocolate.
Course: Cookie
Cuisine: Italian
Keyword: Italian cookie, Italian cookie recipe, Italian mostaccioli cookie
Servings: 6 1/2 dozen
Author: Marisa

Ingredients

  • COOKIE DOUGH
  • 3 cups all purpose flour
  • 2 cups almonds very finely ground
  • 1/3 cup baking cocoa powder I used dutch processed
  • 1/4 teaspoon ground cloves
  • 1/2 teaspoon cinnamon
  • 2 teaspoons baking powder
  • pinch of salt
  • 4 large eggs
  • 3/4 cup granulated sugar
  • 3/4 cup honey
  • orange zest from 1 large orange
  • lemon zest from 1 medium sized lemon
  • 1/2 teaspoon pure vanilla extract
  • 2 tablespoons Limoncello or substitute with the juice of one lemon
  • 3 ounces coarsely grated semi-sweet or bitter sweet chocolate
  • FOR THE CHOCOLATE GLAZE
  • 12 ounces semi-sweet or bittersweet chocolate
  • 12 ounces white chocolate
  • vegetable oil for thinning the chocolate

Instructions

  • Preheat the oven to 350 degrees F.
  • Line 4 cookie sheets with parchment paper and set aside.
  • In a large bowl whisk together the flour, finely ground almonds, cocoa powder, cloves, cinnamon, baking powder and salt then set aside.
  • Using a stand mixer or hand held mixer, beat the eggs together.
  • Mix in the sugar and honey, beating until very well combined.
  • Stir in the orange and lemon zest, the vanilla extract and limoncello.
  • Slowly mix in the flour mixture until combined.
  • Stir in the grated chocolate.
  • The dough will be very soft and pliable.
  • Working with small portions of the dough at a time (about 1 heaping cupful) transfer to a well floured surface.
  • With a floured rolling pin, roll out the dough to about 1/3 of an inch thick.
  • Use a 2 inch diamond cookie cutter to shape and cut out the cookies and then transfer to the prepared baking sheet while spacing them about 1 inch apart. (dipping the cookie cutter in flour before each use will tremendously help for easy release.)
  • Re-rolled the scraps to shape and cut just 1 more time.
  • Bake in the preheated oven for about 10 minutes. The cookies should still be slightly soft to the touch when ready.
  • While one batch is baking in the oven continue rolling and cutting with the remaining dough.
  • Make sure the cookies cool completely before dipping in chocolate.
  • CHOCOLATE COATING:
  • Melt the semi-sweet chocolate using a double boiler or in the microwave, using a microwave safe bowl on high for about 90 seconds stirring at 30 seconds interval.
  • Thin the chocolate with a little bit of vegetable oil to loosen the consistency somewhat for easy dipping.
  • Dip half a batch of the cookies into the melted semi-sweet chocolate and place on a cooling rack till the chocolate sets.
  • Repeat by melting the white chocolate and coating the remaining cookies.
  • Before the white chocolate sets, use a piping bag filled with dark melted chocolate to dot the tops then simply run a toothpick through the dots to create a pretty pattern.
  • Allow for the chocolate to set completely before storing.


Filed Under: Cookies, Dessert Tagged With: almond, chocolate, cookie, dessert, honey, Italian sweets

Chocolate Peanut Butter Biscotti

October 20, 2017 by Marisa 16 Comments

Chocolate Peanut Butter Biscotti

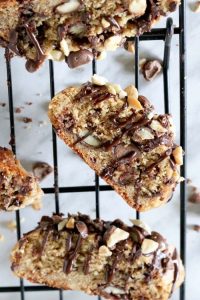
These Chocolate Peanut Butter Biscotti are reminiscent in taste of the much beloved peanut butter cookie! They are over the top delicious with a combo of a melted chocolate and peanut butter drizzle which are then topped with more crushed peanuts…just because!

Chocolate Peanut Butter Biscotti

Lately my daughter has been craving peanut butter cookies and being Italian of course and also loving biscotti so much…well… I had this irresistible urge to come up with a peanut butter biscotti.

These morsels are chock full of chocolate covered peanuts that is mixed into the dough alongside some all natural peanut butter for that special flavor we all love so much.

Simply for extra indulgence and also because one can never have too much chocolate in one’s life, I melted some semi sweet chocolate, stirred in some peanut butter then drizzled this yummy mix over the biscotti. Are you swooning yet?

They were then topped with crushed chocolate covered peanuts for more delicious goodness! And so after some love and labor the Chocolate Peanut Butter Biscotti is born.

Surely you must be swooning now!

Chocolate Peanut Butter Biscotti

I love to brush my biscotti with some beaten egg whites before the first bake for a slight sheen, however its totally optional in this recipe since the tops are drizzled with chocolate and sprinkled with peanuts.

Chocolate Peanut Butter Biscotti

Here’s a handy kitchen tip: If your oven tends to brown the bottoms of baked goods over much, double up on the cookie sheets as this creates some insulation between the baking sheets and disperses the heat much more evenly. This has always worked for me!

Chocolate Peanut Butter Biscotti

As in most biscotti recipes they’re really quite simple to make and don’t require a lot of work. And as an added bonus they keep extremely well in an airtight cookie jar for a week, however at my house they disappear so quickly! Even when hidden from sight, someone always sniffs them out!

Chocolate Peanut Butter Biscotti

Also if I might add, they are extremely tooth friendly!

Happy baking my friends!

If you make this recipe do take a picture and tag @marisasitaliankitchen on Instagram so I can see your creation!


Chocolate Peanut Butter Biscotti
Print Recipe
0 from 0 votes

Chocolate Peanut Butter Biscotti

These Chocolate Peanut Butter Biscotti are reminiscent in taste of the much beloved peanut butter cookie!
Course: Cookie
Cuisine: Italian
Servings: 30
Author: Marisa

Ingredients

  • 2 cups all purpose flour
  • 2 teaspoons baking powder
  • pinch of fine sea salts
  • 1/3 cup unsalted butter softened
  • 3/4 cup golden yellow sugar or light brown sugar
  • 1/2 cup all natural creamy peanut butter
  • 2 large eggs
  • 1 teaspoon vanilla extract
  • 1 cup chocolate covered peanuts roughly chopped
  • lightly beaten egg white from one egg for brushing on the logs
  • FOR THE TOPPING
  • 2 ounces semi-sweet chocolate
  • 2 teaspoons all natural peanut butter
  • 1/2 cup roughly chopped chocolate covered peanuts

Instructions

  • Preheat oven to 350 degrees F.
  • Line a baking sheet with parchment paper.
  • Whisk the flour, baking powder and salt together in a medium sized bowl and set aside
  • In a large bowl beat the butter, sugar and peanut butter on medium high speed just until fluffy for a minute or two.
  • Next, beat in the eggs and vanilla extract until combined.
  • With the mixer on low speed, beat in the flour mixture just until combined.
  • Stir in the coarsely chopped peanuts.
  • Divide the dough in half and roll each portion on a lightly floured work surface into a 12 inch log and transfer each log to the prepared baking sheet.
  • Brush the biscotti with the beaten egg white.
  • Bake in preheated oven until golden brown for about 25 minutes.
  • Let cool for 10 minutes.
  • Once cooled, slice the biscotti crosswise into 3/4 inch pieces and place upright back on the baking sheet.
  • Return to the oven and bake an additional 15 minutes.
  • Let cool then drizzle with chocolate peanut butter and sprinkle some chopped chocolate covered peanuts.
  • CHOCOLATE PEANUT BUTTER DRIZZLE
  • Place the 2 ounces of chocolate in a microwave safe bowl and melt in the microwave for about 60 seconds while stirring every 15 seconds till melted.
  • Stir in the peanut butter until well combined.
  • Drizzle the chocolate peanut butter over the biscotti and sprinkle with the remaining chopped chocolate covered peanuts.


Filed Under: Biscotti, Dessert Tagged With: biscotti, chocolate, cookie, peanut butter

Sandwich Cookie Pops

May 7, 2016 by Marisa 48 Comments

sandwich-cookie-pops


sandwich-cookie-pops

This past week turned out to be pretty challenging for me. It has been quite hectic in my kitchen trying to finish dozens of chocolate cake pops and these yummy sandwich cookie pops…all for a good cause!

A few colleagues and I organize an annual bake sale to raise money for National Denim Day, a Canadian wide event which raises money for Breast Cancer Awareness. This year was exceptionally exciting because we had many co-workers who generously donated their time and talent to make this year’s fundraising a success.

Aside from making the much requested cake pops, I did want to switch things up a little and make something different…something fanciful and playful. It had to be a special treat and exciting enough to entice one to donate, however big or small the donation might be. These sandwich cookie pops were certainly it!

They are somewhat whimsical and sophisticated in appearance, appealing to both the young and older crowds.

This simple cookie dough is scented with vanilla and black raspberry liqueur. Once baked, the cookies are sandwiched together with a delicious buttercream, dipped in white chocolate candy melts and sprinkled with funfetti.

sandwich-cookie-pops

Now, a little about these sandwich cookie pops…yes, they are a little more work then a drop cookie, but only because there are a few more steps to follow.

Read the recipe through first and when your are ready to make them, pace yourself. Prepare the dough the day before, let it chill in the fridge then proceed with the recipe the following day. Bake them in the morning, fill them in the afternoon and dip them in the evening. Simple enough!

sandwich-cookie-pops

When working with candy melts I highly recommend you thin the chocolate with some vegetable oil as this will do 2 things for you. First, it will make the sandwich cookie pops easier to dip and secondly, it will render the chocolate melts less sweet.

sandwich-cookie-pops

The best part with these sandwich cookie pops, if one is an avid baker, they can be adapted to suit many different occasions or themed parties such as baby and bridal showers, as well as birthdays or holidays such as Mother’s Day!

And on that note…Buona Festa della Mamma to all amazing moms!

sandwich-cookie-pops
Print Recipe
0 from 0 votes

Sandwich Cookie Pops

These sandwich cookie pops are vanilla sugar cookies with a raspberry buttercream filling dunked in white chocolate candy melts and sprinkled with funfetti.
Course: Dessert
Servings: 50 cookie pops
Author: Marisa

Ingredients

  • COOKIE DOUGH
  • 1 1/4 cups all-purpose flour
  • 1 teaspoon cream of tartar
  • 1/2 teaspoon baking soda
  • 1/2 teaspoon salt
  • 1/2 cup butter softened
  • 3/4 granulated sugar
  • 1 tablespoon black raspberry liqueur or milk
  • 1 teaspoon pure vanilla extract
  • 50 lollipop sticks
  • 1 1/2 pounds candy melts flavor of your choice (I used Wilton candy melts)
  • Funfetti or any sprinkles of your choice optional
  • RASPBERRY BUTTERCREAM
  • 1/2 cup softened butter
  • 2 1/2 cups icing sugar
  • 2 tablespoon seedless raspberry jam
  • 1 tablespoon black raspberry liqueur or milk

Instructions

  • Stir together the flour, cream of tartar, baking soda and salt in a medium sized bowl. Set this aside.
  • In a larger bowl beat the softened butter on medium to high speed for 30 seconds.
  • Add the granulated sugar and beat until it turns creamy and smooth. Occasionally scrape down the sides of the bowl.
  • Beat in the liqueur or milk if using, and the vanilla extract.
  • Next, beat in the flour mixture until everything is combined.
  • Once combined, cover and chill the dough for 30 minutes.
  • Remove the dough from the fridge and divide into two equal portions. You may want to use a scale for this.
  • Roll out each half into a 12 inch rope.
  • Wrap up each roll in saran wrap and chill for about 4 to 24 hours.
  • When ready to bake, preheat the oven to 375 degrees F.
  • Line two cookie baking sheets with parchment paper. If you have four all the better.
  • Slice the rolls into 1/8 inch pieces.
  • Place 50 lollipop sticks about 1 and 1/2 inch apart on your prepared cookie sheets.
  • Place a dough slice, centered on one end, of each lollipop stick.
  • Bake for about 6 to 7 minutes or until the edges are a light golden brown.
  • Bake the rest of the cookie slices without the lollipop sticks.
  • When ready, let the cookies cool on the baking sheets for one minute, then transfer them to a wire rack to cool completely.
  • Meanwhile, prepare the buttercream.
  • RASPBERRY BUTTERCREAM
  • In a medium sized bowl, beat 1/2 cup of softened butter with an electric mixer on medium-high speed for 30 seconds.
  • Beat in 1 cup of the icing sugar, raspberry jam and the liquor (or milk).
  • Gradually beat in the remaining 1 1/2 cups of icing sugar.
  • Spread about a teaspoon of the raspberry buttercream on the bottom part of each cookie with the stick.
  • Top with the remaining cookies bottom side down, pressing down gently to sandwich together. Set aside while melting the chocolate.
  • Melt the chocolate in a microwave safe bowl on 50% power for 1 minute. Stir well and continue to microwave at 30 second intervals until smooth and completely melted.
  • At this point the candy melts will need to be thinned in order to make them more fluid and not overly sweet.
  • Stir in some vegetable oil, 1 teaspoon at a time making sure it is well incorporated. ( a good rule is 2 teaspoons per 12 oz of candy melts.) It should give a ribbon like pouring consistency.
  • Pour the melted chocolate in a wide rimmed coffee mug. Stir again.
  • Hold each cookie pop by the stick and carefully dip into the melted chocolate to coat all over and let excess chocolate drip off back into the mug. You can also tap the cookie stick against the rim of your mug to help it along, turning the stick over and over as you tap. This helps to achieve an even coating.
  • Place on a waxed or parchment lined baking sheet and sprinkle with funfetti.
  • Repeat with remaining cookie pops.
  • Keep them flat on baking sheet till chocolate is set.

Notes

Recipe adapted from Better Homes and Garden Magazine


Filed Under: Cookies, Dessert Tagged With: birthday, buttercream, candy melts, cookie, cookie pops, desserts, funfetti, holiday, Mother's Day, raspberry, sandwich cookies, sweet

« Previous Page

Primary Sidebar

A Little About Me

blankHi I'm Marisa! Welcome to my little corner of the web where you'll find delicious foods inspired by my Italian heritage and Canadian upbringing. So kick off your shoes, have a seat and stay awhile... Read More…

Let's Be Social

  • Facebook
  • Twitter
  • Pinterest
  • Instagram

Search In My Kitchen

Copyright © 2021 · Foodie Pro & The Genesis Framework