An elegant and impressive Chocolate and Pear Crostata with a silky smooth filling of finely ground walnuts and dark chocolate. As a bonus, it’s effortless to put together.

Although it has been years since my dad passed away, his pear tree continues to flourish. It’s a constant and wonderful reminder of how he passionately tended and nurtured his garden.
It lays mostly dormant right now except for this one majestic pear tree. This lone pear tree bears more fruit than we can consume. Although I must say, the squirrels are giving us a run for our money!
Its branches are now weighed down heavily and bursting with delectable fruits, while some are strewn all over the ground, blanketed in green and gold.
These ripened sweet fruits are just about ready to be plucked off and sink one’s teeth into. But, since I have so many…well, why not bake with them?
What is a Crostata?
A crostata is an Italian rustic baked tart with a short-crust pastry base. It’s a free-form tart, far easier to make than a two-crust pie.
Much like pies, there are endless filling variations for Italy’s favourite tart. From elaborate, Italian-style Crostata with Amaretti and Jam to an elegant Peach Crostata Recipe with apricot jam.
Italian tarts are not limited to fruits and jams alone. During the Easter holiday, it’s a tradition to enjoy at least one type of tart filled with creamy ricotta, preferably with a chocolate twist.
This pear crostata is so good that it will take a lot of restraint not to devour the whole tart. The short-crust pastry dough is much like shortbread and filled with a silky-rich chocolate and walnut filling.
Part of the appeal of this Italian crostata is the juicy pear halves, which are sliced and nestled over the chocolate filling. They provide such an elegant appearance and are sure to garner many compliments.
But really, feel free here to add your artistic flare and fan out the slices in whichever way you wish!
Let’s get started!
Ingredients For Crostata Pastry Dough

With just a few basic ingredients consisting of flour, butter, sugar and an egg yolk, you’re well on your way to making a tender and crumbly short-crust pastry dough.
Ingredients For Chocolate Walnut and Pear Filling
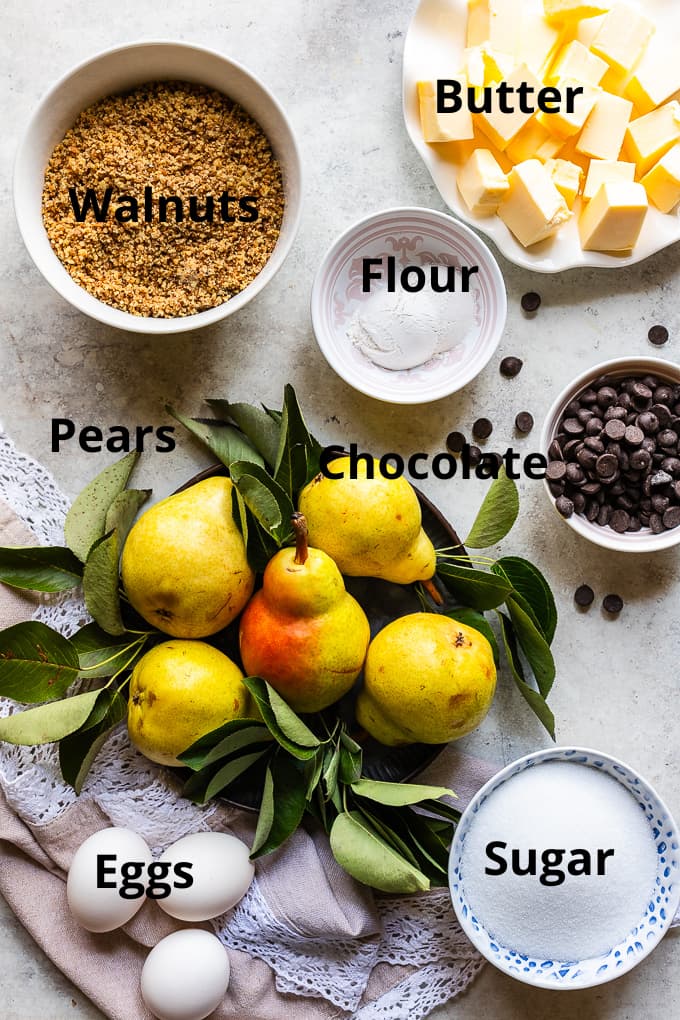
- Butter, cubed butter blends quicker and more evenly.
- Granulated Sugar for a little sweetness.
- Eggs: I always use large eggs when baking.
- Walnuts: Lightly toasted and finely chopped. You can also substitute with almonds.
- All-purpose Flour for structure.
- Dark Chocolate: Use at least 70% dark chocolate.
- Pears: Use ripe but firm Bartlett pears, and choose the smallest you can find.
How to Make a Chocolate and Pear Crostata
Although you may use a mixer to make the pastry dough, I prefer using my food processor. The dough easily comes together in a soft and pliable texture.
- Place the cubed butter and sugar in the bowl. Cubed butter processes quicker and evenly.
- Blend together until you have a smooth mixture.
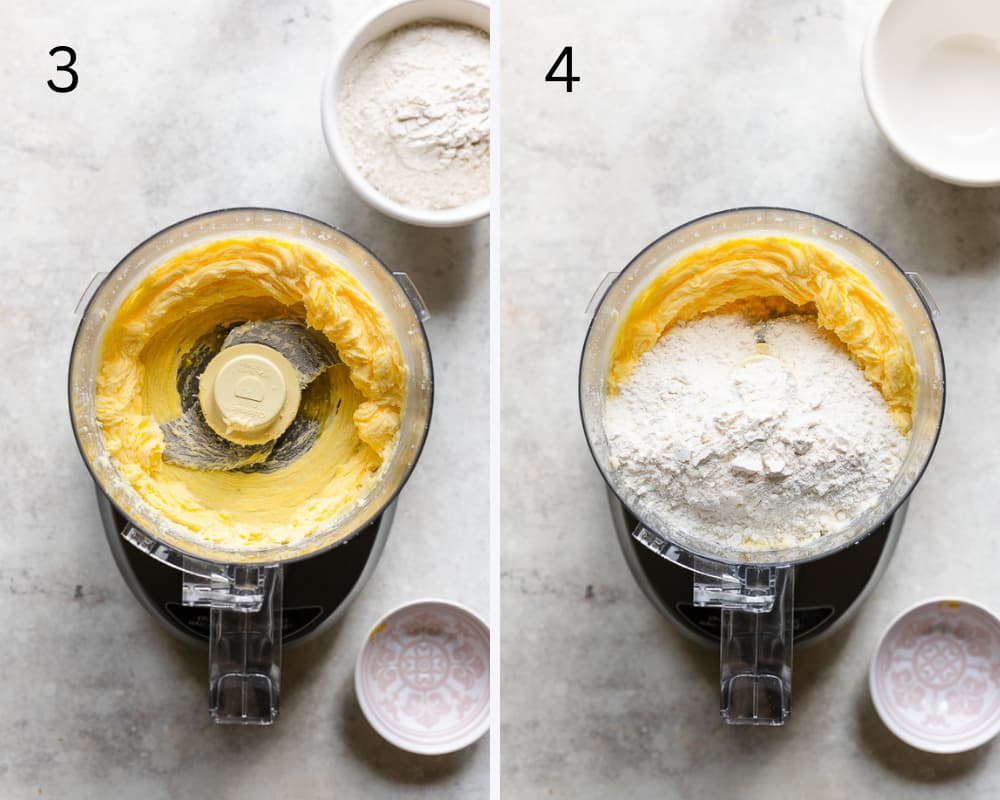
- Add in the egg and pulse until well incorporated.
- Add the flour to the egg and butter mixture.
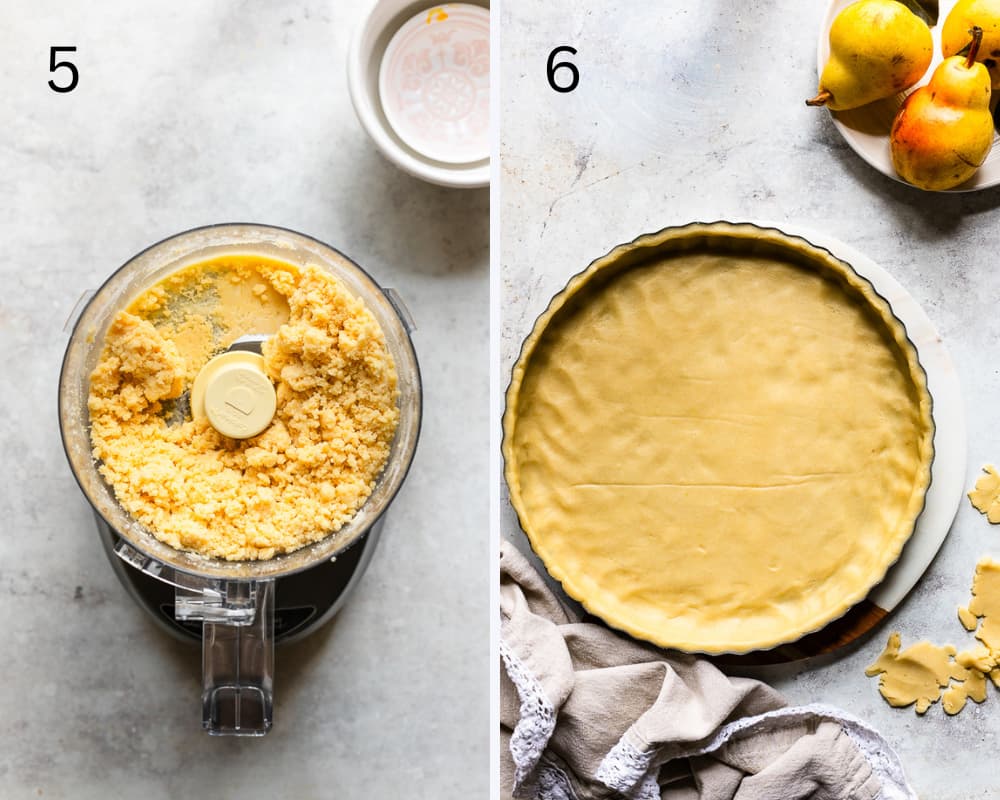
- Pulse intermittently until the flour is well incorporated with a smooth consistency. Transfer to a work surface and knead by hand until the dough has come together in one cohesive ball. (takes less than one minute)
- Roll out the crostata dough between 2 sheets of parchment paper and line the greased tart tin with the dough. (See notes below on how much dough to use depending on the size of your tart tin.)
How to Make Chocolate Walnut Filling for Crostata
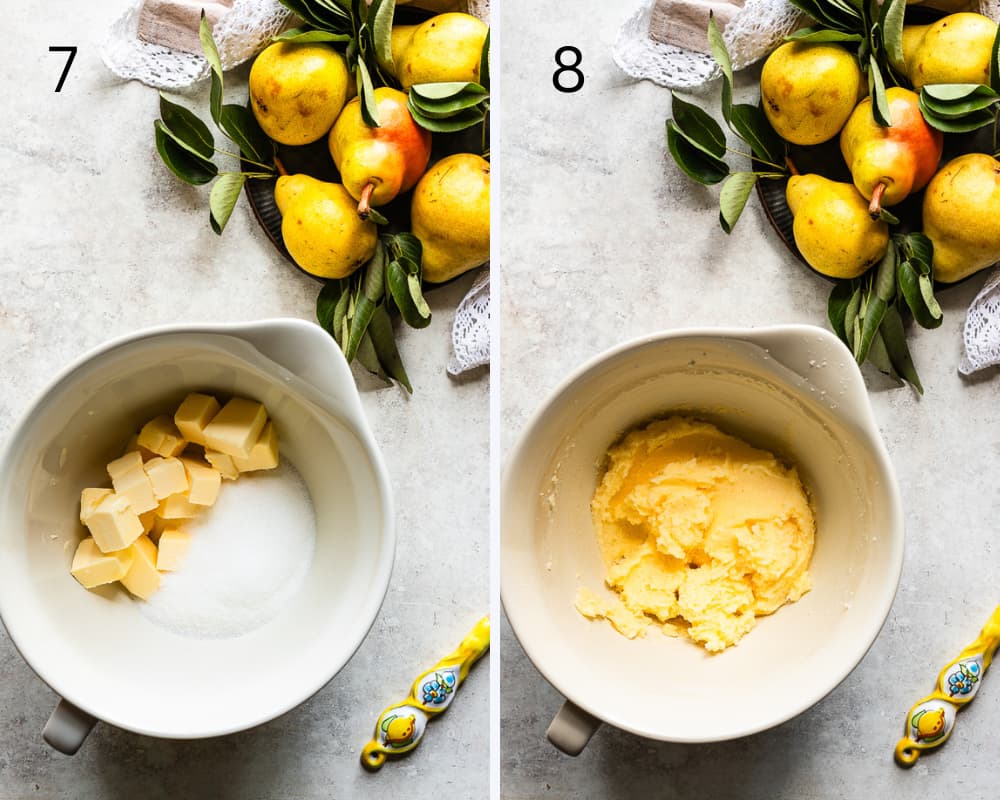
- Place the butter and sugar in a mixing bowl.
- Beat together until the mixture is light and fluffy.
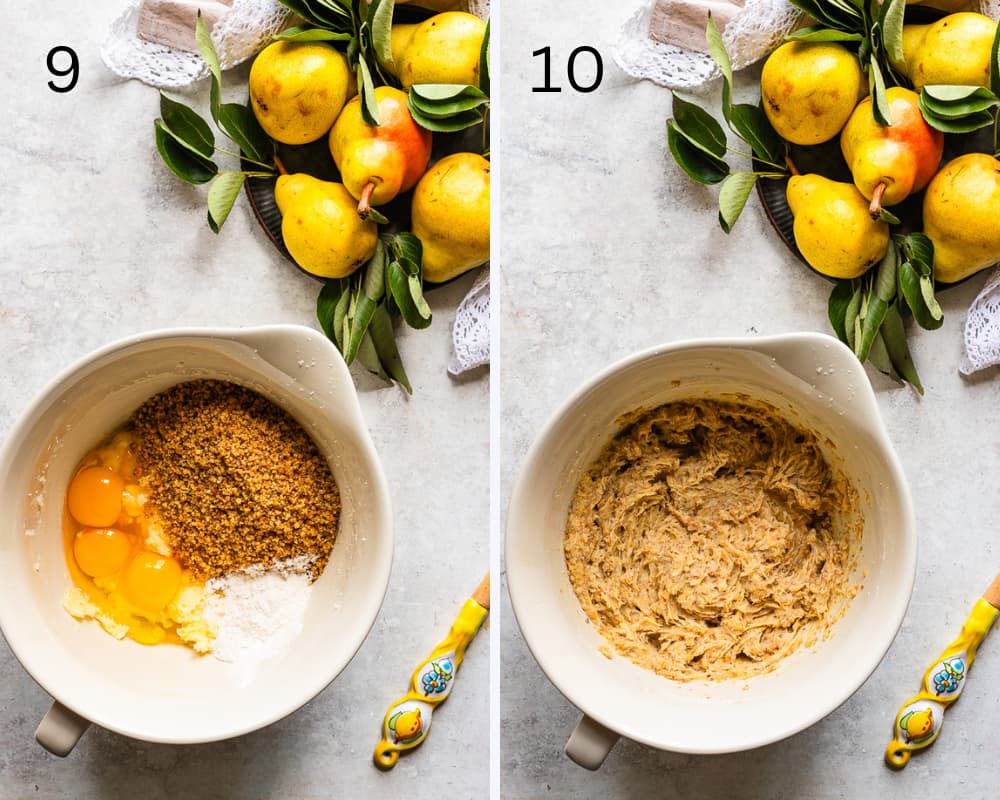
- Add in the eggs, ground walnuts, and flour.
- Beat together until the mixture is well incorporated.
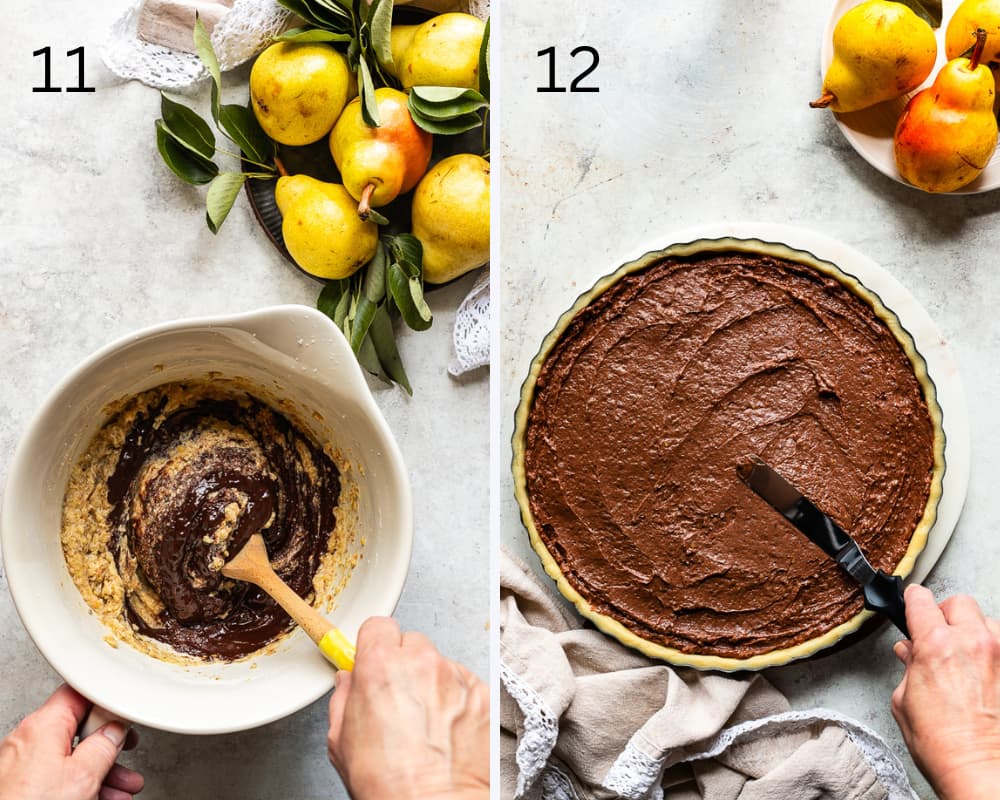
- Stir in the melted chocolate.
- Transfer the walnut chocolate mixture into the pastry-lined tart tin and smooth it out evenly with a spoon or offset spatula.
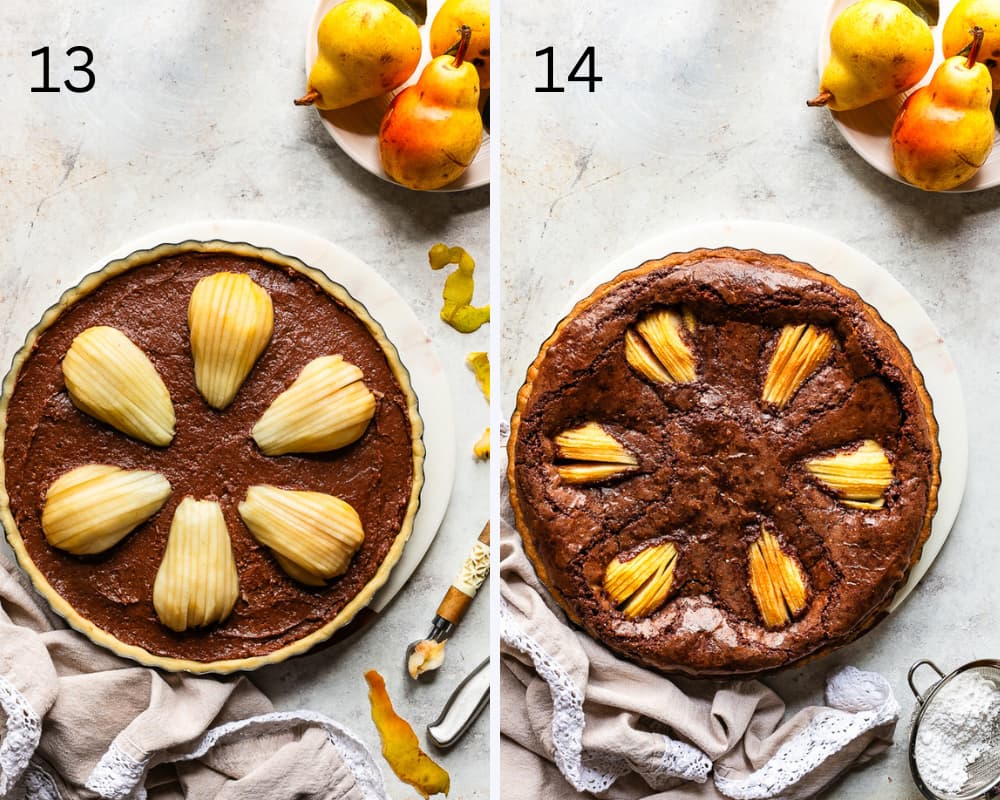
- Arrange the peeled, cored and sliced pears over the chocolate filling.
- Bake in a preheated oven for approximately 45 minutes. The chocolate walnut filling will look set, and the pastry dough should be golden brown at this point.
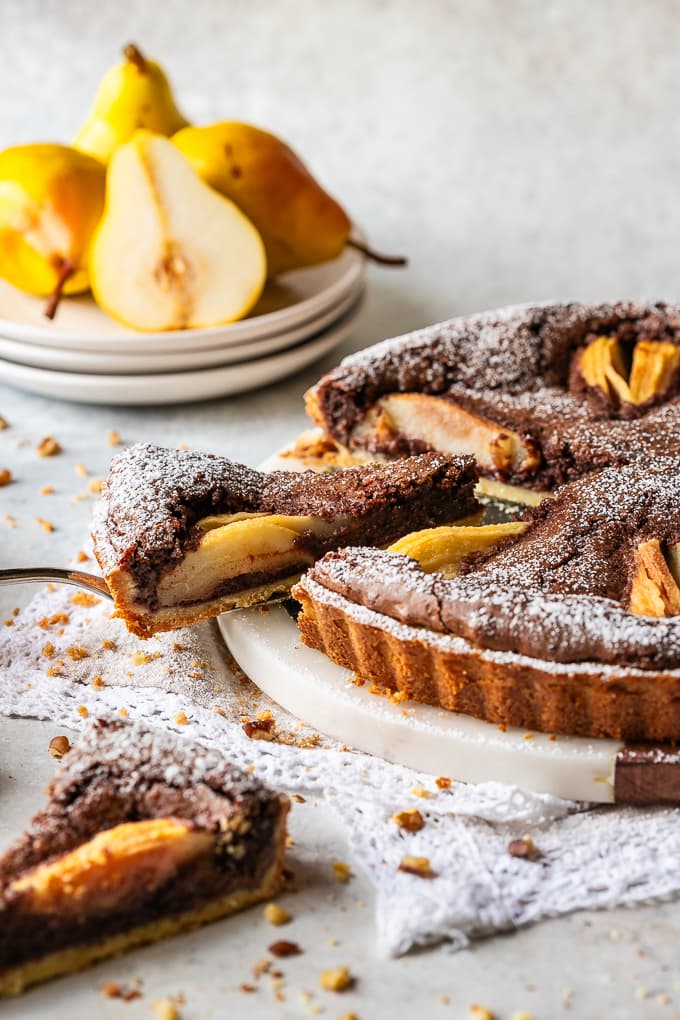
- Allow to cool completely before dusting with powdered sugar.
When pears are in season, this chocolate crostata becomes a delightful Fall dessert. But really, it’s just fabulous all year round.
Enjoy the process of baking this chocolate crostata with juicy ripe pears, and be sure to share it in the company of family and friends.
Happy Baking!
Tips For Success
Here are a few tips to ensure success when baking this Chocolate and Pear Crostata. The size of the pears and baking pan does matter. So you don’t have an overspill of the chocolate filling, here are my recommendations for different-sized tart pans.
9-inch round tart, use half the quantity of the pastry dough and 2 1/2 medium-sized pears or 3 small pears. Freeze the remaining portion of dough for later use or make cookie cutouts.
10-inch round tart, use 3/4 quantity of the pastry dough and 3 medium-sized pears or 4 small pears. Bake cut-out cookies with remaining dough.
11-inch round tart, you can use most of the dough. You’ll just have the trimmings left over. Use 3 to 3 1/2 medium pears or 4 small pears.
Originally published on Oct 1, 2015, this recipe was republished on August 29, 2018, with updated content and photos and republished once again on Oct 24, 2023, with new content and photos to ensure success with a step-by-step guide.
Chocolate and Pear Crostata
Equipment
- 11 inch round baking tin
Ingredients
For the Short Crust Pastry Dough
- 3/4 cup or 12 tablespoons butter (cubed)
- 1/4 cup granulated sugar
- 1 large egg yolk
- 2 cups all purpose flour
For the Chocolate Filling
- 14 tablespoons butter (cubed)
- 1 cup granulated sugar
- 3 large eggs (beaten )
- 1 1/3 cups walnuts, lightly toasted (finely ground)
- 2 tablespoons all purpose flour
- 3 1/2 ounces dark chocolate or semi-sweet chocolate, melted (I used 70% dark chocolate)
- 3 medium ripe firm pears (or 4 small pears (I used Bartlett Pears))
- powdered sugar (for dusting)
Instructions
Making the Pastry
- Place the butter and sugar together in a food processor and blend until smooth.
- Add in the egg yolk and blend again until it is thoroughly mixed.
- Next, add in the flour and pulse intermittently until the dough is smooth and not sticky.
- For an 11-inch tart tin, you'll need most of the dough. See notes below for different-sized tart pans.
- Line the greased tart tin with the dough by patting it down in the tart tin while spreading it out with your fingers. Or roll between two sheets of parchment paper. Either will work fine. (If it tears, don't worry. You can press it back together with your fingers.)
- Trim off the excess with a knife.
- Chill for at least 30 minutes.
For the Filling
- Beat together the butter with the sugar until light and fluffy.
- Add in the eggs, ground walnuts, flour and beat until smooth.
- Stir in the melted chocolate.
- Spoon the mixture over the pastry and smooth it gently with a pastry knife.
- Peel the pears and cut them in half length-wise.
- Remove the cores and slice each half length-wise into thin slices.
- While keeping each of the sliced halves together, place them over the chocolate filling. Leave some space between them so that the mixture has room to expand.
- Bake in a preheated oven at 350 degrees F, for about 45 minutes or until the walnut mixture is firm and the pastry is golden brown.
- Transfer to a wire rack to cool then dust with powdered sugar just before serving.
Notes
Nutrition
The photos shake me again! Great great work.
Thank-you Min, that is a real compliment coming from an artist like you. Have a wonderful day 🙂
Marisa, this is a work of art! Looks so delicious too!
Thank-you Sandhya, it was fun to make and I love getting creative in the kitchen 🙂
It looks amazing, Marisa! 🙂
Thank-you…equally delicious and really not complicated to make at all 🙂
Wonderful and delicious!!!
Thank-you so much Serena 🙂
Wow! Impressive!
Thank-you so much 🙂
it looks amazing, the way to arranged it..I love it ! 🙂
Thank-so much Anita..it was fun and delicious 🙂
I’m sure it was 🙂
Wow, on my Bucket list for sure!!
Thank you so much for these beautiful and yummy findings!
Your welcome Odile, enjoy… you will love it 🙂
Marisa looks so inviting, could eat it through an ipad beautiful arrangement. The best recipes in town!!!!!! God bless your talent and will to share these precious delicious recipes!!!!!!!!!tku xoxoxo
Thank you my dear Carmie…it means a lot 🙂
What a fantastic combination. This looks beautiful and delicious! Love your photos. 🙂
Thank-you…this recipe is a real keeper 🙂
This looks great!
Thank-you, always appreciated 🙂
Beautiful!
Thank-you Sadie…it was heavenly 🙂
Beautiful!!! 🙂
Thank-you Linda…much appreciated 🙂
Yet another gorgeous display, Marisa!!
Thank-you Lana….so sweet of you!!! It is really a lot easier to make then people might think 🙂
Pears off of Dad’s tree, can’t get fresher than that. This picture is so gorgeous and amazing! I can’t imagine what it must taste like! Yumm Marisa, please do come over for a cup of coffee and bring me a piece… or two!!!
lol!! I will be right there, save a seat for me…. 🙂
ok yeah!
This crostata is gorgeous! Love the chocolate and pear – a brilliant and delicious combo. I can’t wait to give this a try! Thanks for sharing, Marisa!
Thanks Jess, it is truly a great combination and the recipe is a real keeper 🙂
Wow! That cake looks soooooo delicious! And I love pears with chocolate! 🙂
It is a wonderful combination ! Thank-you 🙂
Amazing ☺
What a lovely tart. Pears and chocolate are such a good combination.
Hi Karen, thank-you so much 🙂
Came back to look at this again – this is too beautiful to eat!
Haha, thanks Jasmine….but life is to short not to eat it, right? Besides we can always bake it again and again 🙂 Thanks for stopping by !
Absolutely!! 😀
Have a wonderful day Jasmine !
Thank you, Marisa!! You too!! 😀
Marisa ,you are amazing!!!! your pictures look so yummy !!!! I must try!!!! thank-you for sharing.
You are very welcome Dulce…you’ll see it really is not difficult and the end result is gorgeous 🙂
What a beautiful keepsake from your father Marisa. There is a plant that will keep the squirrels away, it is called rue and you can find it at marché Jean Talon. We learnt about it the hard way after losing just about every pear to a very hungry squirrel. We haven’t got many pears to harvest this year as our trees are bi-annual but we’ll have something to look forward to next year… though I may not be able to wait til then to make this tart! It looks amazing, as are the photos!
I’ve never heard of this rue plant that keeps squirrels away and I’m sure my dad would have loved to have known this for sure. His escapades regarding those squirrels where quite hilarious and never a dull moment in his garden! I hope your tree is very fruitful and whatever you make I’m sure will be delicious! Thank you my dear!
Haha.. I can imagine as we had some fun escapades ourselves until we gave up and just let her have all the pears! You can probably find rue discounted at the moment, plant it (maybe two is better than one) in the garden close to the trees, with some protection, they will survive the winter and you’ll be all set for next summer’s harvest!
Ahhh that’s sounds like a good plan. Thank you Annika☺️
Wow ! This looks stunning !!
It’s truly delicious and a keeper for sure! Thanks so much Megala!
Now that is one delicious crostata. I’d love to try this – a reverse twist on a pear tart I make with a chocolate crust and almond frangipane filling. How lucky you are to have a father supplying you with fresh pears!
That chocolate crust and almond frangipane filling sounds amazing Linda! We look forward every year for these juicy pears and this crostata is the first dessert I bake with them and always turns out beautifully! Hope you get to try it Linda, it’s a keeper for sure!
Looks absolutely delicious!! Love the combination of walnuts, chocolate and pears – YUM! And photos are beautiful!
Thank you Jessica! It truly is as delicious as it looks with wonderful flavours. With a rustic elegance it makes a lovely dessert for any special occasion!
This cake is absolutely gorgeous!
Thanks Kortney! It’s sinfully delicious as well and an absolute keeper!
When you shared a photo of this crostata on Instagram, I just fell in love with the styling! The photos look amazing and the cake sounds delightful! A slice with a cup of tea would be perfect right now!
Ahhh! Thanks so much Leanne, that’s very kind of you! I wish I had some left over to share! ?
It looks gorgeous, Marissa! The new photos are fantastic, I can’t wait to actually give this a try at home.
Thanks so much! I’v actually made another one this morning and brought it in to work…it received rave reviews ! It’s a real keeper!