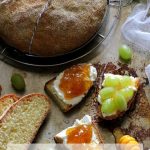
I would definitely say that this Polenta Ricotta Bread recipe could very well be a beginner’s introduction into the art of bread making.
It’s a simple process of gathering a few staple ingredients and transforming them in a domestic kitchen. And so easily attainable for any home baker.
Although I religiously make pizza once a week and occasionally focaccia, I’ve never actually delved into the art of bread making.
More notably…artisan bread. I love working with just about any type of dough!
There’s something so comforting in using a few simple ingredients such as flour mixed with liquids that I’m immediately transported into my zen moment.
I turned to my new cookbook, Simply Bread from The Australian Women’s Weekly for inspiration and came across these Polenta Ricotta Loaves.
It sounded like perfect usage for that lonely tub of ricotta sitting in my fridge. A constant reminder that I bought way too much ricotta for my Easter baking marathon!
Not to mention what great mileage my large bag of polenta received from making a few batches of my Lemon Cornmeal S Cookies and now these beautiful loaves of bread.
The dough comes together effortlessly using a stand mixer. It requires a gentle kneading before both the first and second rise with very minimal hands on time.
The ricotta adds a certain lightness of flavour to the bread. And the polenta lends a pleasant gritty texture which in turn tinges the dough to a lovely golden hue.
Just before baking, the loaves are brushed with a little bit of water and sprinkled with extra polenta for a crispy outer layer.
Toppings For Polenta Ricotta Bread
I love these slices slathered with ricotta and a dollop of fig jam. But just as delicious is a topping of fresh fruit and a drizzle of honey. They’re a perfect compliment to the delicate tasting loaves.

As with most breads these Polenta Ricotta loaves are best enjoyed the same day. They’re so yummy you’ll want to make a double batch of these ricotta loaves as I did.
Try slicing the breads, wrap well and freeze. Then enjoy at a moments notice when a craving hits!
If you make this recipe remember to tag @marisasitaliankitchen on Instagram so I can see your creation!
Polenta Ricotta Bread
Ingredients
- 3 1/4 cups bread flour
- 1 cup polenta (I used fine cornmeal)
- 2/3 cup ricotta
- 1 teaspoon fine sea salt
- 1 tablespoon granulated sugar
- 8 grams dried yeast (I used traditional active dry yeast)
- 1 1/4 cups warm water (approximately)
- 2 tablespoons polenta (extra for sprinkling on loaves (I used fine cornmeal))
Instructions
- In the bowl of an electric mixer and fitted with the hook attachment, add in the flour, polenta, ricotta, salt, sugar and yeast.
- With the mixer running on low speed, gradually add in 1 cup of the warm water and mix just until combined.
- Add the remaining 1/4 cup of water only if needed to bring the dough together.
- Transfer the dough to a lightly floured work surface and knead until smooth.
- Place the dough in a large well greased bowl, turning to grease all over..
- Cover with plastic wrap and set aside in a warm place for 1 1/2 hours or until the dough has doubled in size.
- Meanwhile line 2 baking trays with parchment paper, grease lightly and sprinkle with some of the extra cornmeal.
- Once the dough has doubled in size, transfer the dough onto a lightly floured work surface.
- Knead the dough until smooth and divide in half.
- Shape each half into a round loaf and place each on individual prepared baking trays.
- Cover each loaf with a greased plastic wrap and set aside in a warm place for 1 1/2 hours or until doubled in size.
- When ready to bake, preheat the oven to 425 degrees F.
- Remove the plastic wraps and brush the loves with a little bit of water and sprinkle with the extra cornmeal.
- Bake the loaves for 15 minutes.
- Reduce the oven temperature to 400 degrees F and bake an additional 20 minutes or until golden brown in color.
- Transfer the loaves to a wire rack to cool a little and enjoy while still warm.


What a beautiful idea! I imagine it would make fantastic toast, too!
It does indeed…we’ve been enjoying simply toasted and buttered as well as with various toppings!
I love everything about this! I can’t wait to make it for my family!! Your pictures are so warm and inviting!
Thanks so much Annie! And it freezes well too…I prefer to pre slice them and pull a slice or two out of the freezer as needed ?
Could this bread be made in a bread machine.? I don’t have a stand mixer, and I just had surgery to my hand, therefore unable to knead it. It looks amazing and I would love to try it.
Hi Vincenza, I don’t own a bread machine and therefore have no experience using one. However most manufacturers offer instructions and tips in their manuals on how to convert a more traditional bread recipe to their respective machines. If you do try it feel free to come back and leave a comment on how it turned out with your bread machine…this might just help other readers! Thanks so much for commenting!
It’s so beautiful. I wasn’t sure if it was going to be a yeasted bread or quick bread! I must make this, even though I rarely bake anymore.
Mimi you’ll see that its a simple process with beautiful results…hope you get to try it!
I really love the sound and look of this bread! Thanks for sharing Marisa 😉
Your most welcome…there’s something about homemade bread that makes us insistently swell with pride when it comes out of the oven! ?
Hi Marisa,
Bread just came out of the oven! Simply Irristable!
Hi Mena, I’m so happy to hear this! I love it in the morning with ricotta and jam!